Getting started · StoreX Theme
A getting started guide for StoreX Theme
If you have any difficulties or stumbled upon a bug please contact us at Our Support Page we offer one on one personal support
Get StoreX WordPress ThemeA getting started guide for StoreX Theme
If you have any difficulties or stumbled upon a bug please contact us at Our Support Page we offer one on one personal support
Get StoreX WordPress ThemeThe package of the StoreX Theme contains everything that you need to customise the look and functionality of the theme
Below is the package structure:
storex_theme/
├── THEME/
│ └── storex.zip
├── DOCUMENTATION/
│ ├── readme.html
│ └── assets
└── SAMPLEDATA/
├── sample-data-installer.zip
THEME folder contains StoreX theme, these two folders have to be uploaded to wp-content/themes/ folder of your WordPress. The main CSS file of the theme is located in the StoreX theme folder.
The DOCUMENTATION folder contains this document that you are reading now. However, we recommend you to use the online version of this documentation because it reflects the changes in the theme (if any) almost immediately. The url is: http://docs.themes.zone/storex
The SAMPLEDATA contains everything you need to get the same looks of StoreX theme that is on the live demo of the theme at http://storex.themes.zone
StoreX Theme is a WordPress theme, therefore it is important to get to know WordPress CMS before you continue. If you are not familiar with WordPress please visit WordPress getting started guide
You may find a detailed documentation of WordPress functionality at WordPress Codex
Once downloaded, unzip the compressed folder to see the structure of package.
Go to THEME folder, there you will find a packaged storex.zip, upload the package to wp-content/themes/ folder of your WordPress and uncompress it. Once uncompressed the theme can be activated.
Go to backend section of your WordPress site (http://link_to_your_site/wp-admin/), then go to Appearance -> Themes and activate the StoreX theme).
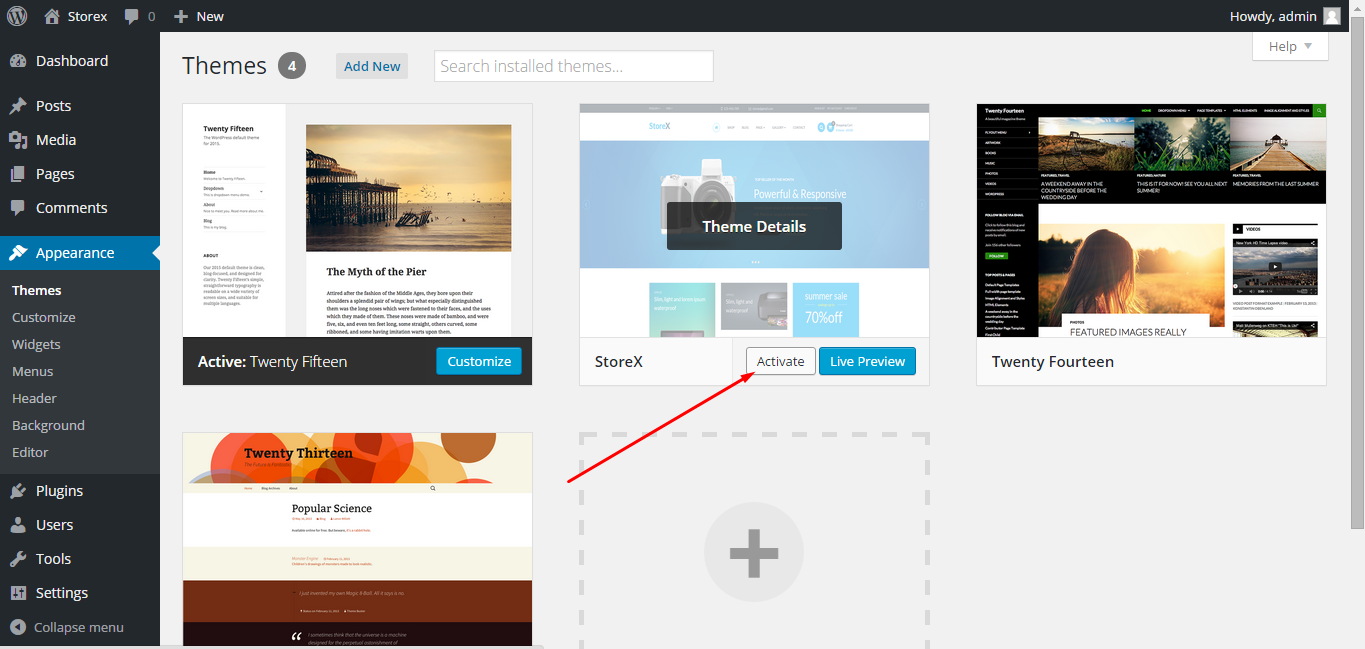
When you click the "Activate" button to activate StoreX Theme, you will see the a notice offering you to install required and recommended plugins. Click "Begin installing plugins", on the screen that appears, next select the plugins you want to be installed, pick "Install" in Bulk Actions select box and click "Apply" button. For optimal user experience install and activate all recommended plugins.
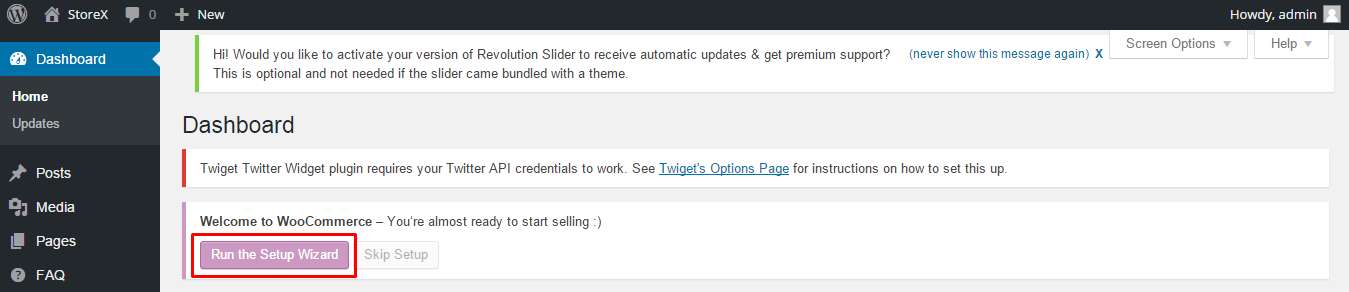
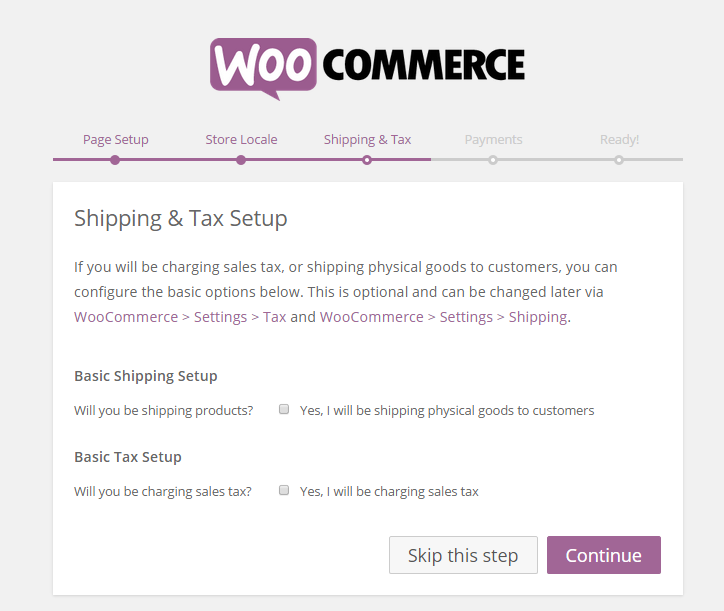
After the theme is installed you can install WooCommerce pages so that your WordPress installation actually becomes an online store. Go back to your Dashboard and press "Run the Setup Wizard" button:
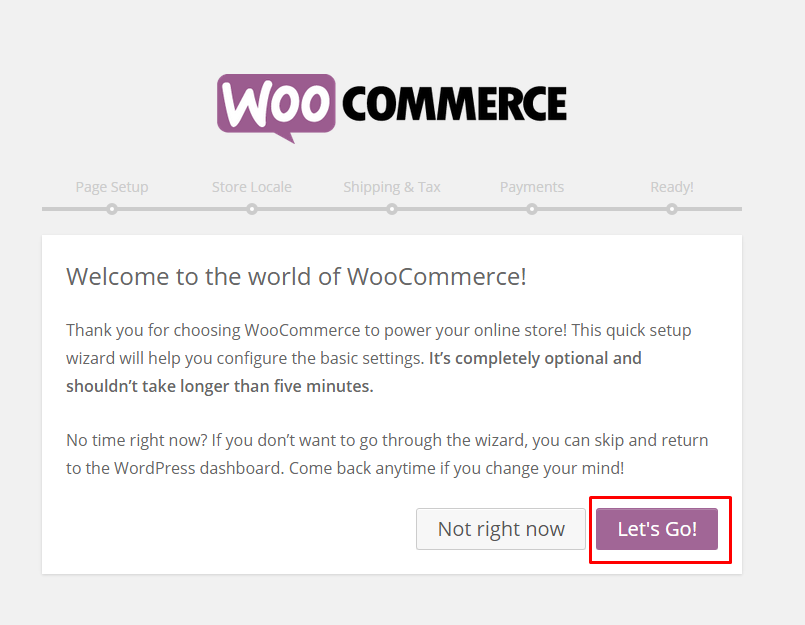
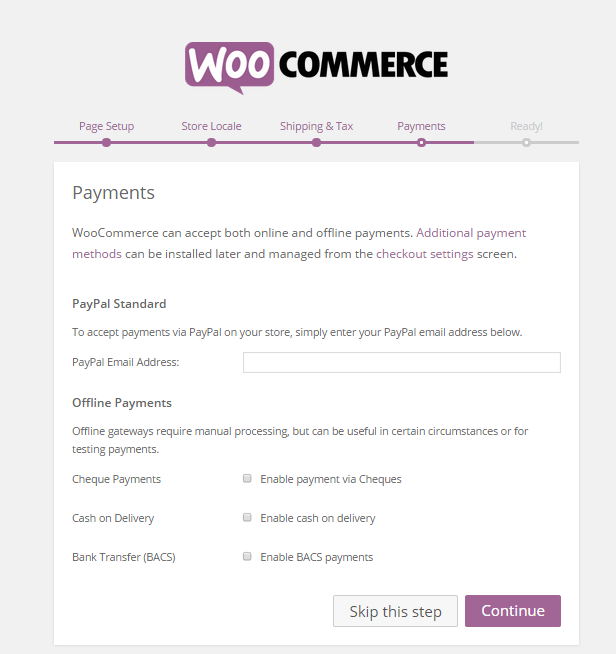
Hit "Continue"" to create WooCommerce Pages":
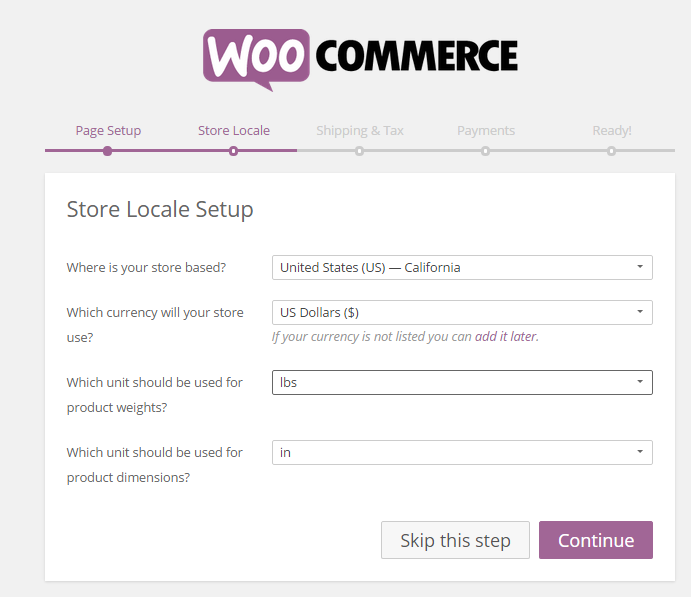
Choose your store settings now or do it later:
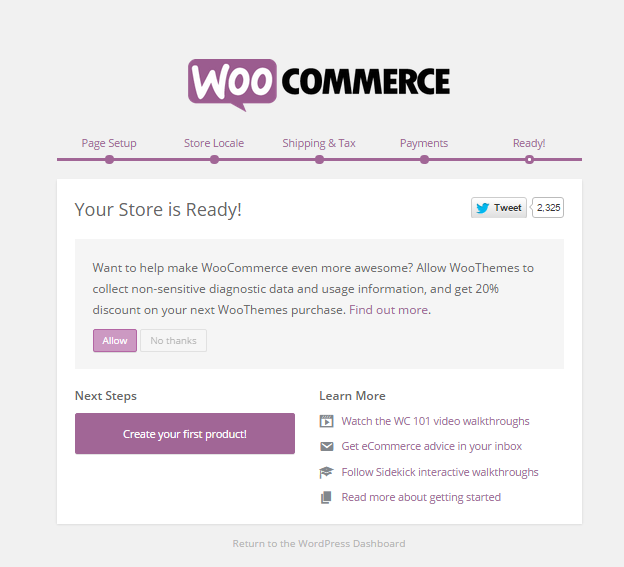
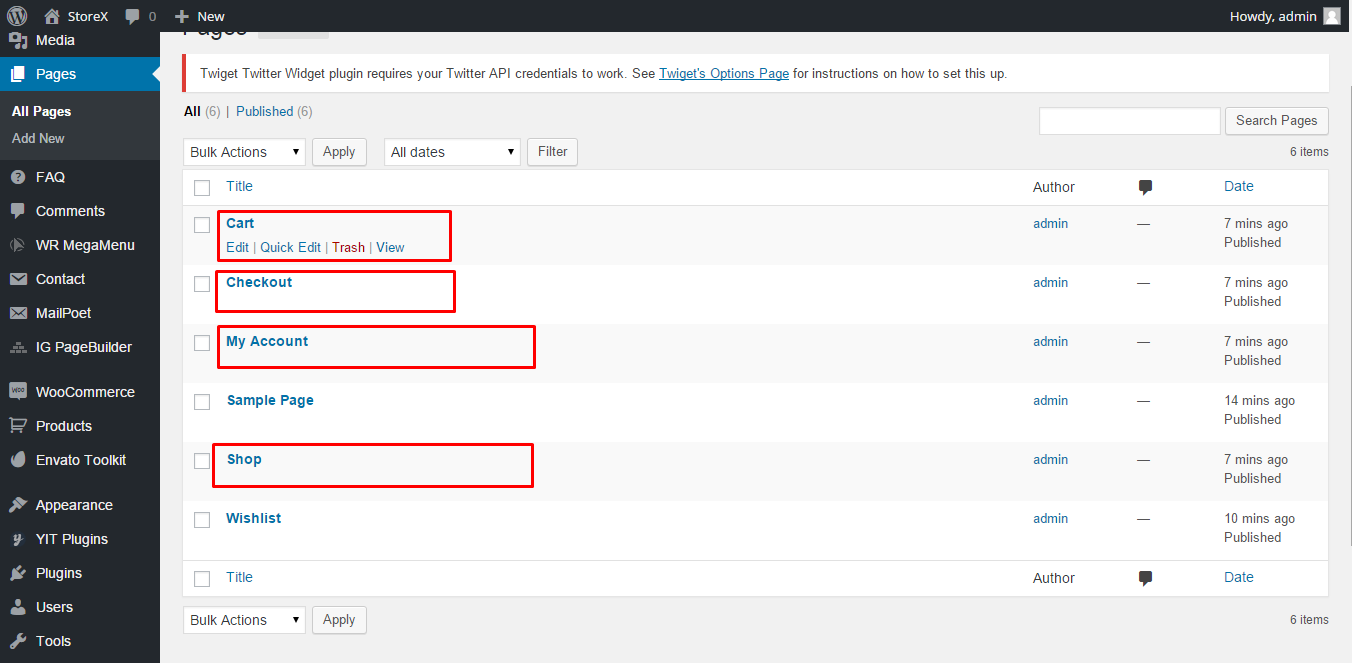
WooCommerce had been successfuly set up. You can now see WooCommerce pages on your pages list:
Please, follow this link to learn more about installing WooCommerce from WooCommerce official site.
You should not install sample data on an existing website - it's database will be deleted and replaced with sample one. You also should not run sample data installer on a WordPress MultiSite - the database for all you overwritted as well. As long as you are using one database for several sites all of these sites may be lost.
Please note that images used on our live demo cannot be used on your live sites build with the help of our theme. You should only use properly licensed images on your live projects. Images you see on our live demo are not sold with the theme and therefore are not included in the theme package.
After you activate your theme and install required plugins you may want to install sample data to make your site look like Live Demo of our theme, which can be found here: http://storex.themes.zone/. You also need to donwload the "uploads" folder (click this link to download the uploads folder), unzip it and upload it to your wp-content folder. After that install and activate sample data installer plugin. It can be found in "Sample data" folder of you theme package.
To achieve the best site speed you need to choose good hosting. WP Engine servers are configured to run WordPress and WooCommerce sites as smoothly as possible, they are always up to date, simplest to configure and their support is just outstanding.
For all our clients here is a special offer from us, 20% discounts for:
Video tutorial on how to install Sample Data:
We strongly recommend you to create a child theme and use it for customizing StoreX Theme. This way you can update the theme and it's plugins without fear of loosing implemented changes.
To create a child theme you need to create two files - style.css and functions.php, and place them in the storex-child folder, which also needs to be created in the wp-content/themes folder of your wordpress isntalls.
We created sample storex-child folder with sample files inside of it. You can download this folder, unzip it and use to create your child theme for StoreX. Here's the donwload link.
In case if you want to create the child theme folder and files yourself, here's the demo contents of the functions.php and style.css files in the child theme:
style.css code:
/*
Theme Name: StoreX Theme Child
Theme URI: http://storex.themes.zone
Author: Themes Zone
Author URI: http://themes.zone
Description: Multi purpose Theme.
Version: 1.0
License: GNU General Public License v2 or later
License URI: http://www.gnu.org/licenses/gpl-2.0.html
Tags: black, brown, orange, tan, white, yellow, light, one-column, two-columns, right-sidebar, fluid-layout, fixed-layout, custom-header, custom-menu, editor-style, featured-images, microformats, post-formats, sticky-post, translation-ready
Text Domain: storex
Template: storex
*/
functions.php code:
<?php
/**
 * storex child functions and definitions.
 *
 */

add_action('wp_enqueue_scripts', 'child_theme_enqueue_styles');
function child_theme_enqueue_styles() {
wp_enqueue_style('parent-style', get_template_directory_uri().'/style.css');
wp_enqueue_style('child-style', get_stylesheet_directory_uri().'/style.css', array('parent-style','plumtree-woo-styles'));
}
Once you place the child theme folder and files in your themes folder, you need to go to the dashboard of your wordpress install, click Appearance->Themes and activate the child theme:

Most likely your menu is going to seem "lost" after the child theme actiation - there will be no menu at the top of your site. Go to Appearance->Menus and reassign your menu:
You can now enjoy your child theme. Add your custom styles at the end of the child theme's style.css file, add your custom functions to the child theme's functions.php without fear of loosing your changes after an update of the theme.
StoreX theme supports default WordPress functionality, such as post types and page templates. This allows you build any kind of page, plus this theme contains a lot of useful shortcodes and pre-built elements.
It is strongly recommended to setup a separate copy of the WordPress instance with the demo content, this way you will be able to look up how to create this or that layout or add different elements.
Before reading further it is strongly recommended to read WordPress Codex on How to Create a Static Home Page, General Information on Creating Static Pages and about WordPress Page Templates
Theme menu, which is located in Appearance menu of your dashboard, is a powerful and easy to use tool which gives you control over various theme aspects.
Site settings is the first tab of our theme's menu.
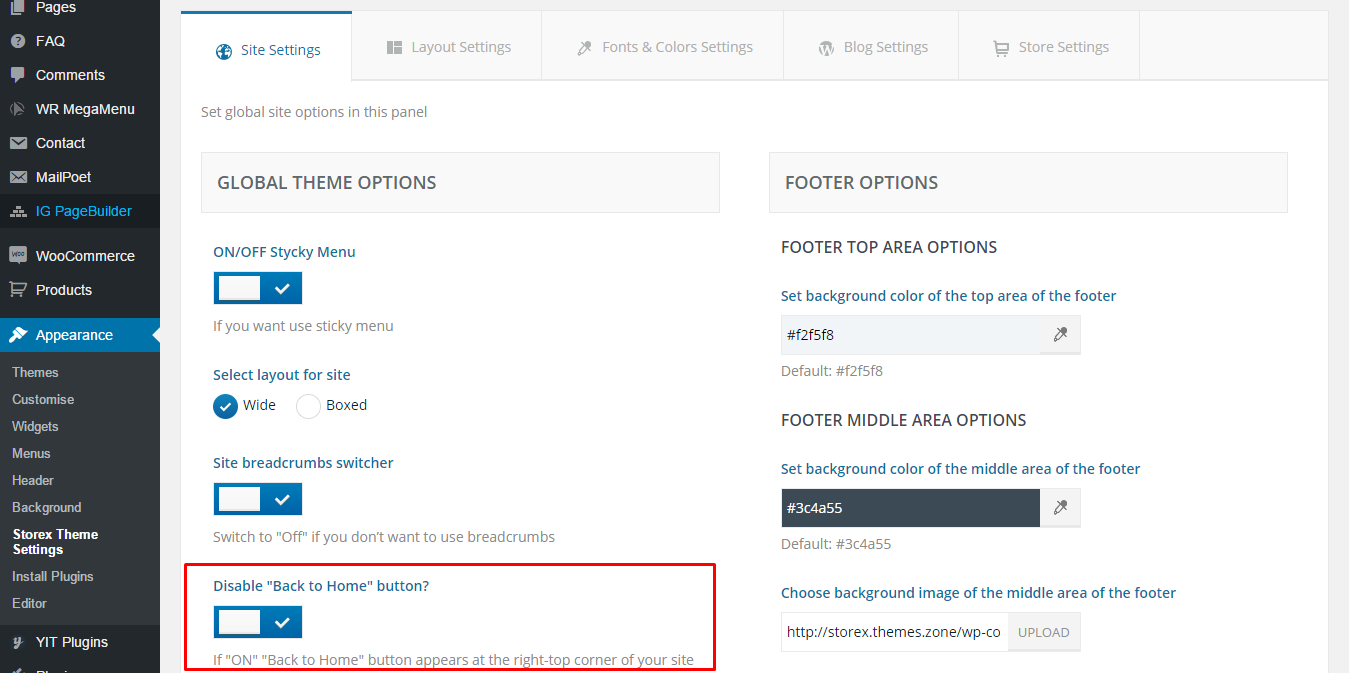
StoreX Theme offers you a dynamic way of sidebar positioning. You can set both global and per page sidebar positions. To set Global Sidebar Positions go to Backend of your WordPress site (http://link_to_your_site.com/wp-admin/), then go to Appearance->Storex Theme Settings panel, open "Layout Settings" tab.
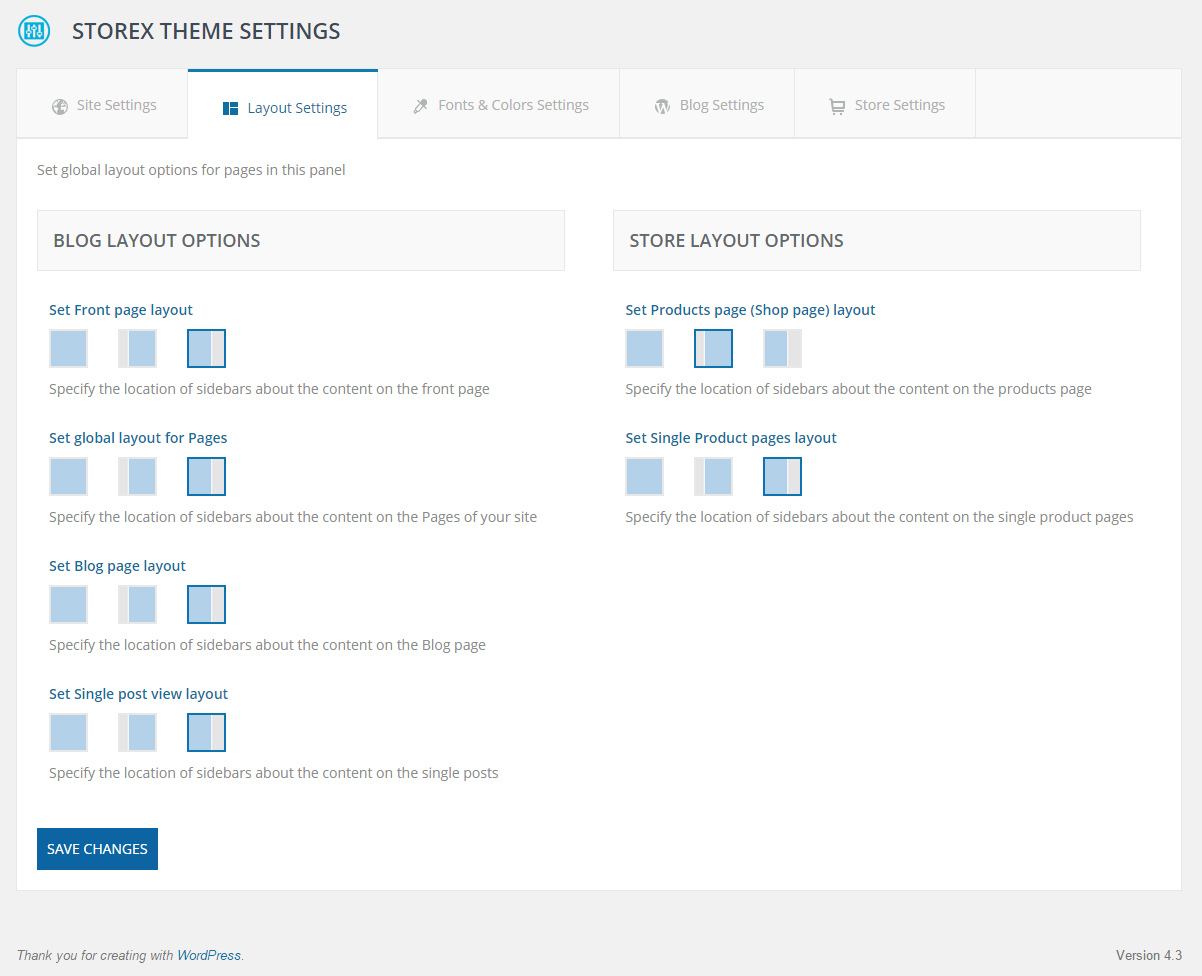
The "Layout Settings" panel lets you set global layout settings for each type of page. You can set sidebar position to left, right or without the sidebar. Front Page Layout lets you set the sidebar position for the Home Page, "Global layout for Pages" setting will set global value for all static pages present on the site. The "Blog Page Layout" settings will set sidebar position for "Blog" pages (Page that has blog posts listed). "Single Post View" controls the position of a sidebar on single post page (the Single Post page). Store Layout options lets you set sidebar position on Store Pages (Product Listing Page, Single Product Page).
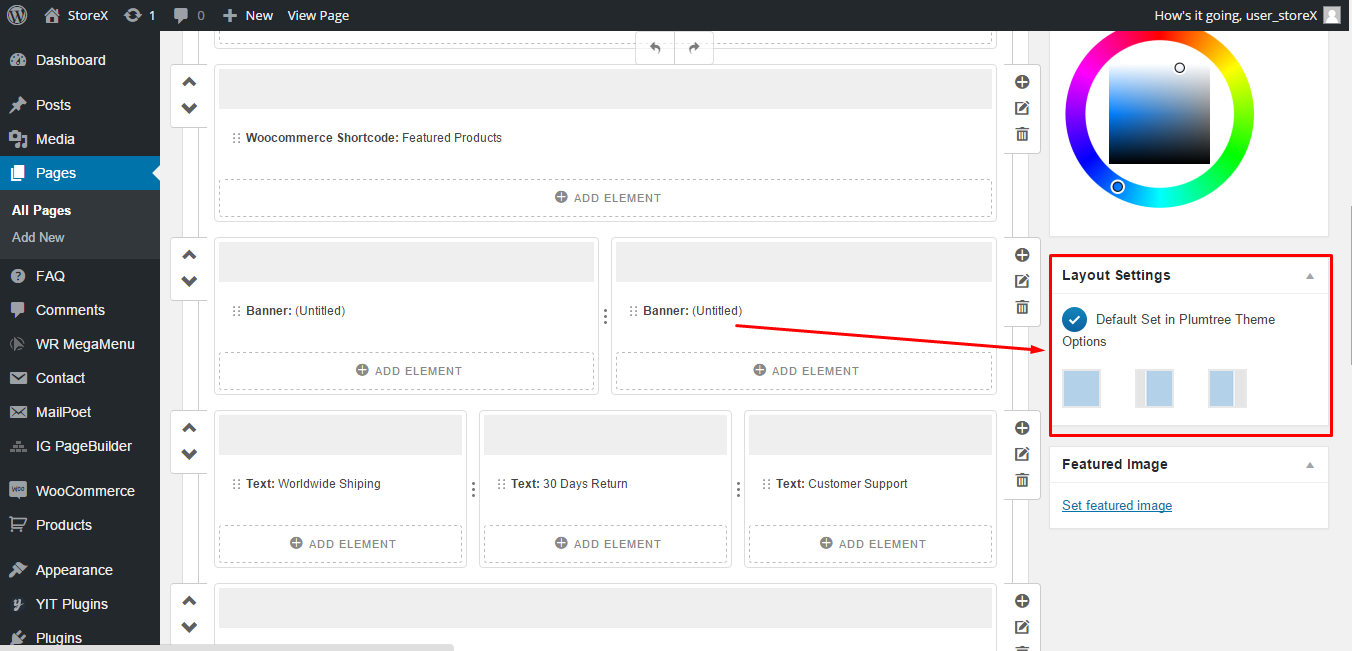
You also can set Sidebar Position for each created Page. Open a static page for editing in the backend of your site, there you will find a "Layout Settings Widget", set the sidebar position in that widget and the global value for the sidebar position will be overridden.
StoreX Theme allows you to change main theme color, text color, menu color and headings color.
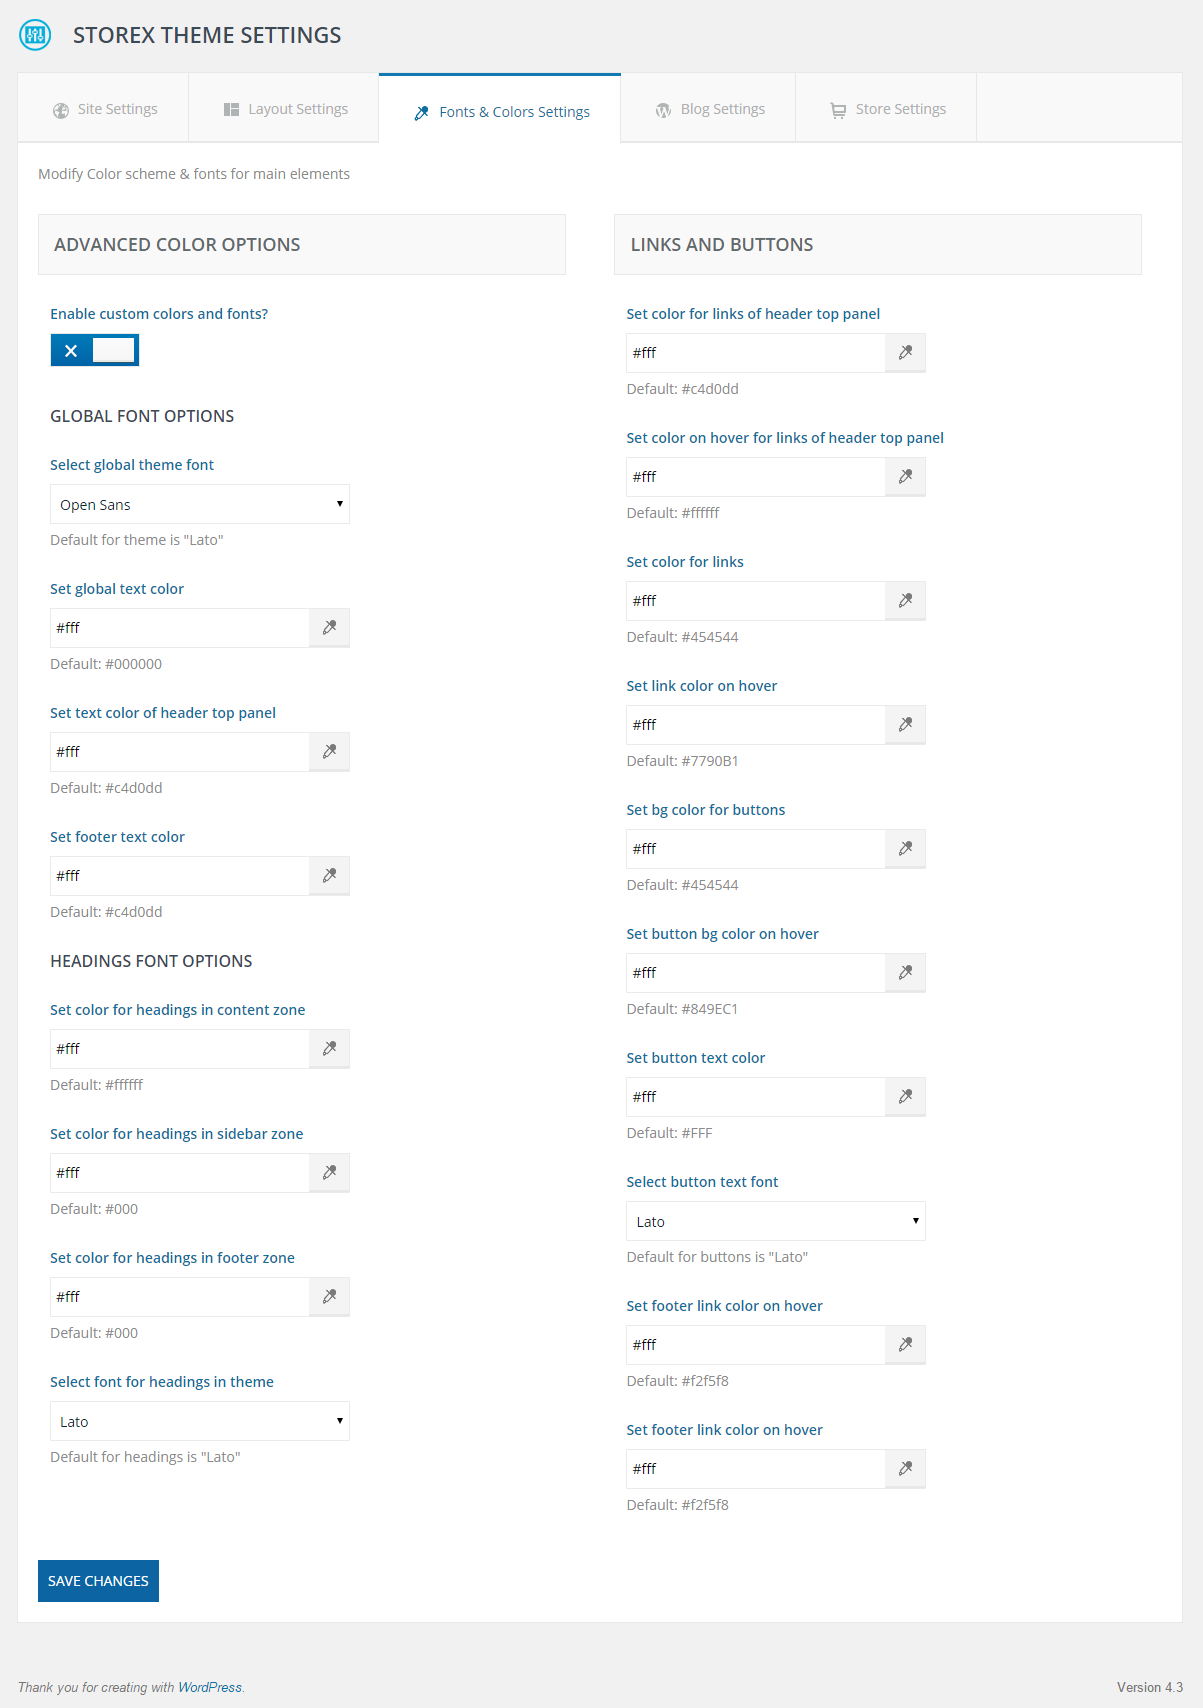 Use Custom Color Scheme Switcher to enable color changes.
StoreX Theme comes with a set of the best fitting font set. You can also add your own fonts to the theme.
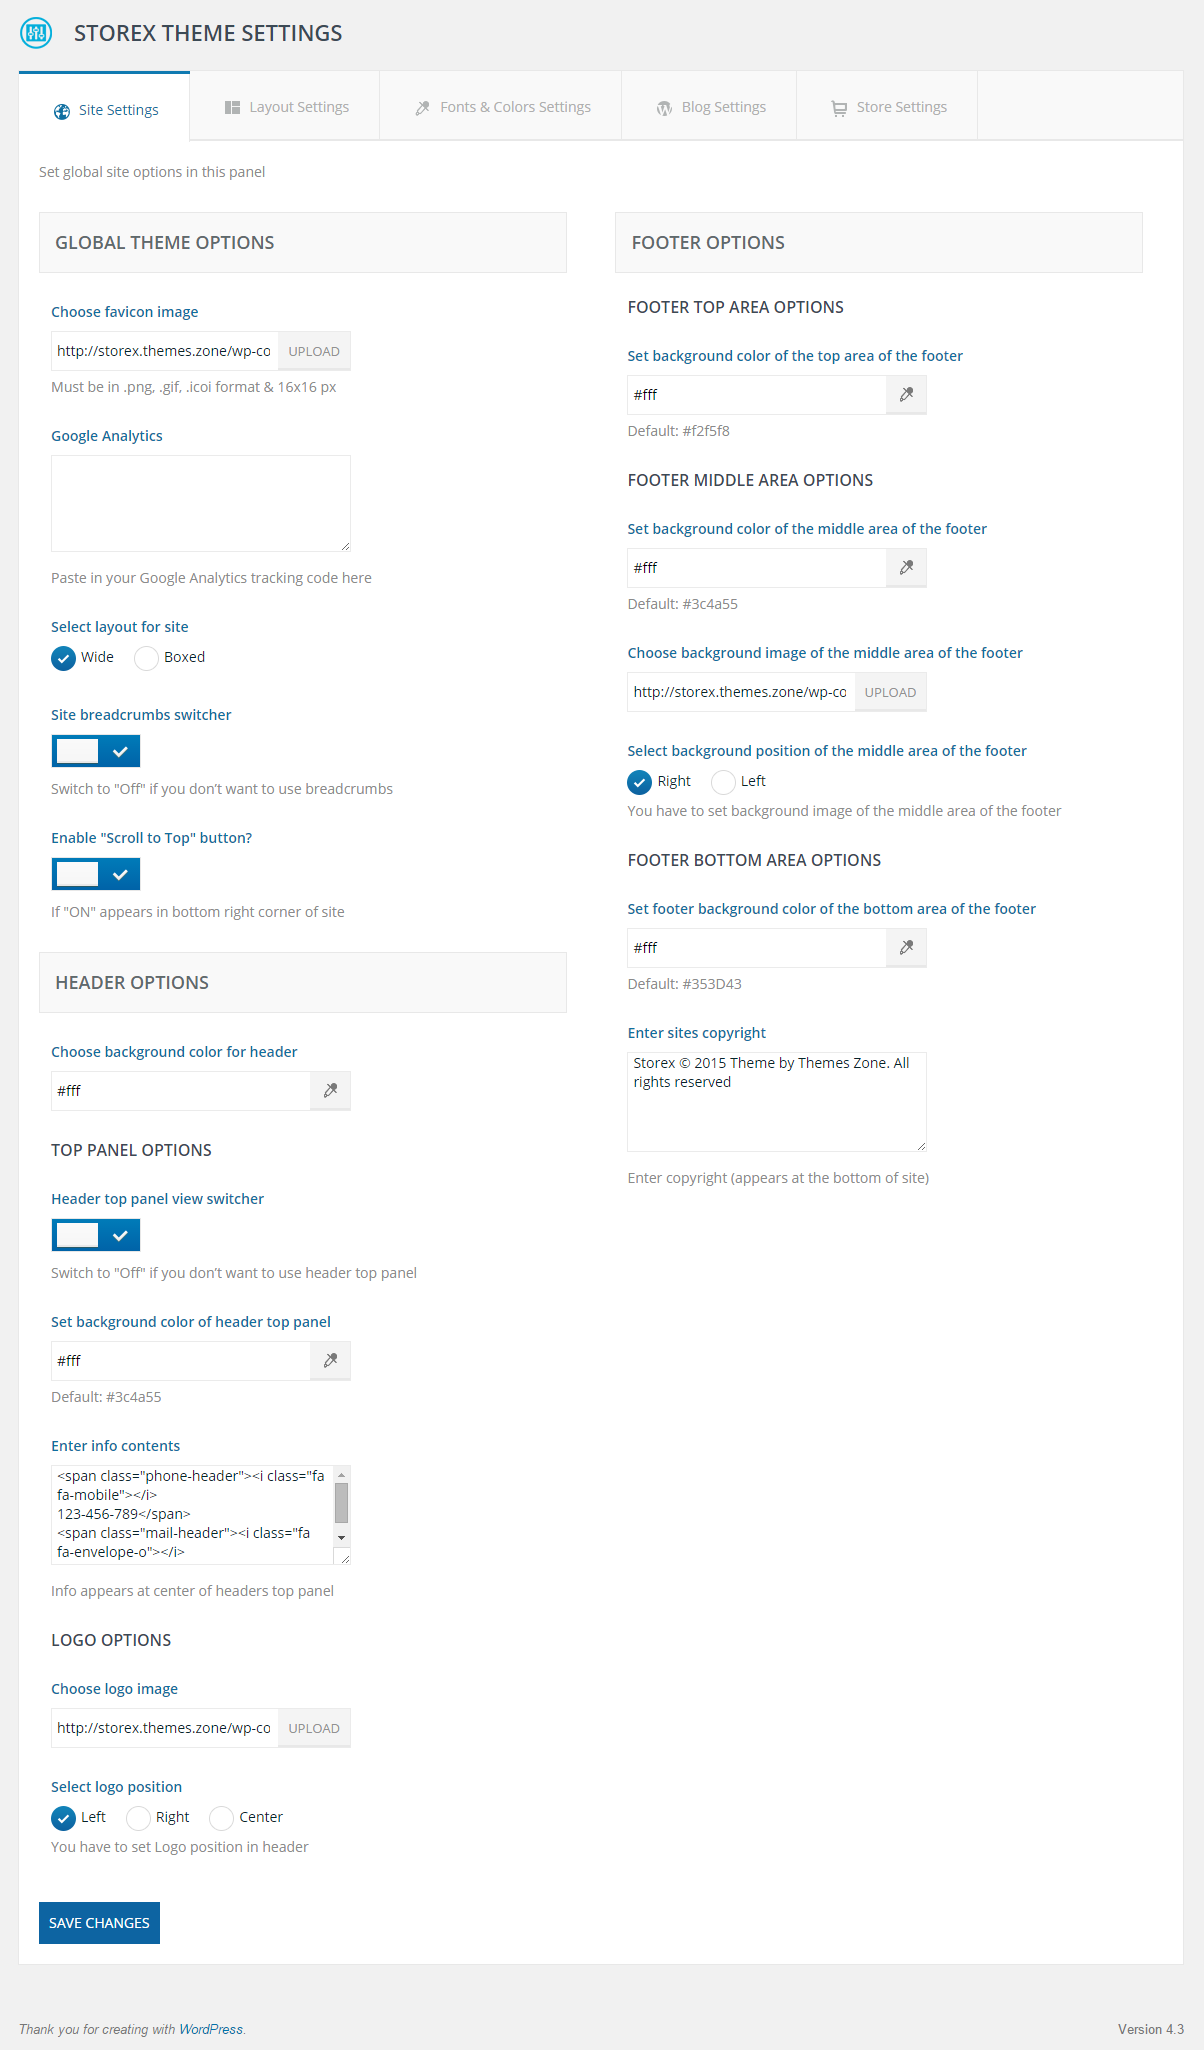
StoreX Theme's header can be modified in Storex Theme Settings->Site Settings-> menu of your Dashboard control panel.
Our sample header consists of the following elements:

It's a text widget placed in the Header Top Panel sidebar:
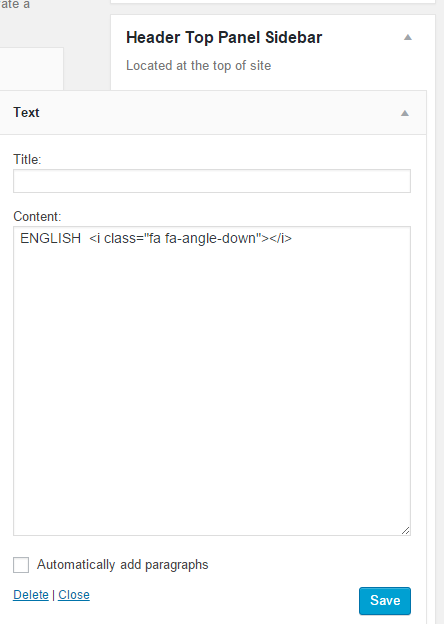
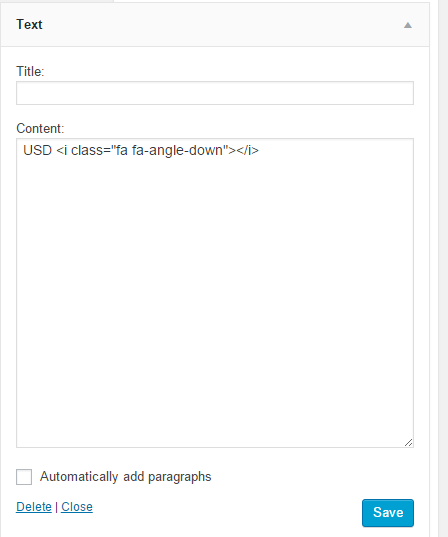
This area is meant to be replaced with some site language switcher of yours or any other widget you'd like to place there.
This text can be modified in the Storex Theme Settings->Site Settings menu of your dashboard:

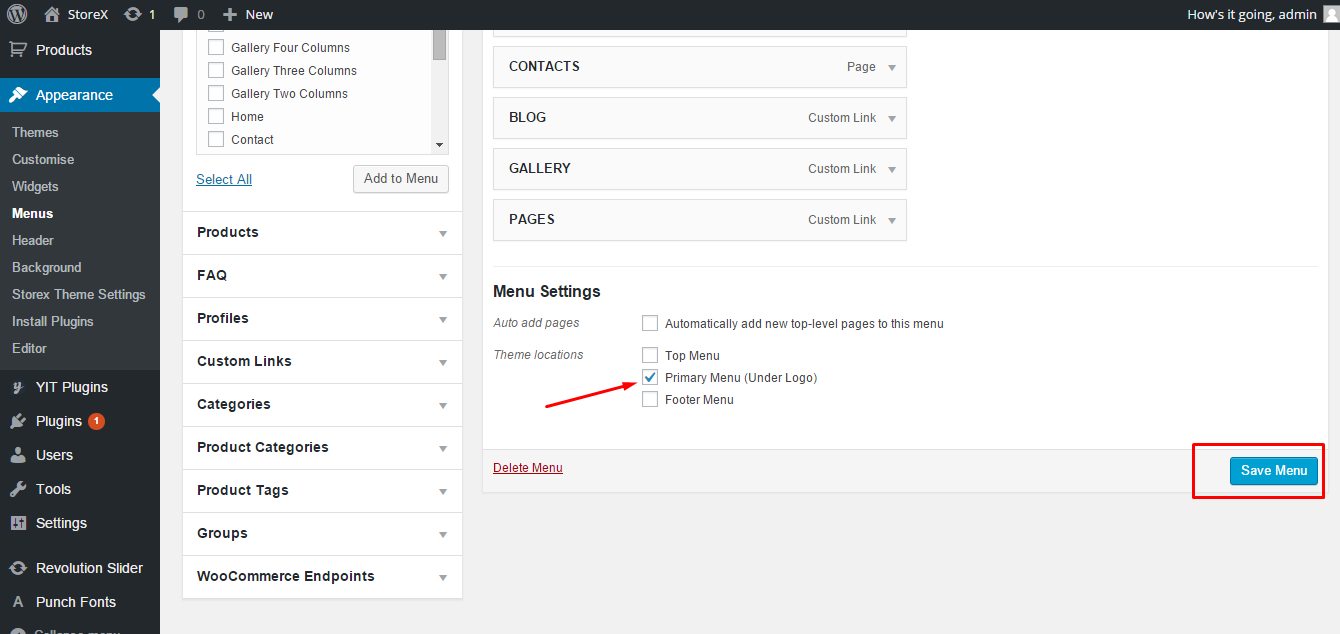
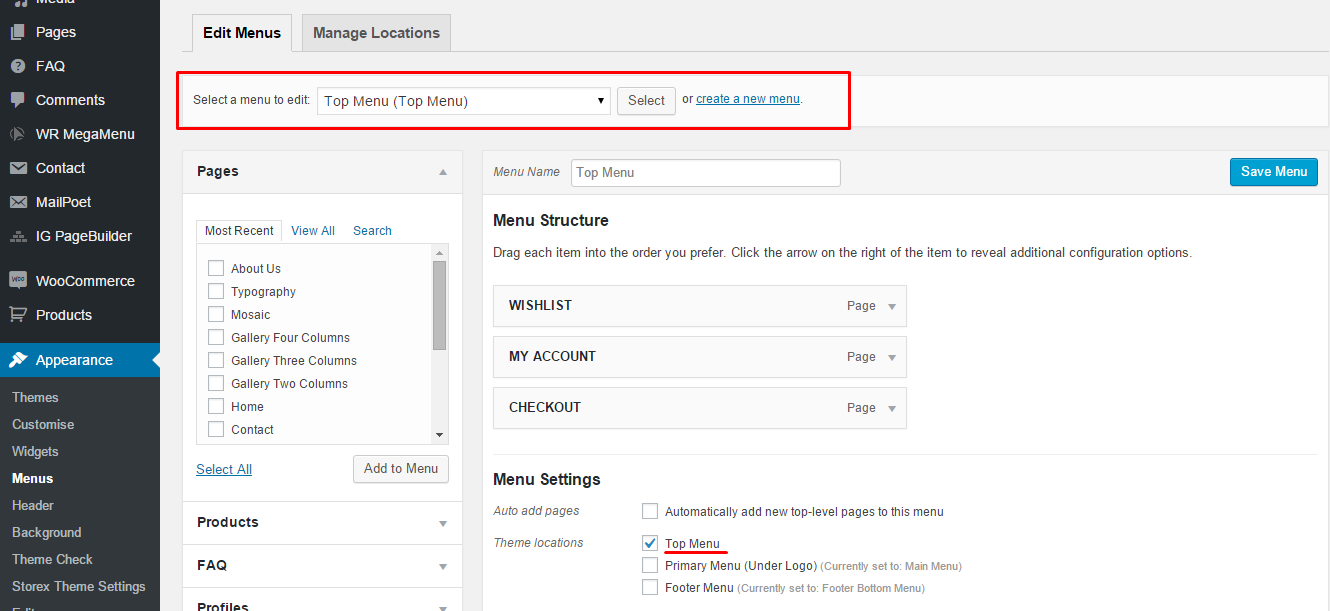
It is a WordPress menu located in the header of the theme. You can create/delete/edit this menu in Appearance->Menu section of your dashboard. Make sure to check (or uncheck) the Top Menu option below:
Site logo can be uploaded in the Logo Options area of the theme theme settings menu located in Appearance->Storex Theme Settings menu of your dashboard. You can also select the desired alignment of your logo: Left (Current), Right or Center:
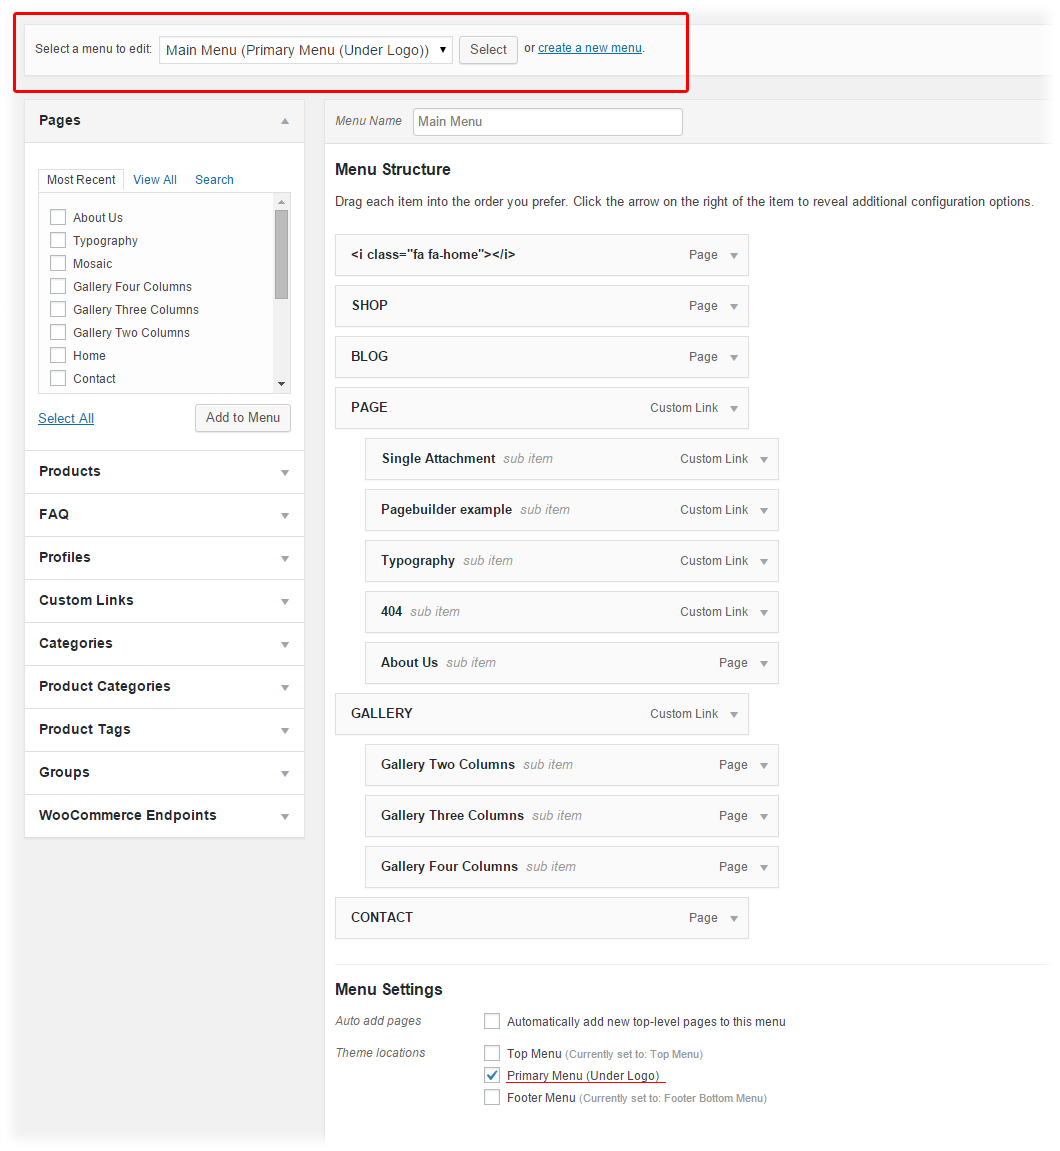
You can edit menu links and structure in the Appearance->Menus section of your dashboard. It's called Main Menu and is assigned as Primary Menu:
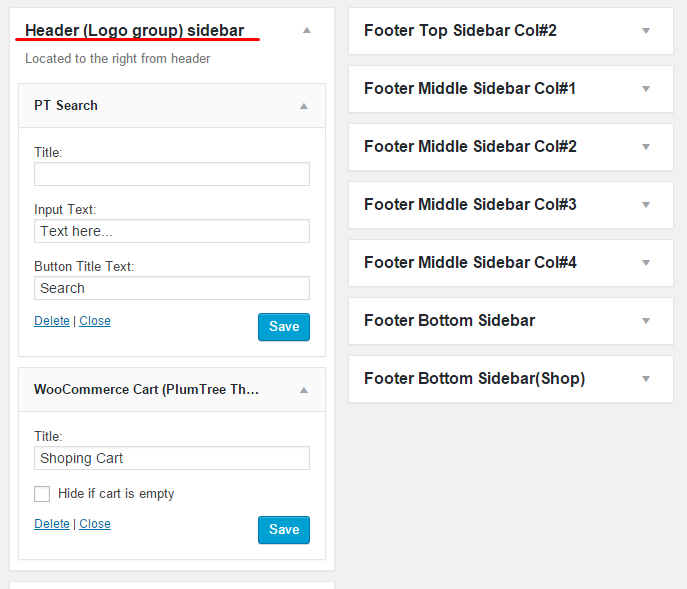
These are "PT Search" and "WooCommerce Cart (Plum Tree Themed)" widgets added to the "Header (Logo group) sidebar":
Except for widgets, header has it's own background settings.
These settings can be found in Appearance->Storex Theme
Settings->Site Settings(tab)
menu of your dashboard.
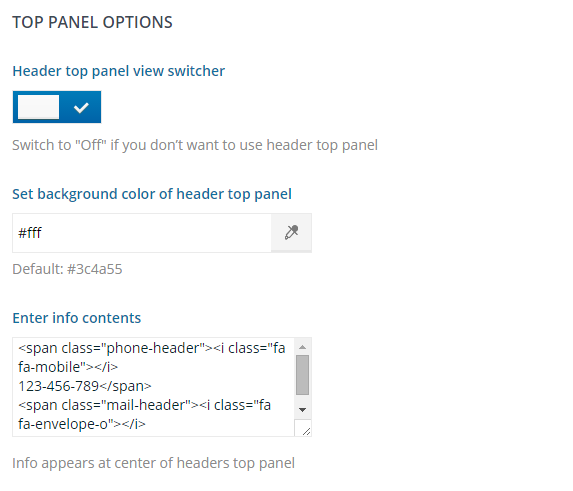
The switcher turns the panel on and off. The backround color option allows you to set the backgound color of the header top panel. "Enter info contents" field allows contact info input.
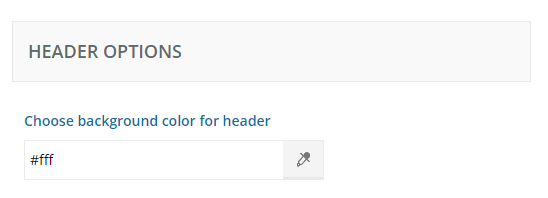
Header options allow you to choose header backgound color. You can also choose your logo image and change it's positioning in the header.
StoreX Theme menu is created with the help of WR Mega Menu plugin:
How to create a stunning menu with WR Megamenu from WooRockets on Vimeo.
Our demo footer consists of:
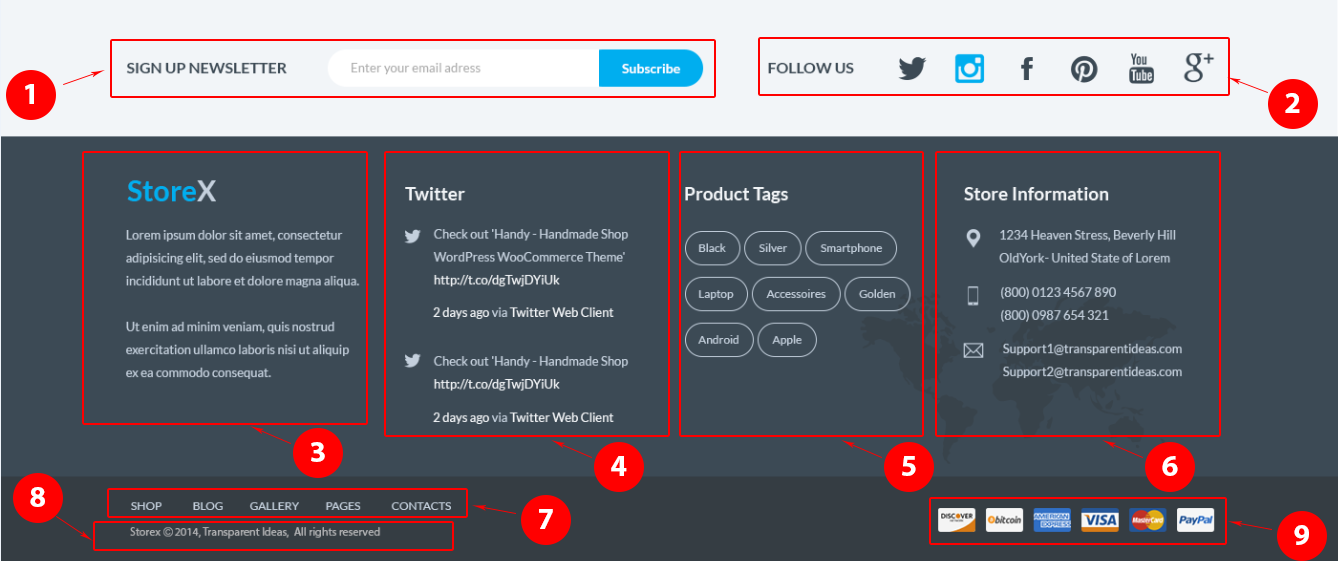
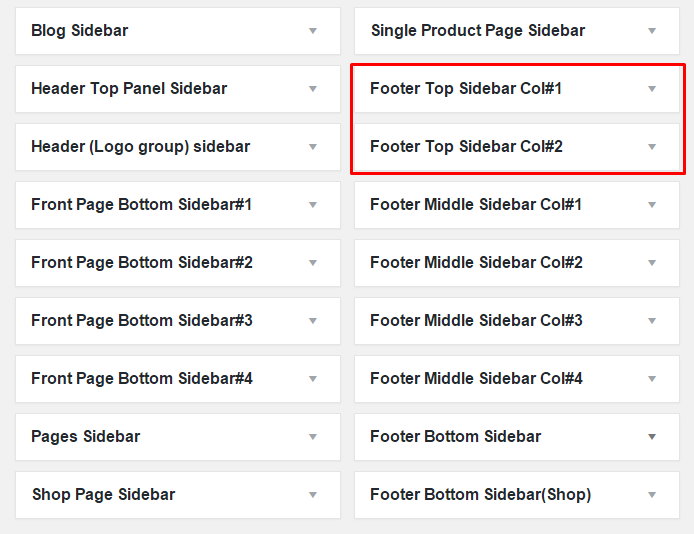
It resembles a widget area with 2 sidebars which can be accessed in Appearance->Widgets menu of your WordPress install. The left sidebar is called "Footer Top Sidebar #1". The right sidebar is called "Footer Sidebar Col#2".
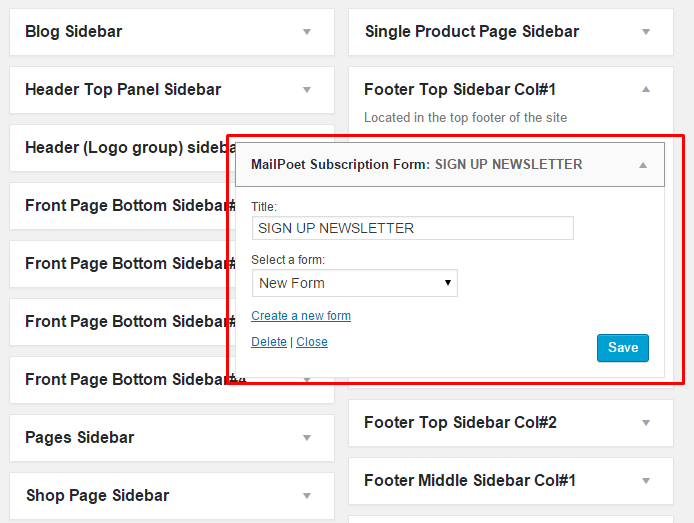
Is a MailPoet Subscription Form widget added to the "Footer Sidebar Col#1" sidebar:
Follow Us footer element is a PT-Social-Icons widget placed in the "Footer Sidebar Col#2" sidebar:
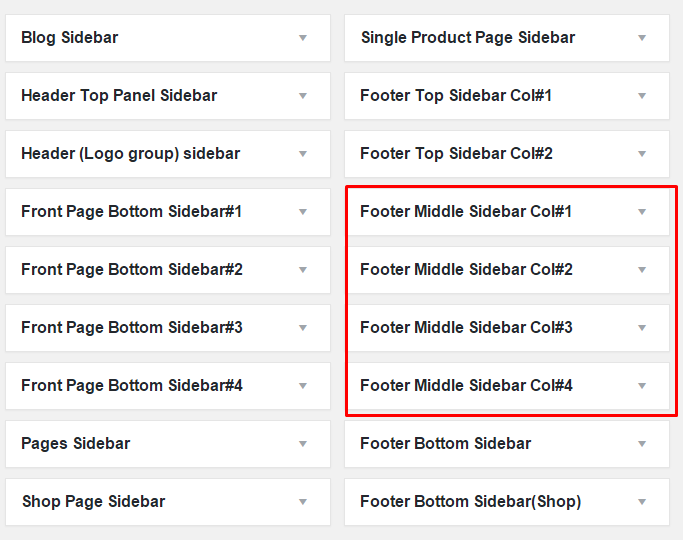
It resembles a widget area with 4 sidebars which can be accessed in Appearance->Widgets menu of your WordPress install. They are called "Footer Middle Sidebar Col#1, Col#2, Col#3, and Col#4":
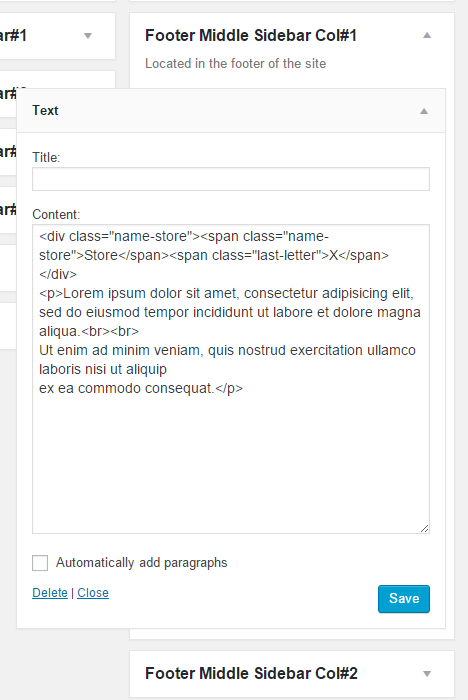
Resembles a simple Text widget with HTML code inside of it added to the "Footer Middle Sidebar Col#1" sidebar:
It is the "TwiGet Twitter Widget" widget placed in the Footer Middle Sidebar Col#2 sidebar:
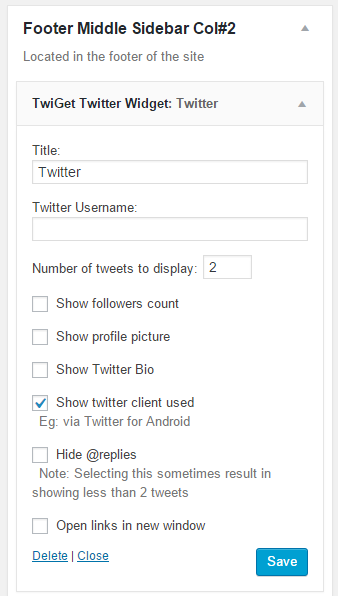
Please, read more about using TwiGet here.
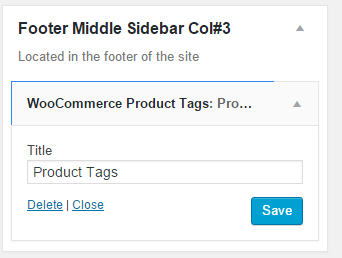
This is a "WooCommerce Product Tags" widget placed in the "Footer Middle Sidebar Col#3" sidebar:
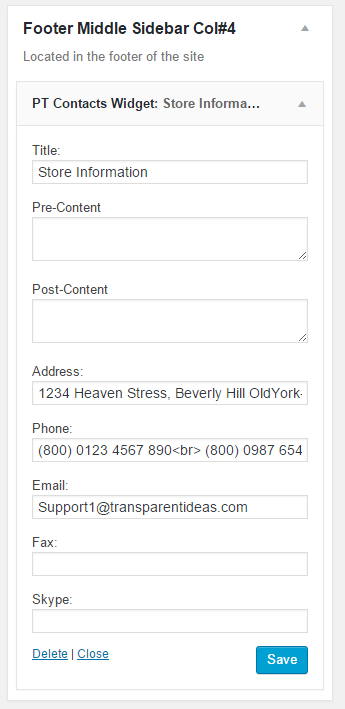
This is the "PT Contacts Widget" placed in the "Footer Middle Sidebar Col#4" sidebar:
Consists of Footer Bottom Menu, Copyright Text, and a widget that outputs available payment systems
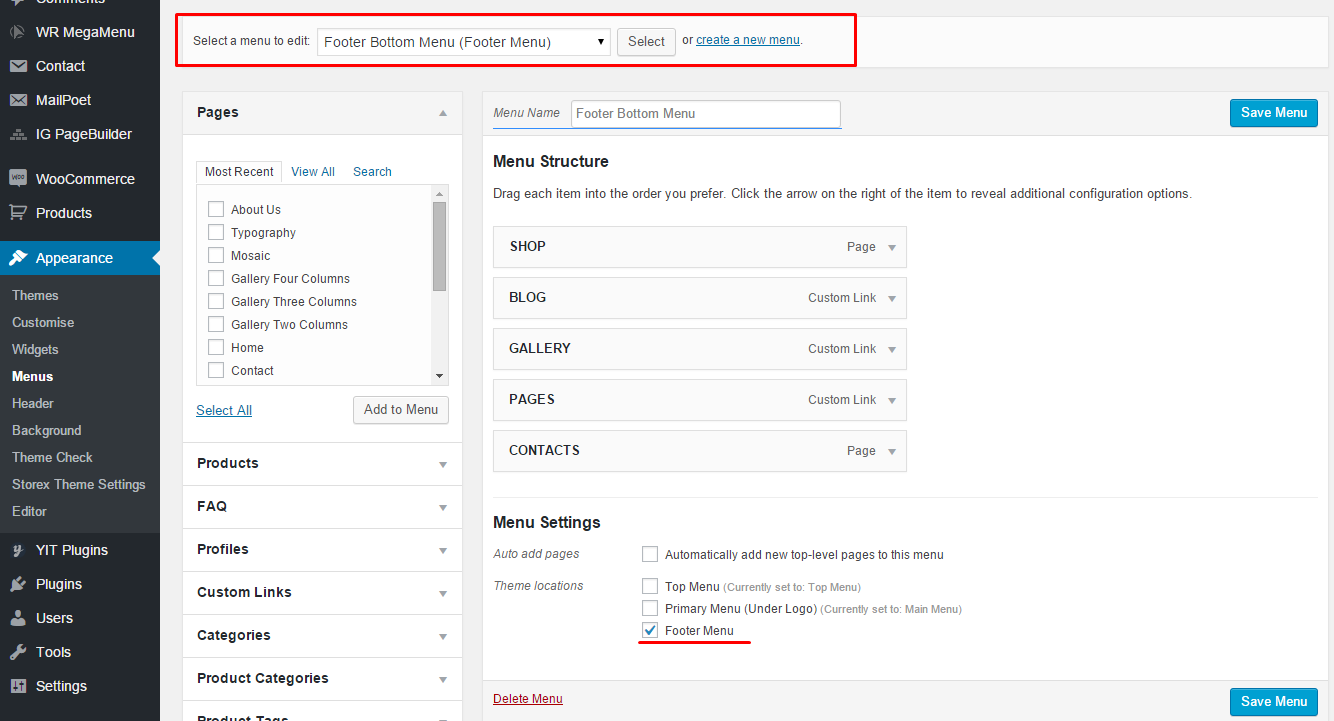
It is a WordPress menu located in the footer. You can create/delete/edit this menu in Appearance->Menu section of your dashboard. Make sure to check (or uncheck) the Footer Menu option below:
This text can be modified in Appearance->Storex Theme Settings->Site Settings (tab) of your dashboard:

This is PT Payment Icons widget added to the Footer Bottom Sidebar:
Except for widgets, footer has it's own background settings.
These settings can be found in Appearance->Storex Theme
Settings->Site Settings(tab)
menu of your dashboard.
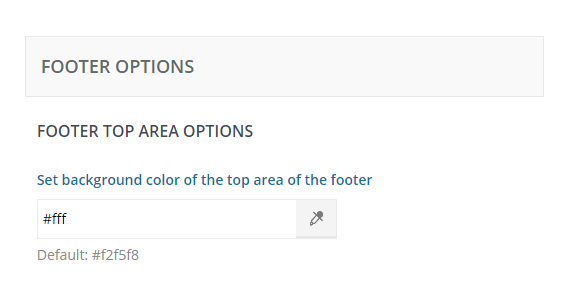
Here you can set background color of the Top Footer Area.
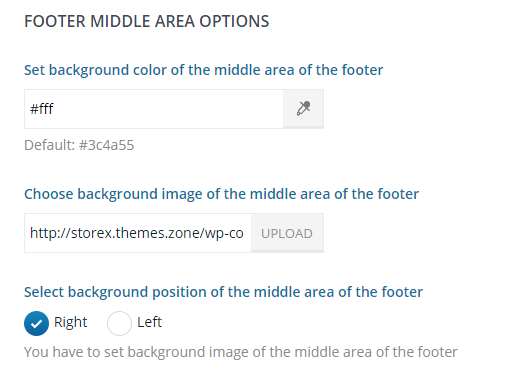
This menu allows you to set background color of the area, or to set a background image for the Middle Footer Area, or both, a color and an image. You can also select background image position: left or right.
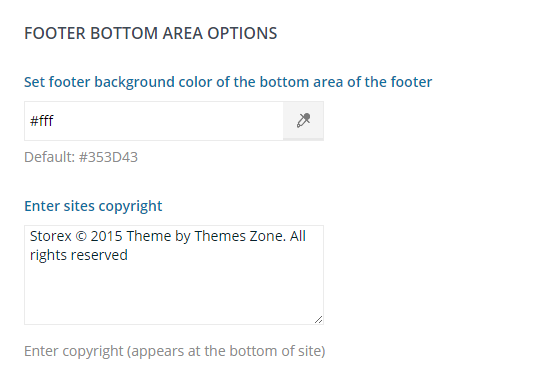
This menu allows you to set background color for the bottom part of the footer and enter site's copyright text.
Conent of StoreX theme is located between header and footer. Our demo content consists of sidebars, WooCommerce elements, such as products, and other elements, which were created in PageBuilder. Below you are going to find video tutorials on how basic content pages of StoreX theme were created with the help of PageBuilder plugin.
Before reading further make sure you have read and understood Theme Options, Using Plugins and Shortcodes
To create a Home Page go to the backend of your site and select "Pages" section, then click "Add New" button. Enter a page title (let's say Home Page), assign Full Width Page Template and click "Publish" button. Then go to "Settings" section and click on "Reading" settings, in the "Front page displays" section set to "A static page" and in the "Front Page" select box select a static page that you want to be displayed as a Home Page. Click "Save Changes" button.
Our sample home page was built with the help of Page Builder plugin (IG PageBuilder PT MOD) which comes with the theme.
Here's what our sample home page consists of:
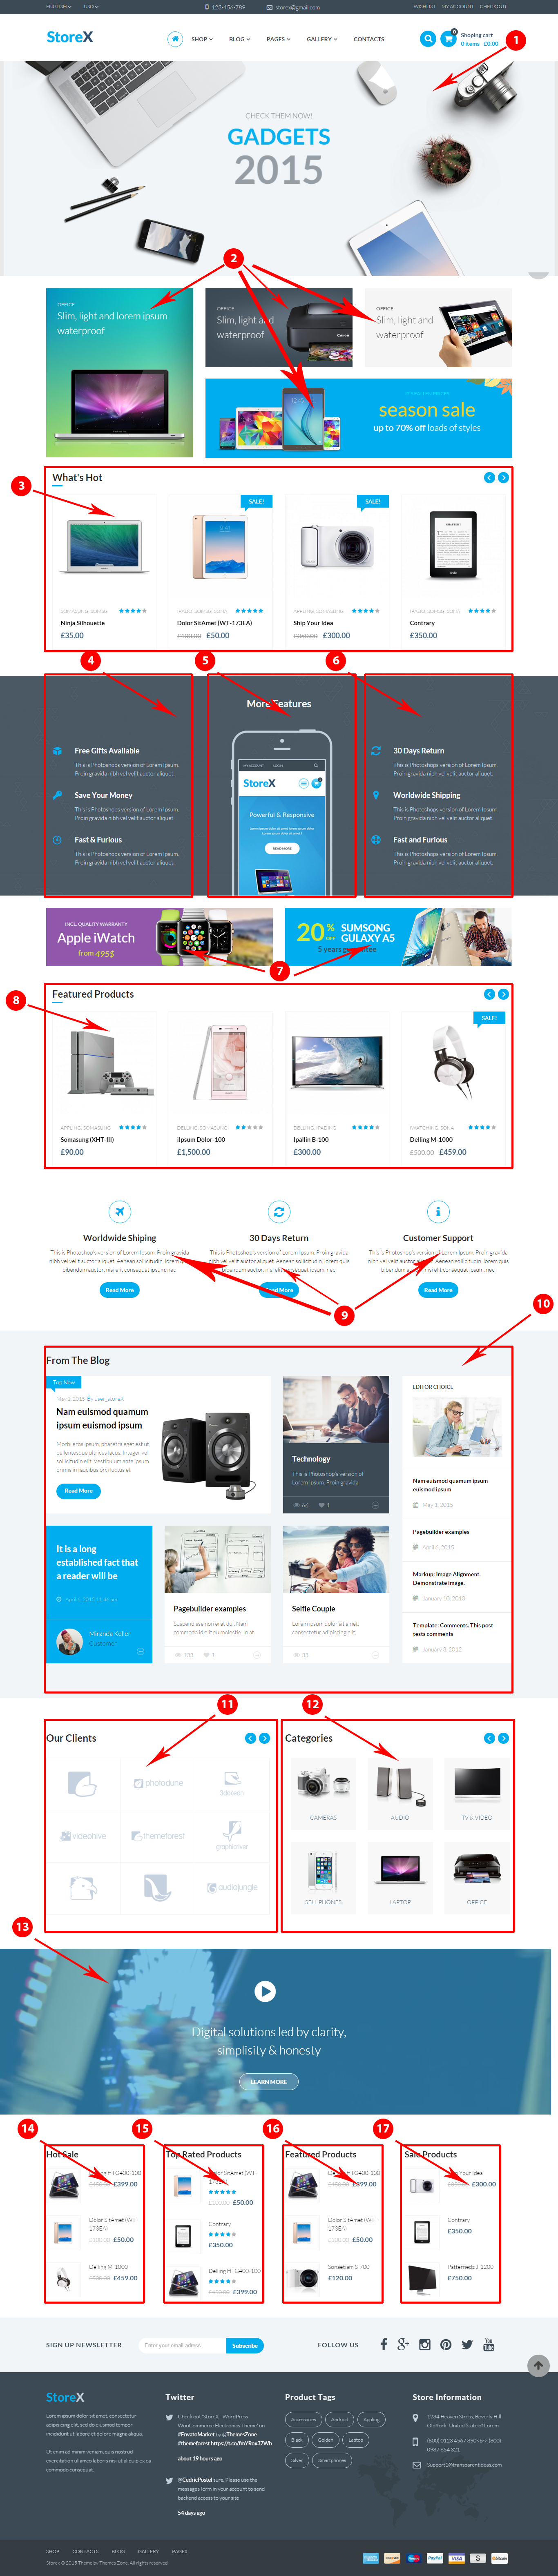
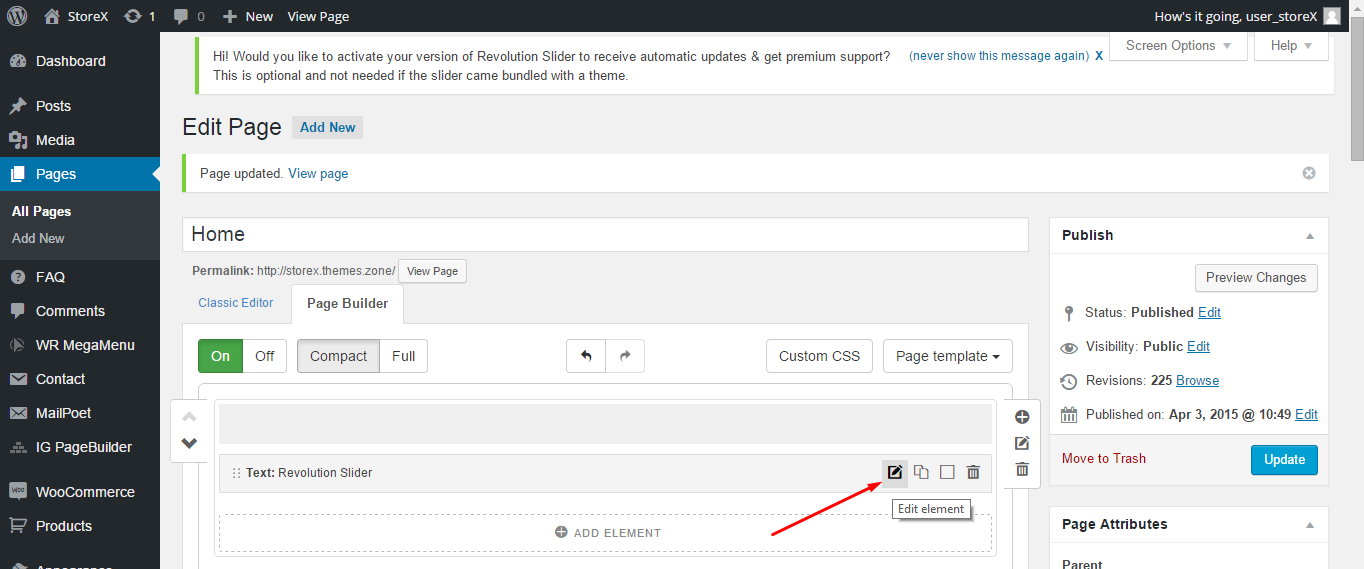
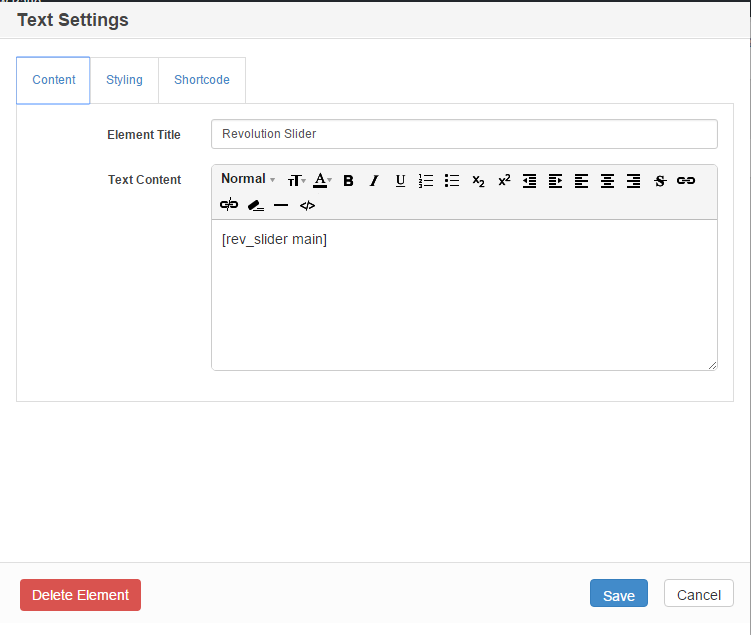
This element resembles a Revolution Slider (a plugin which comes with the theme) shortcode inside a standart "Text" element of PageBuilder:
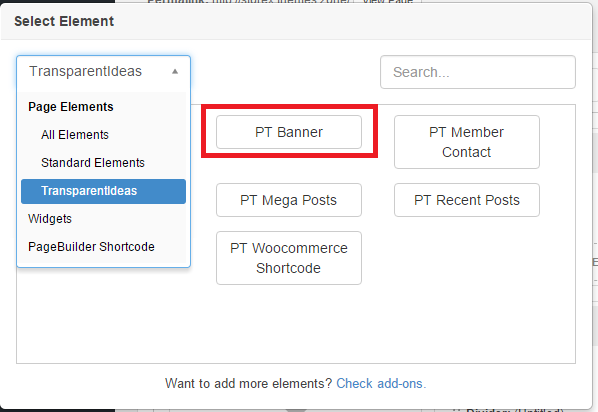
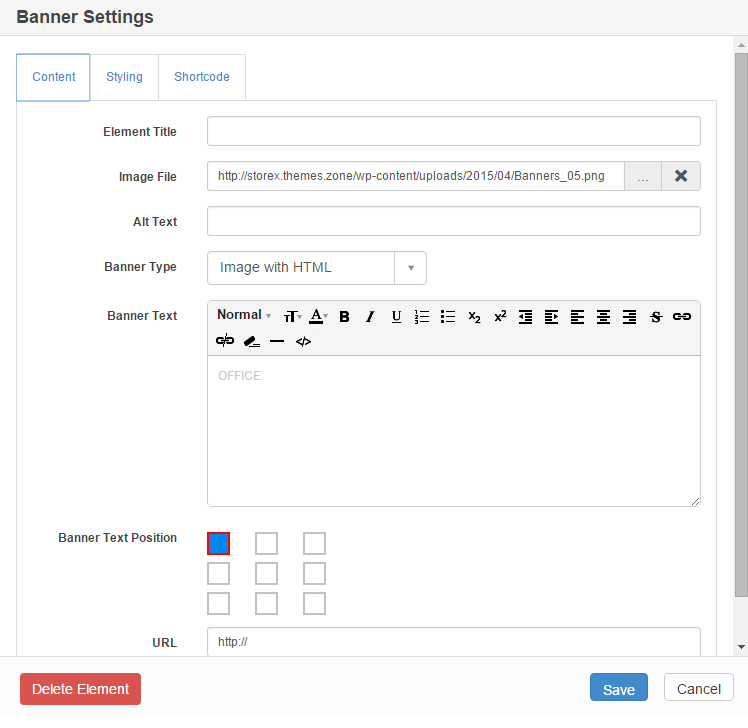
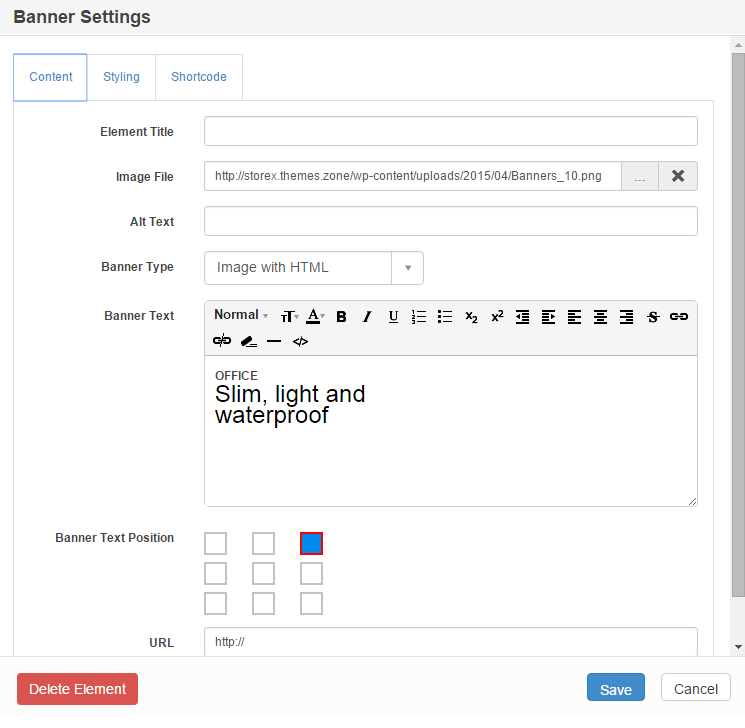
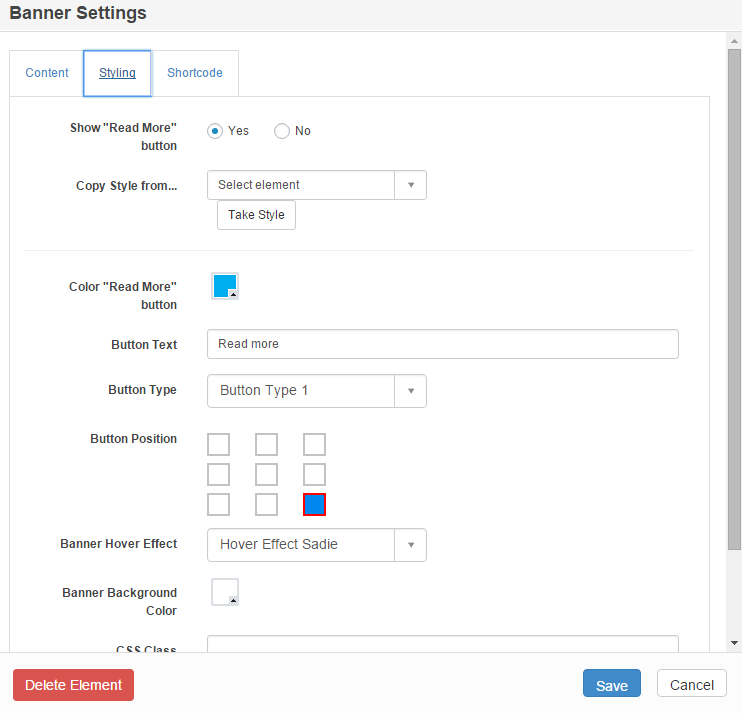
These banners were created with the help of PT Banner widget of PageBuilder:
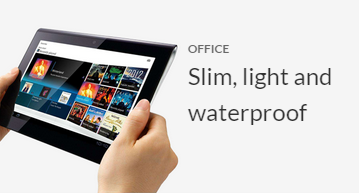
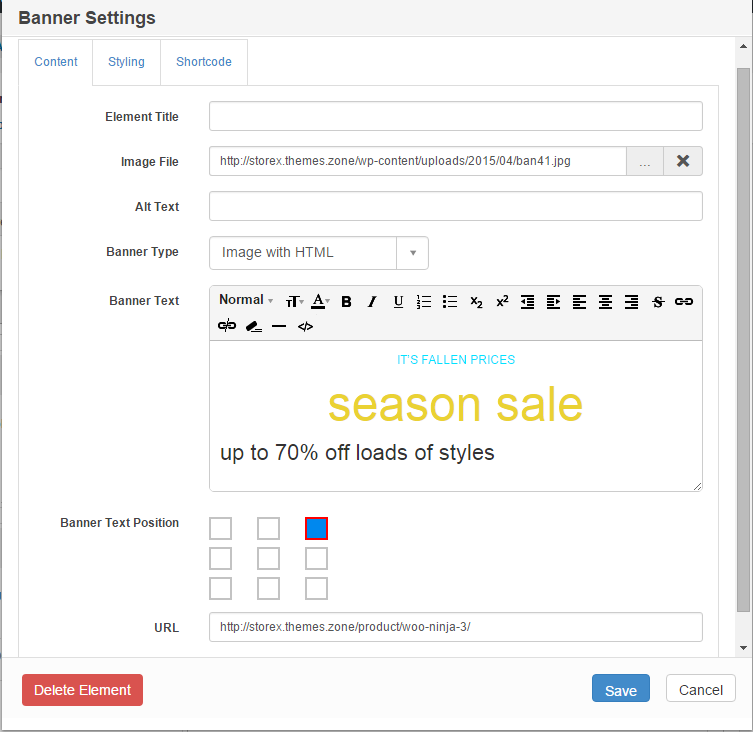
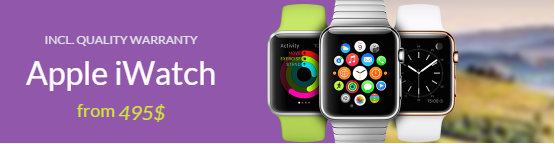
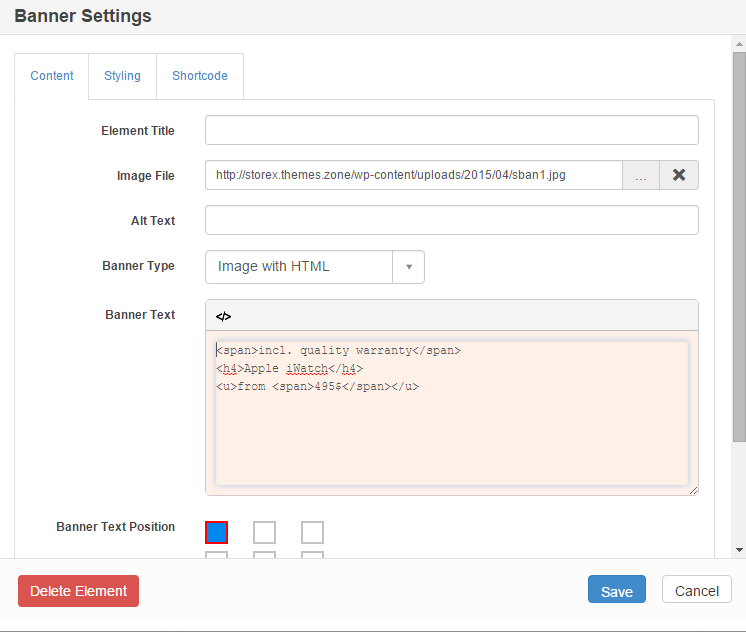
The first banner:
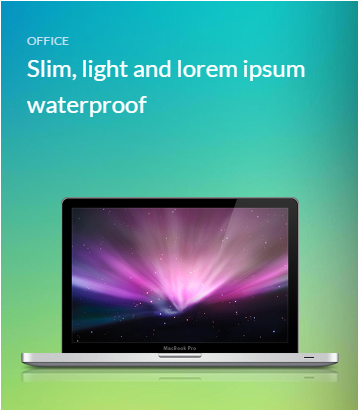
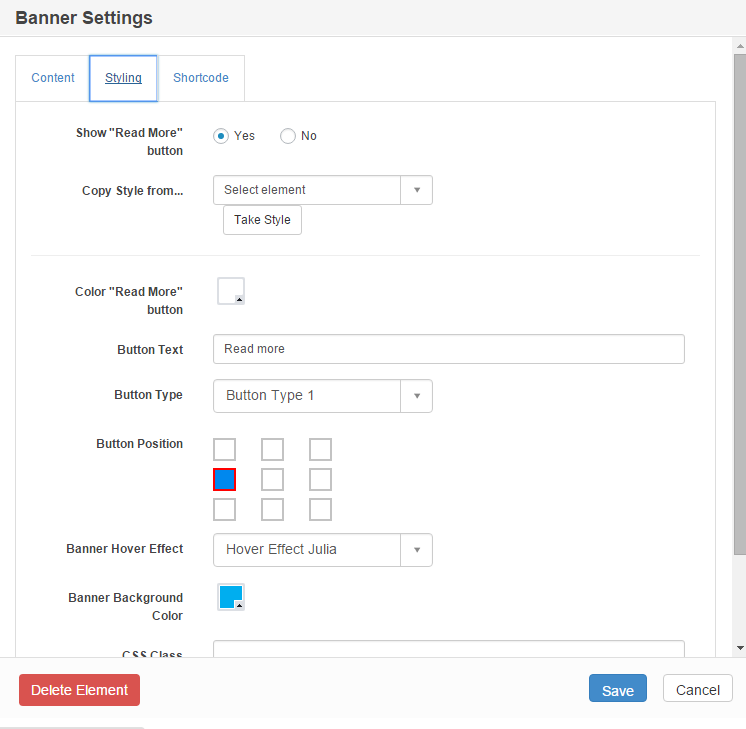
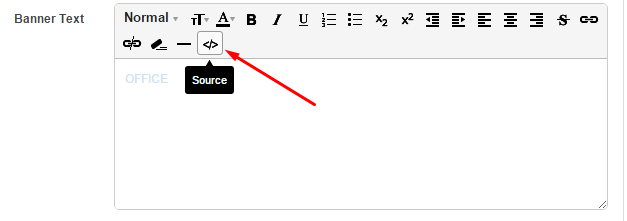
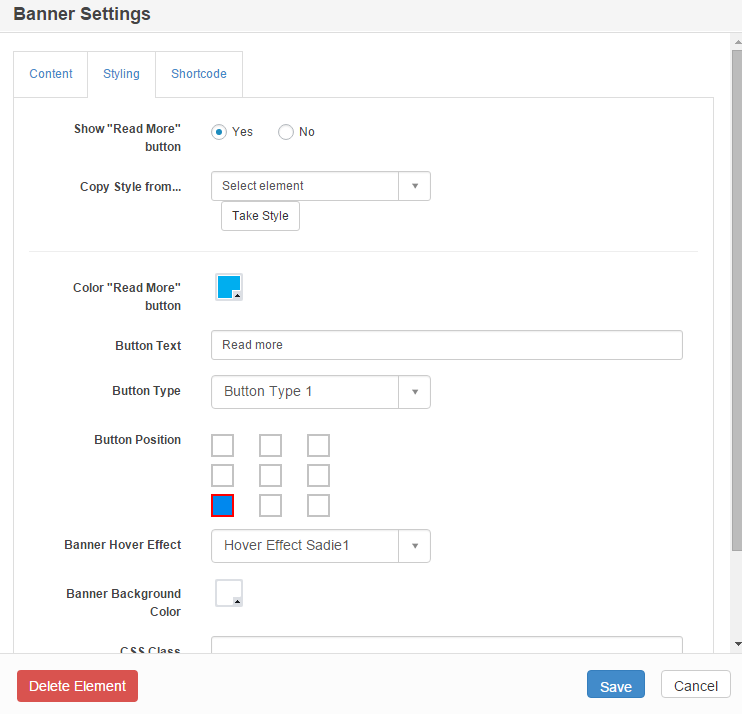
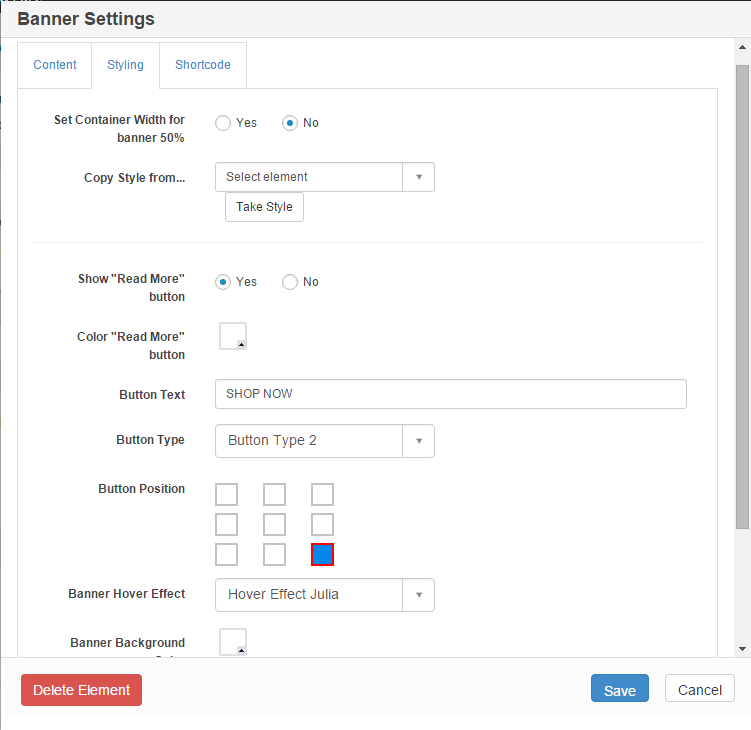
From the inside of PageBuilder this banner looks like this:
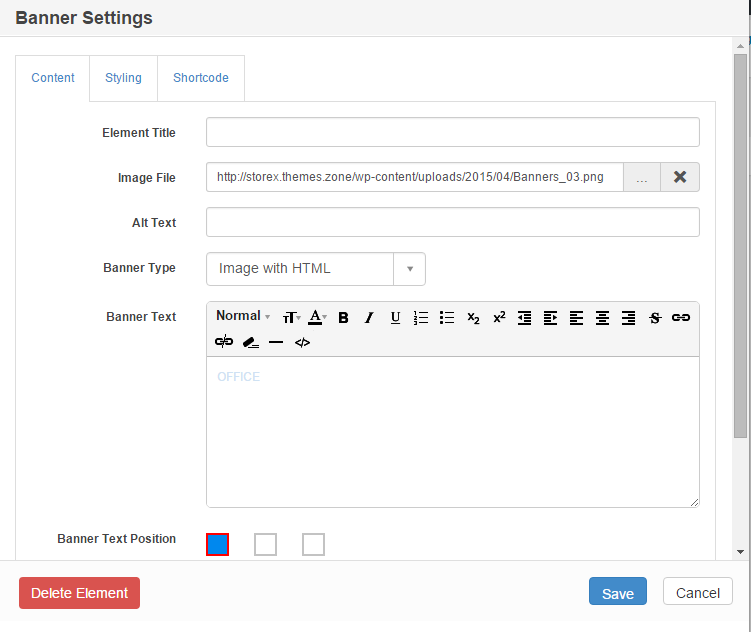
Sample image link used in this banner is:
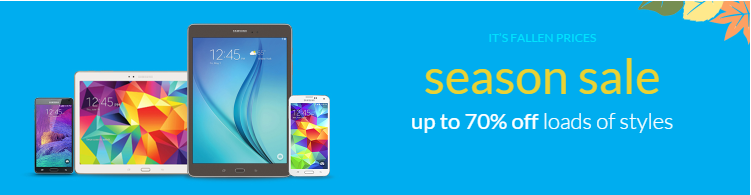
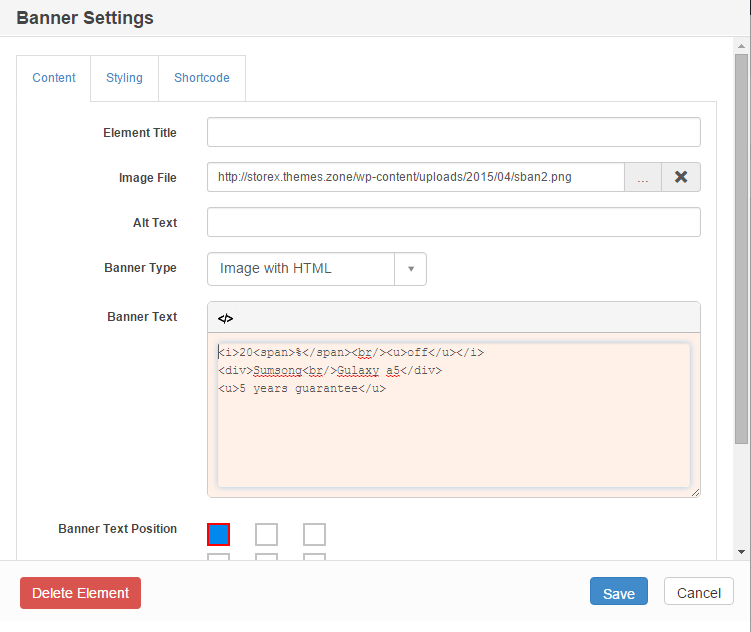
The second banner:
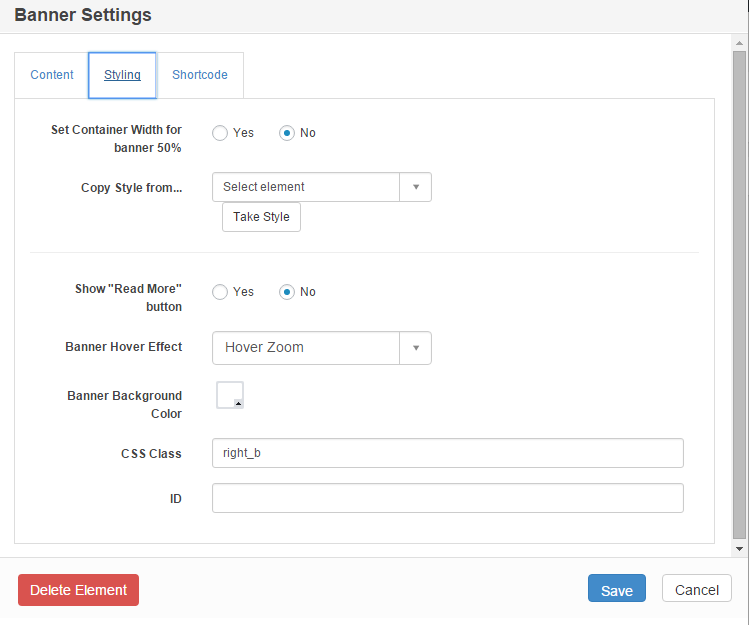
From the inside of PageBuilder this banner looks like this:
Sample image link used in this banner is:
The third banner:
From the inside of PageBuilder this banner looks like this:
Sample image link used in this banner is:
The fourth banner:
From the inside of PageBuilder this banner looks like this:
Sample image link used in this banner is:
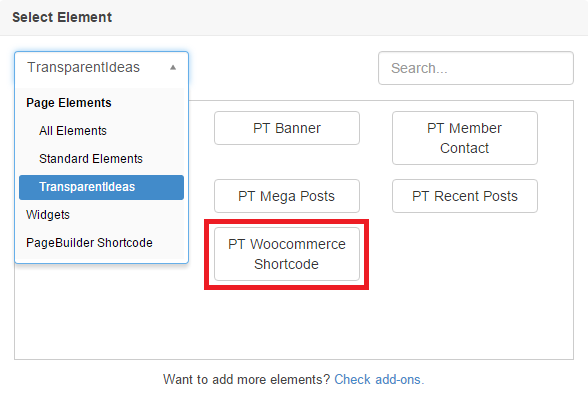
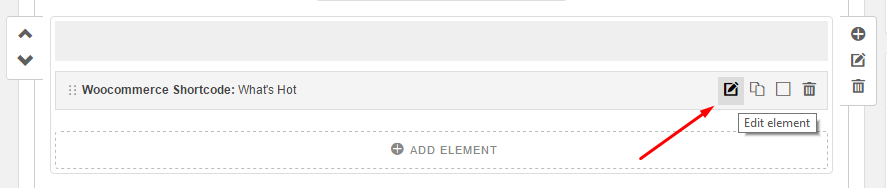
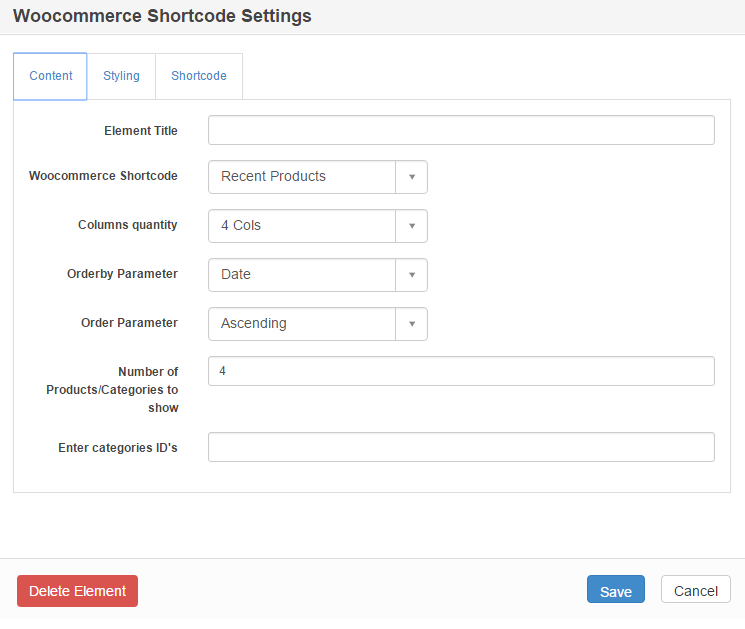
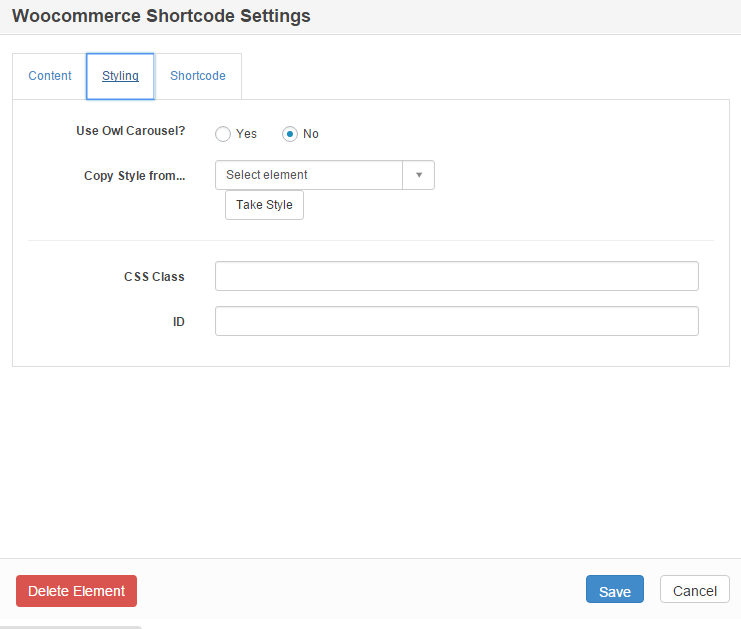
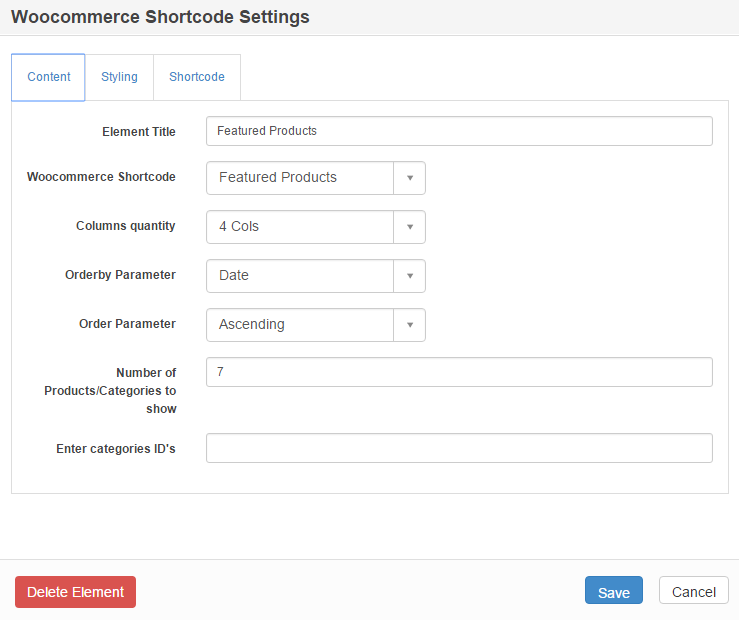
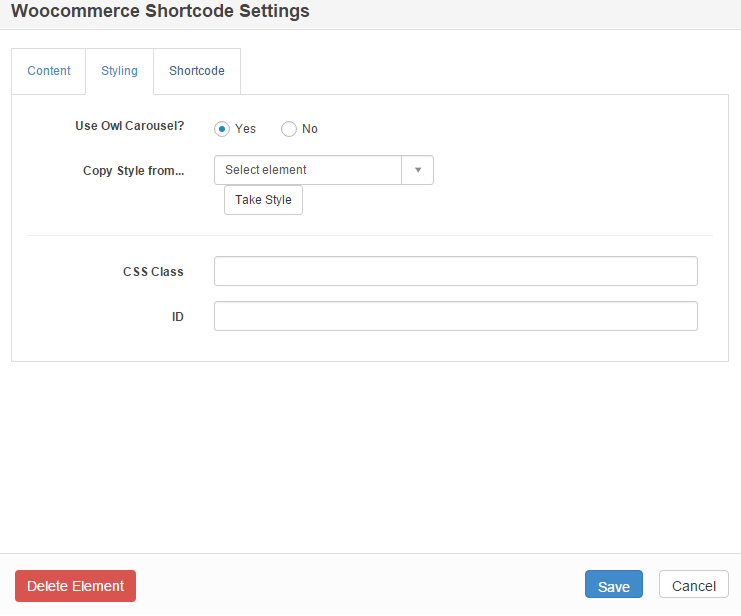
It is a PT Woocommerce Shortcode element of PageBuilder:
Here's how this element of our sample Home Page looks from the inside of PageBuilder:
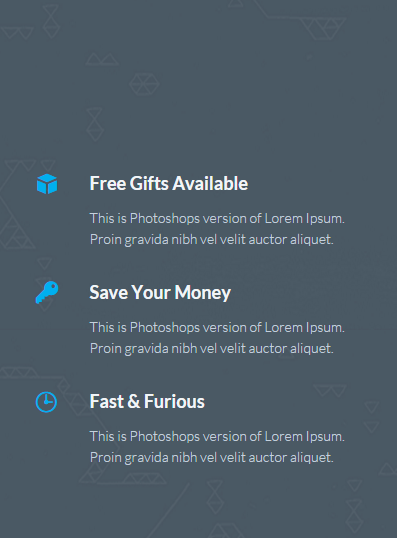
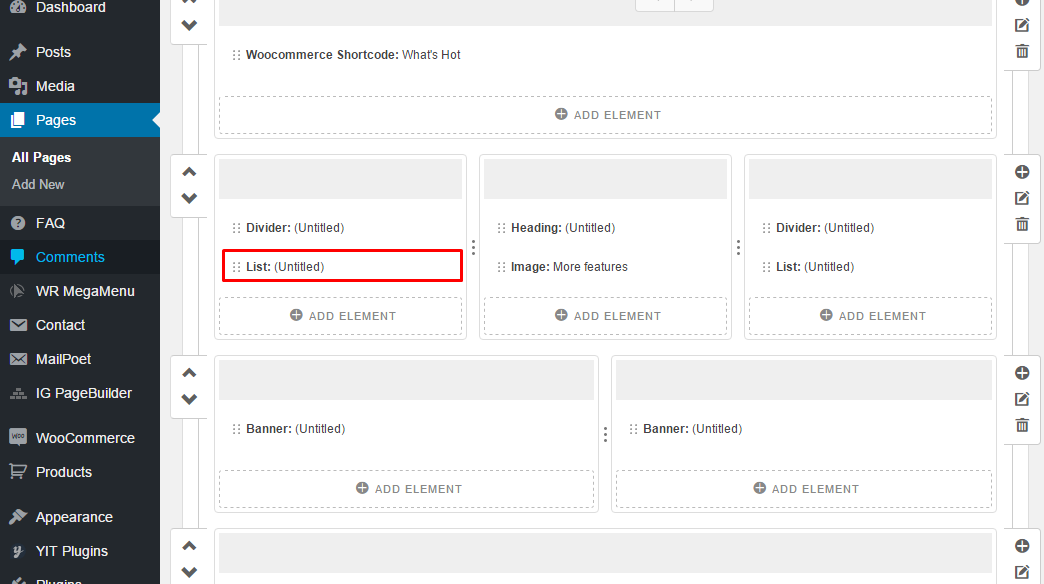
This is a "List" Page Builder element with icons selected:
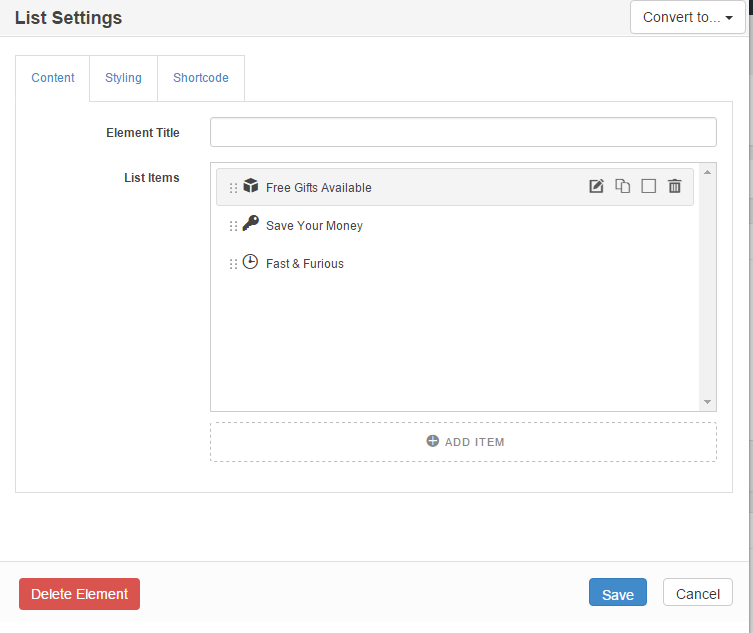
You can see the detailed making of this element in the video tutorial below:
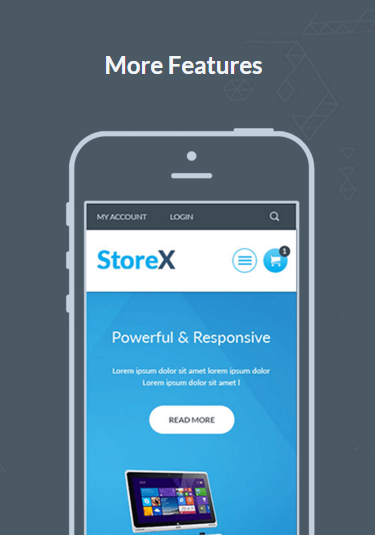
This is an "Image" Page Builder element:
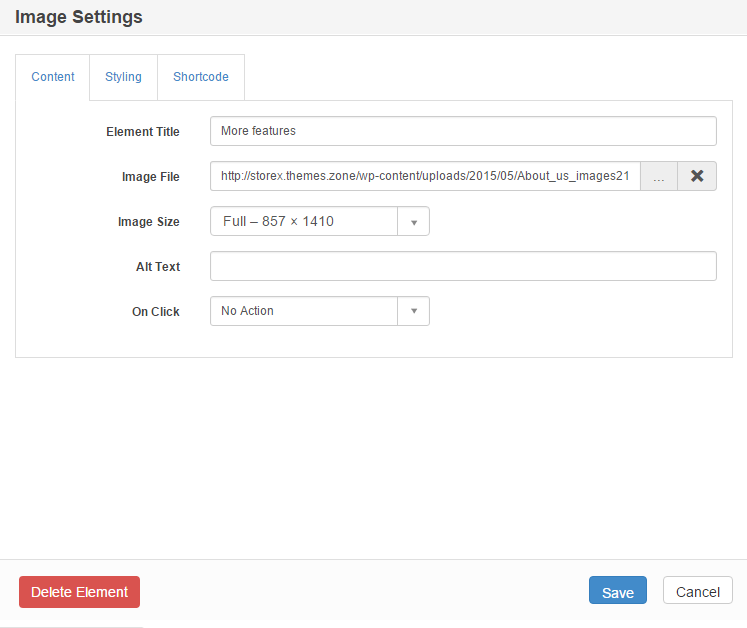

This is a list element of Page Builder with icons selected:
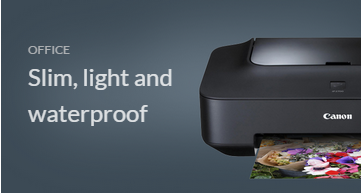
These banners were created with the help of PT Banners Page Builder element:
Here are the screenshots of it's PageBuilder settings:

The image link used in the banner is:
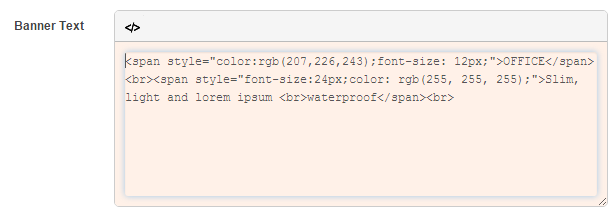
The html code used in this sample banner is:

Here are the screenshots of it's PageBuilder settings:
The image linked used in the banner is:
The html code used in this sample banner is:
This element is also a PT Woocommerce Shortcode element of PageBuilder, just like the previous one:
Here's how this element of our sample Home Page looks from the inside of PageBuilder:
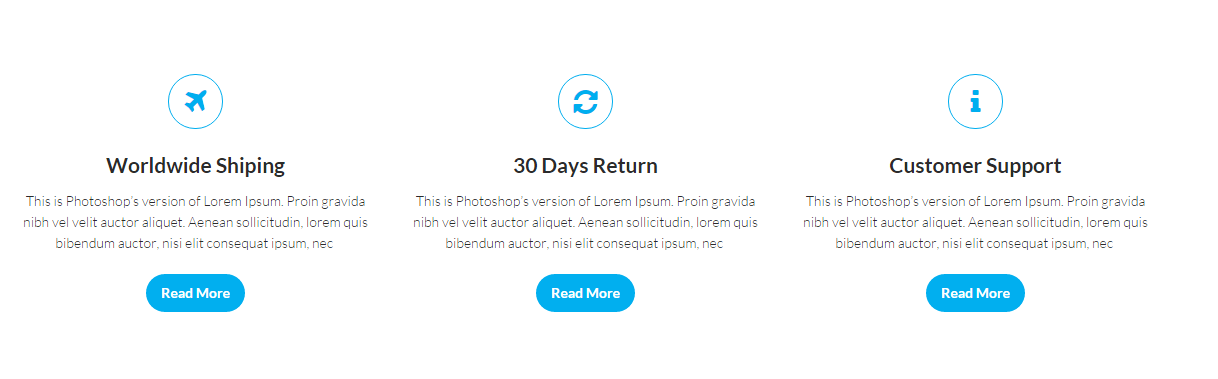
These elements are PageBuilder "Text" widgets with html code inside.
World Wide Shipping text widget contains looks like this from the inside of PageBuilder:
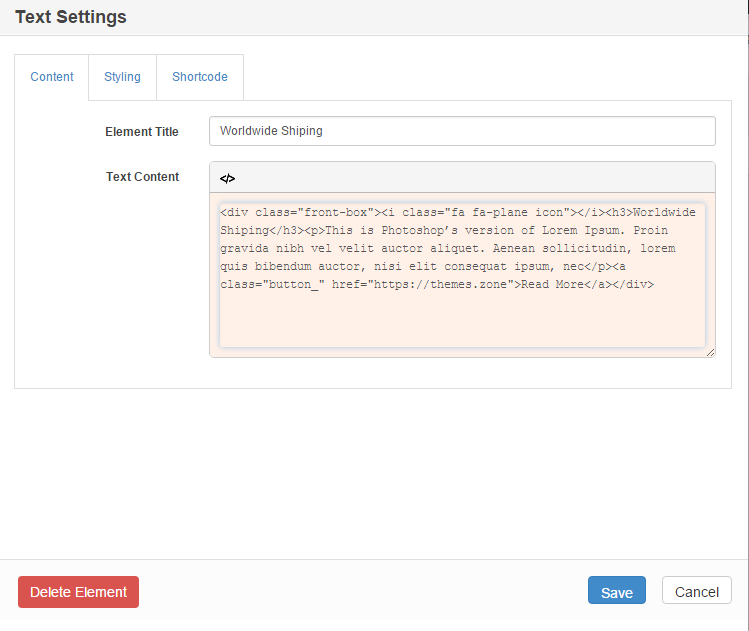
The html code is:
30 Days Return text widget contains looks like this from the inside of PageBuilder:
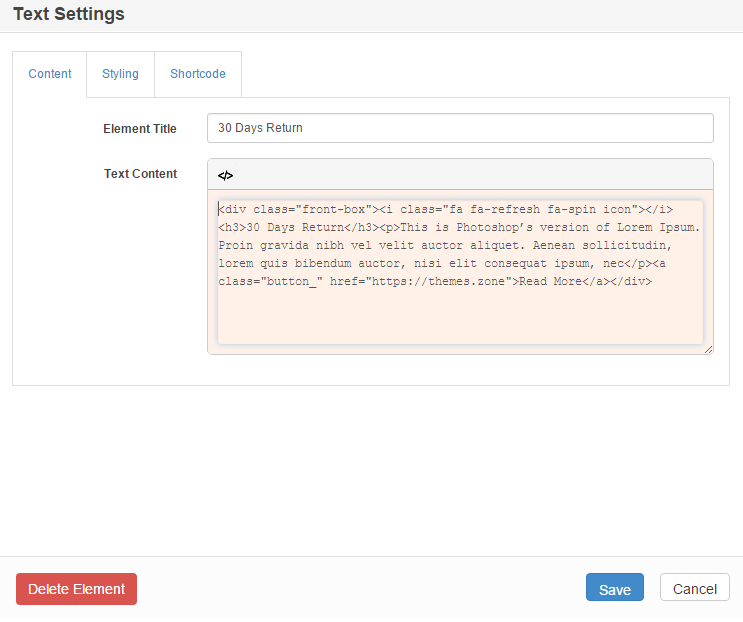
The html code is:
Customer Support text widget contains looks like this from the inside of PageBuilder:
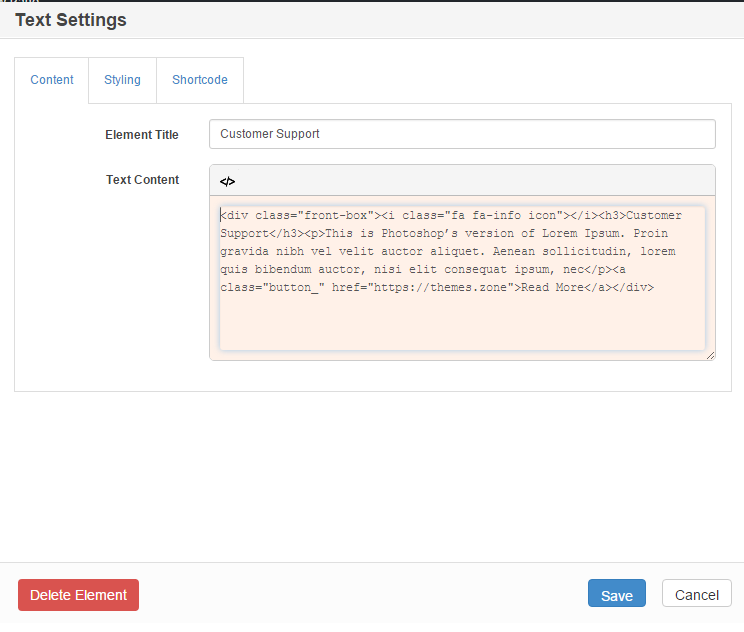
The html code is:
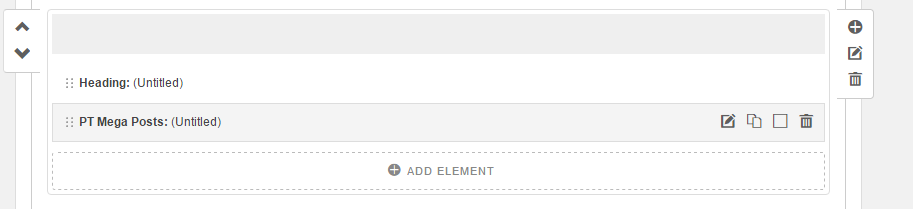
This part of our sample Home Page consists of the standard "Heading" widget of PageBuilder which contains the "From The Blog" text, and "PT Mega Posts" widget of PageBuilder:
Here's an screenshot of our sample "PT Mega Posts" widget insides:
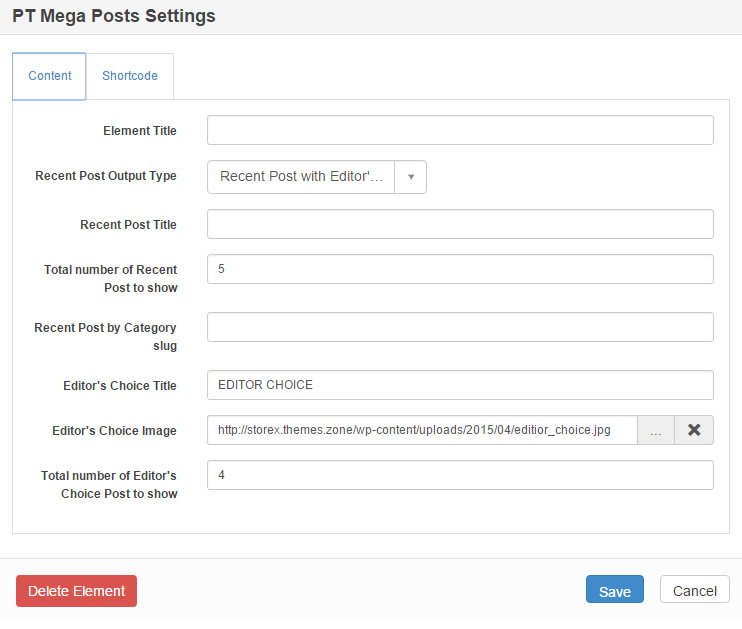
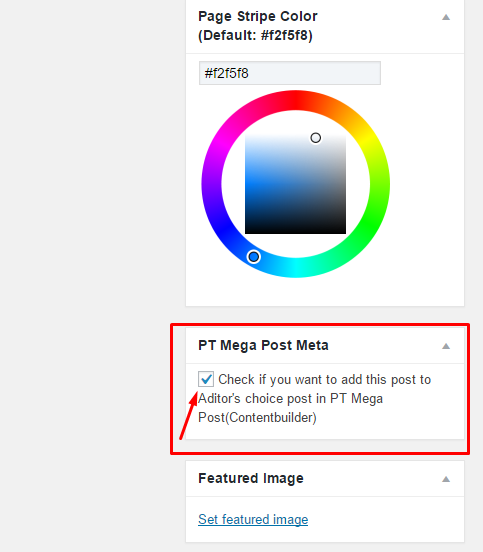
The image used to illustrate Editor Choice plog posts has the following URL:
For a post to become "Editor's Choice" one the following checkbox inside the blog post must be checked:
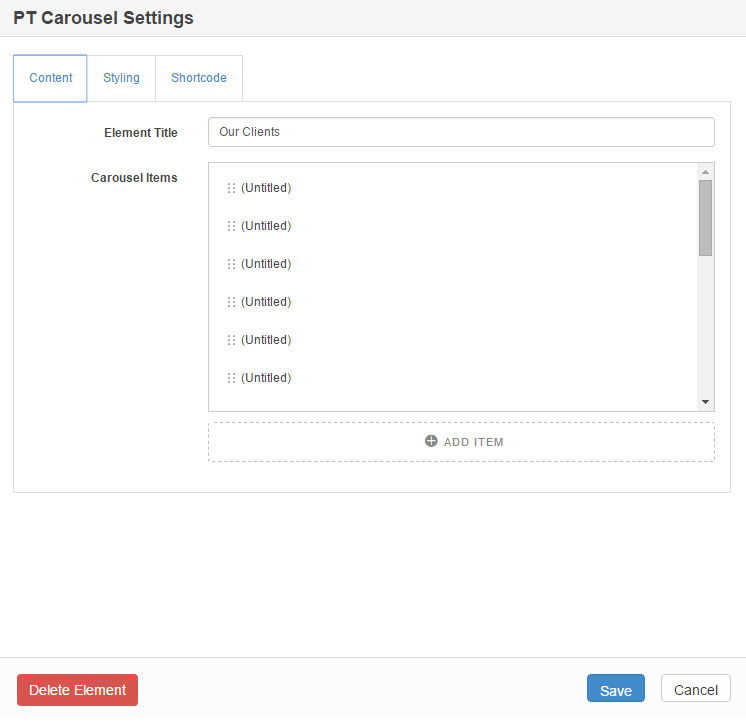
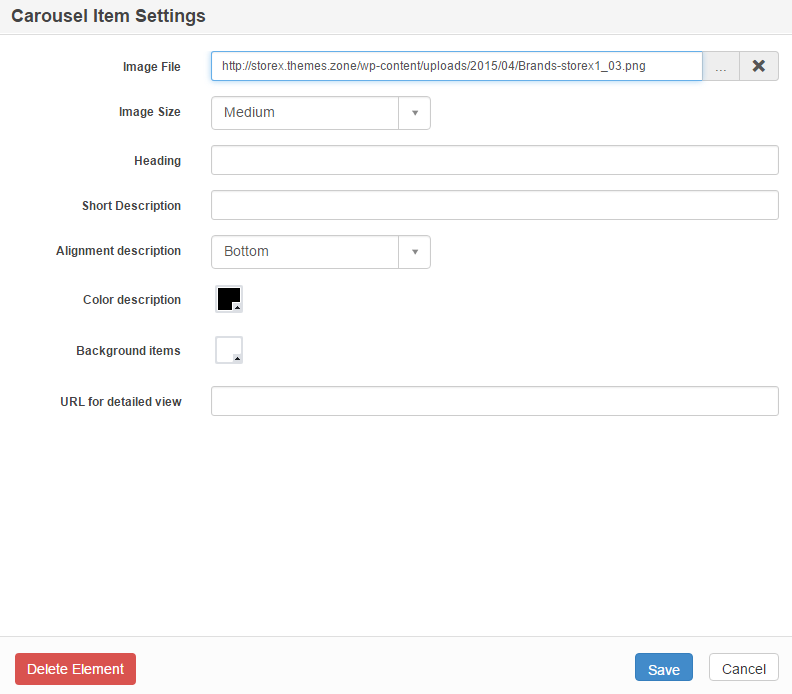
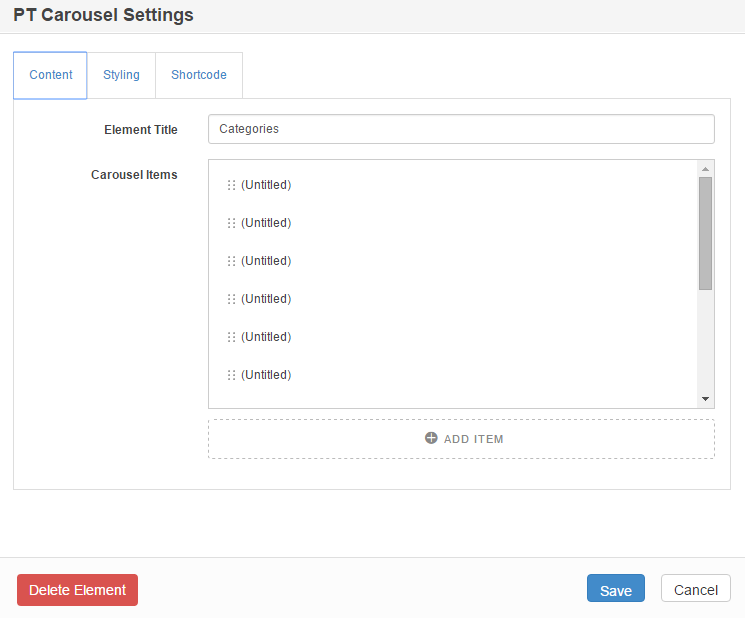
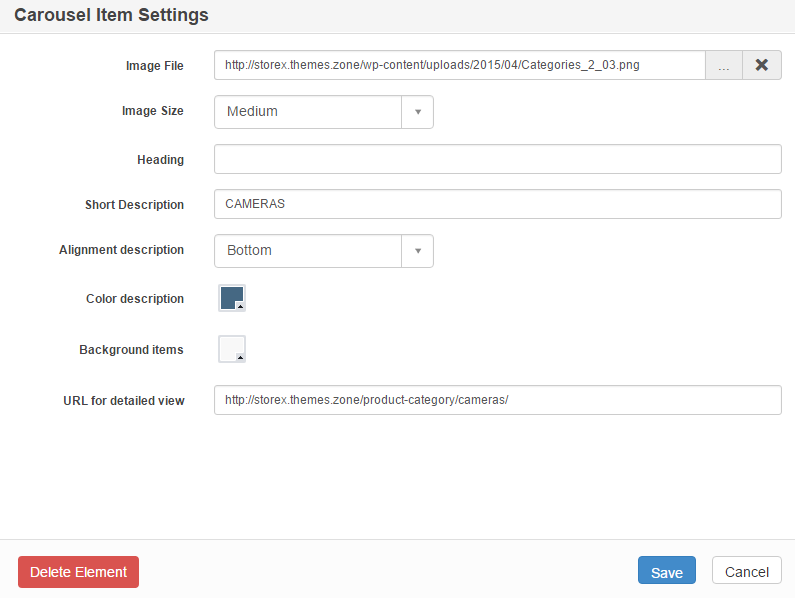
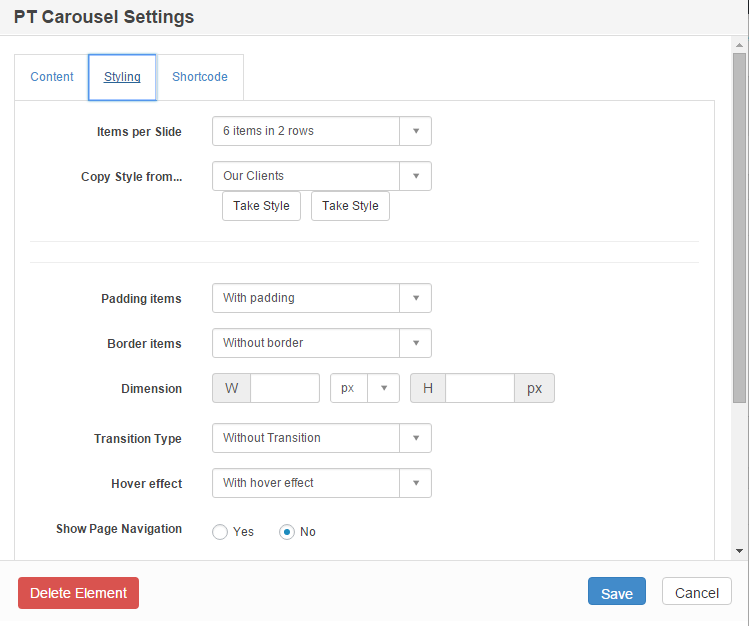
Both elements are "PT Carousel" widgets of PageBuilder:

Our clients carousel looks like this from the inside:
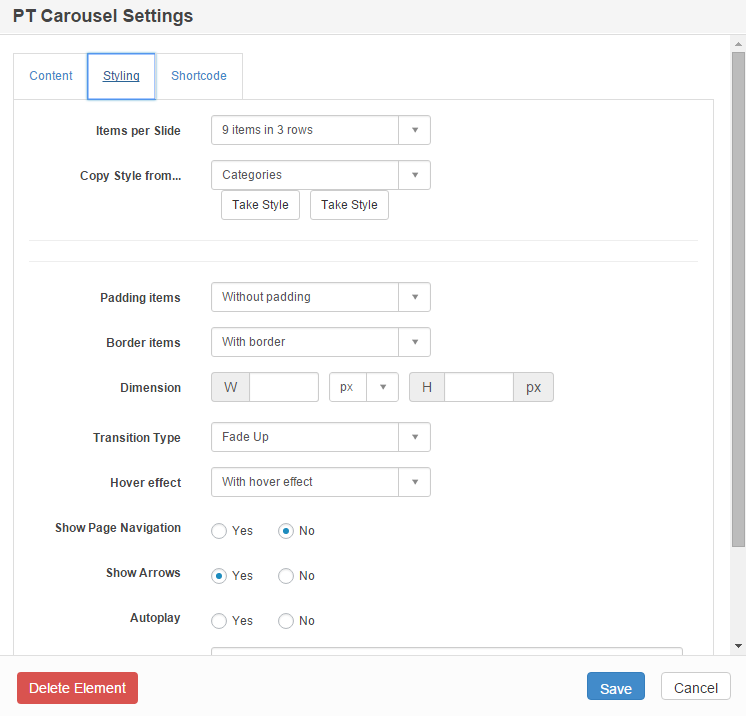
Categories carousel settings look like this:
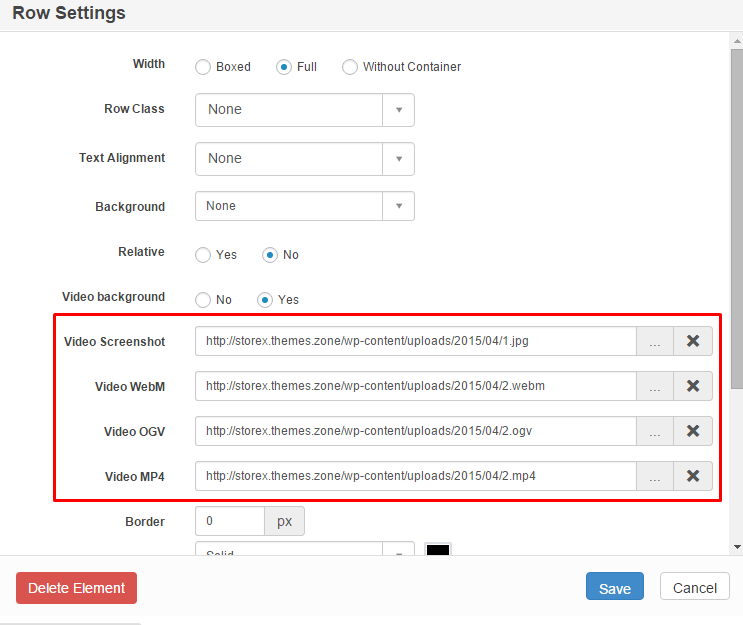
Video background area consists of an html block of text and a video background:

The regular "Text" element of Page Builder contains the following html code:
The video background is attached to the row of page builder in which this theme is located:

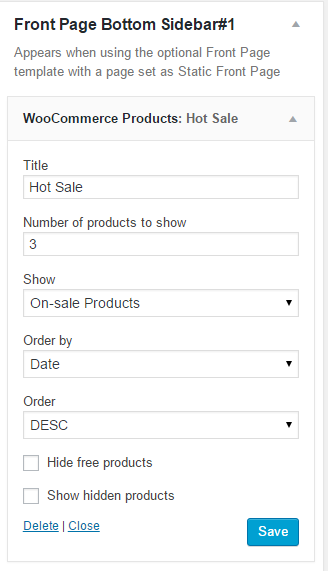
This is a "WooCommerce products widget" placed in the "Front Page Bottom Sidebar#1":
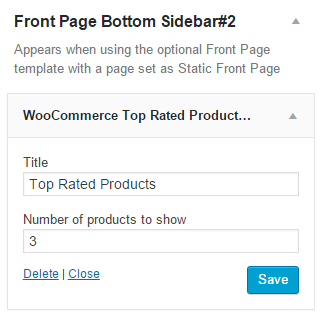
This is a "WooCommerce products widget" placed in the "Front Page Bottom Sidebar#2":
This is a "WooCommerce products widget" placed in the "Front Page Bottom Sidebar#3":

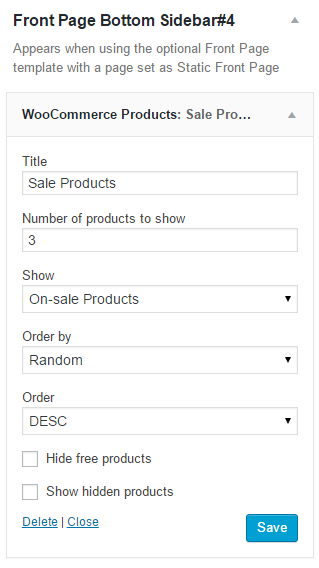
This is a "WooCommerce products widget" placed in the "Front Page Bottom Sidebar#4":
Our sample contacts page looks like this:

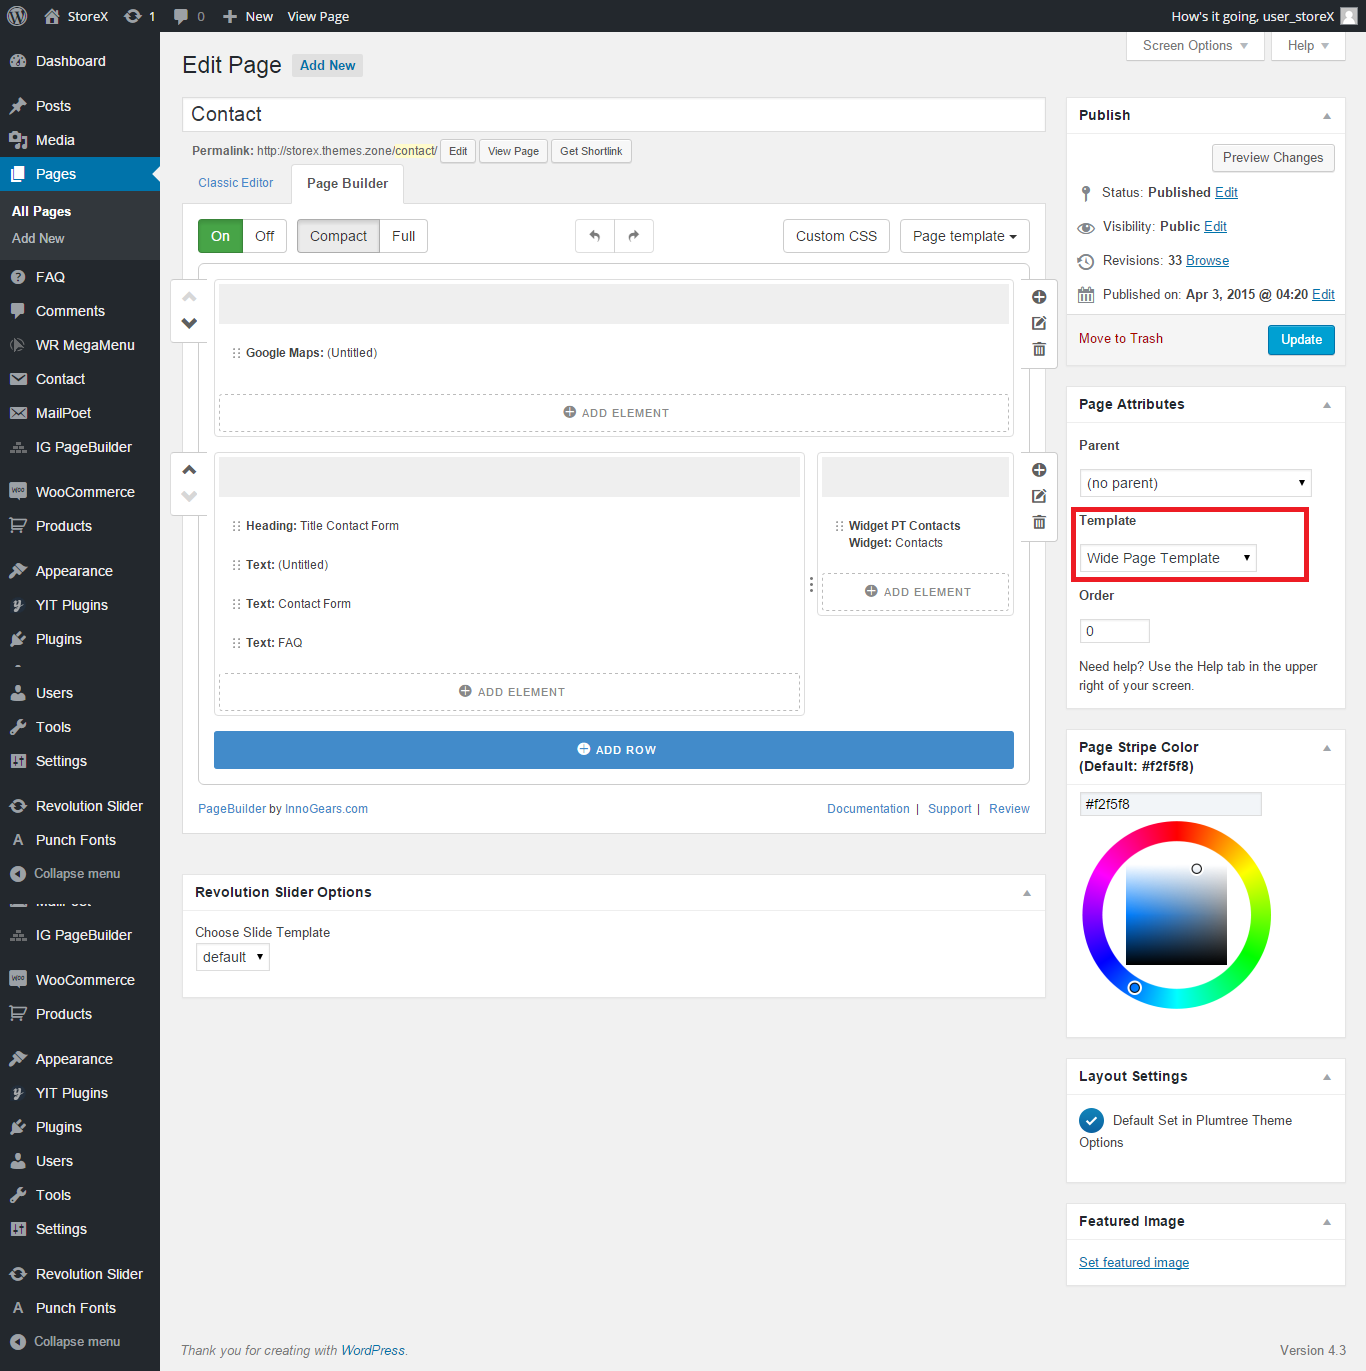
To create a page in your dashboard you need to go to Pages->Add new page. Wide Page Template should be selected for this page:
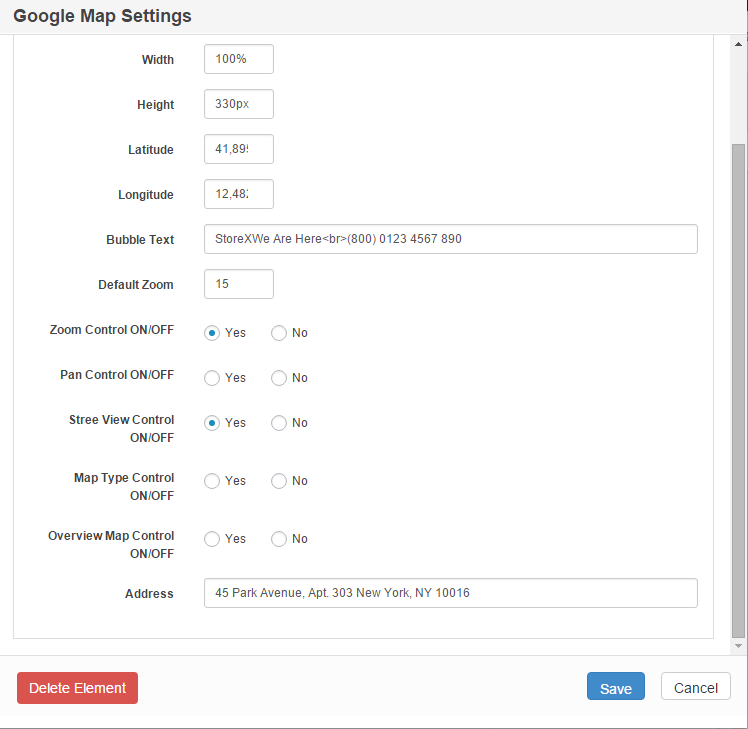
The map is built with the help of Google Maps widget of PageBuilder. Here's how it's setting look from the inside:
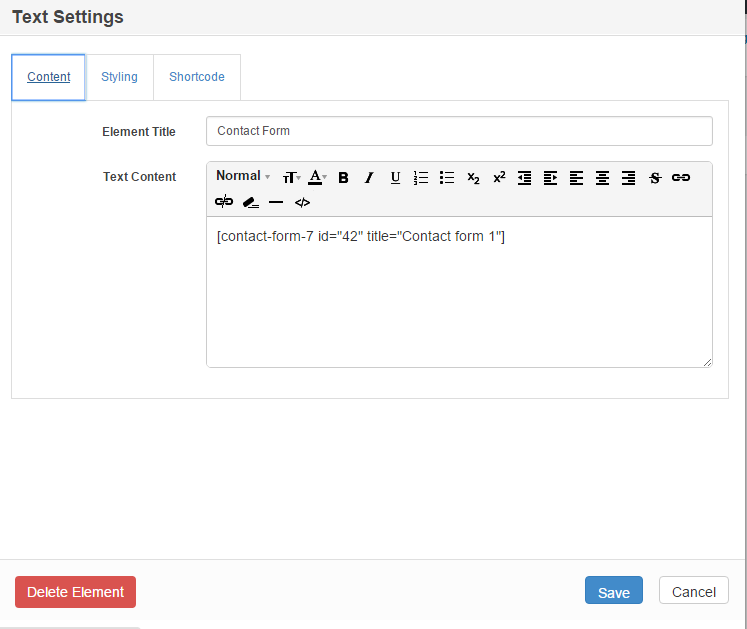
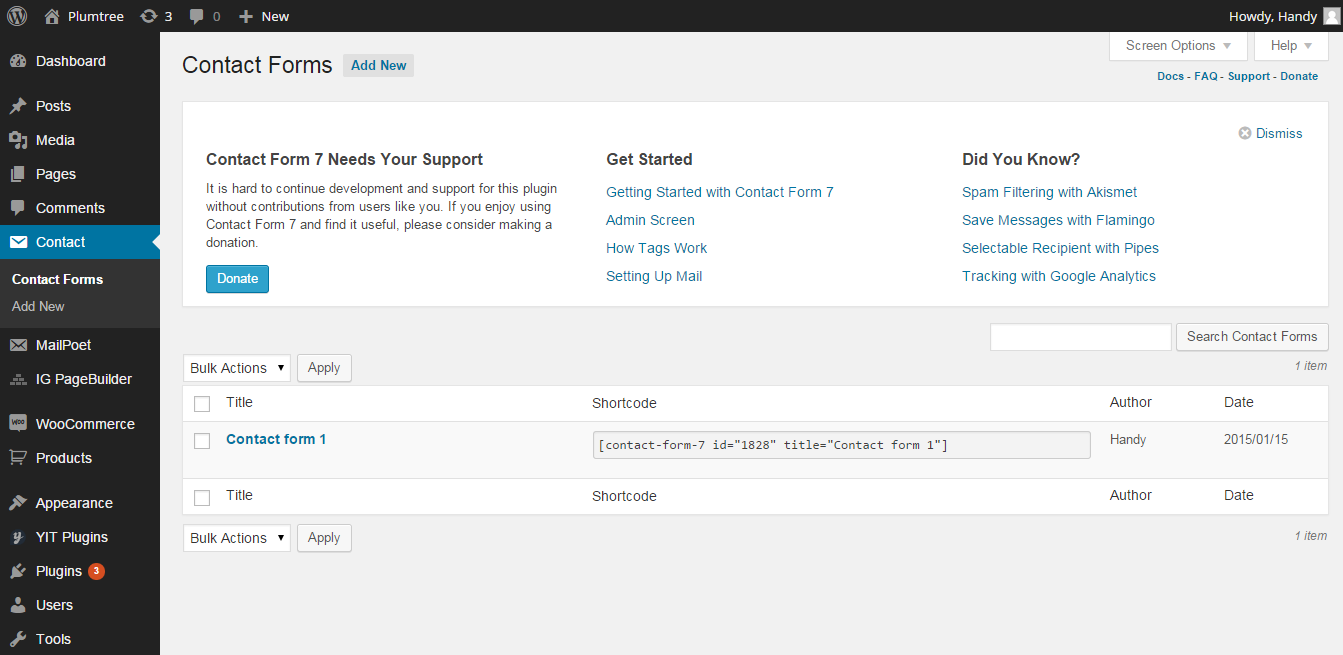
At the top of the contact form regular "Heading" and "Text" widgets are used. The contact form itself was created in "Contact Form 7" plugin and resembles a "Contact Form 7" plugin shortcode with sample contact form's id inserted in the regular "Text" widget of PageBuilder:
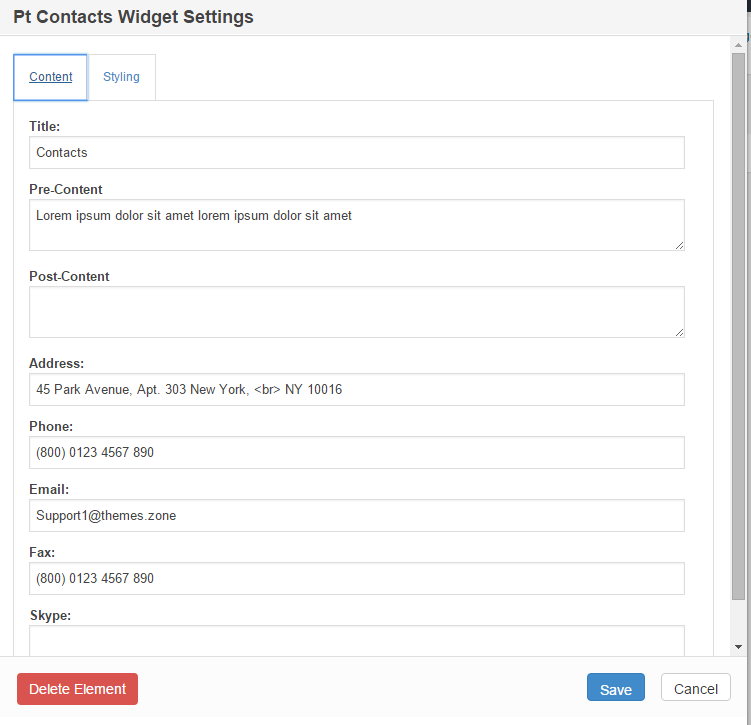
Contacts was created with the help of "PT Contacts Widget" of PageBuilder:
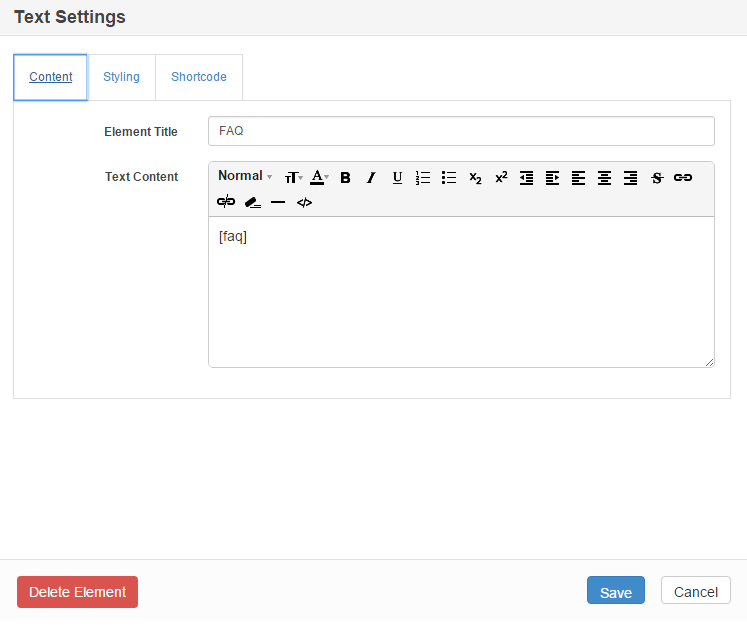
FAQ element was created with the help of "Acronix FAQ" plugin, and resembles a shortcode inside a standard "Text" widget of PageBuilder
Our sample gallery page looks like this:
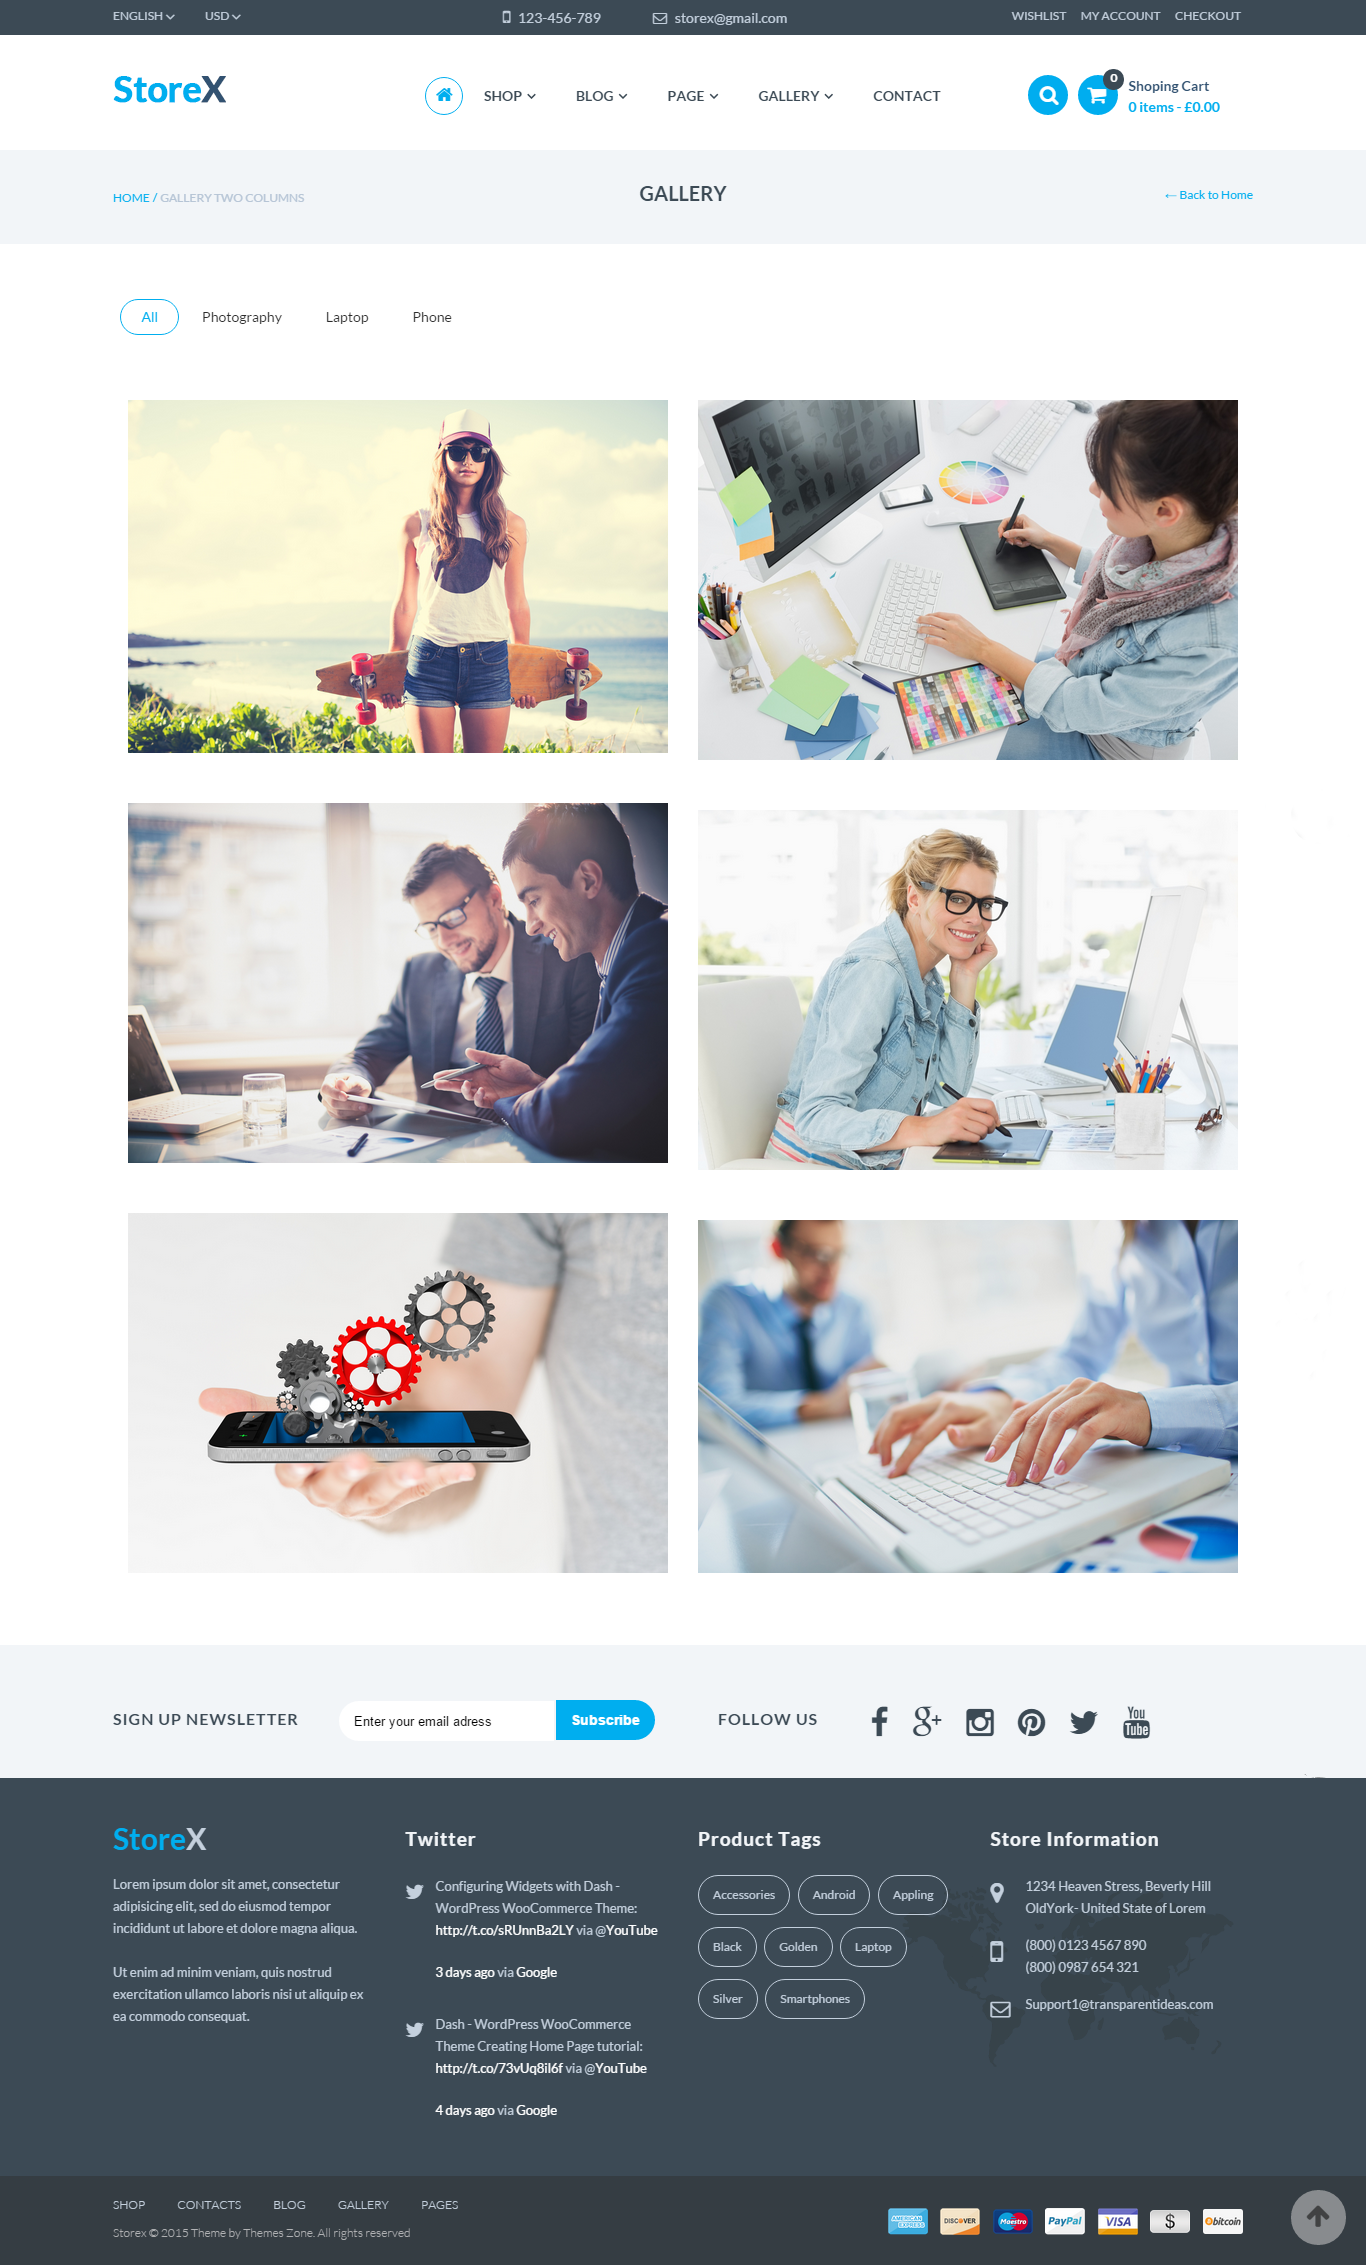
Gallery page tempate is being used for this page:
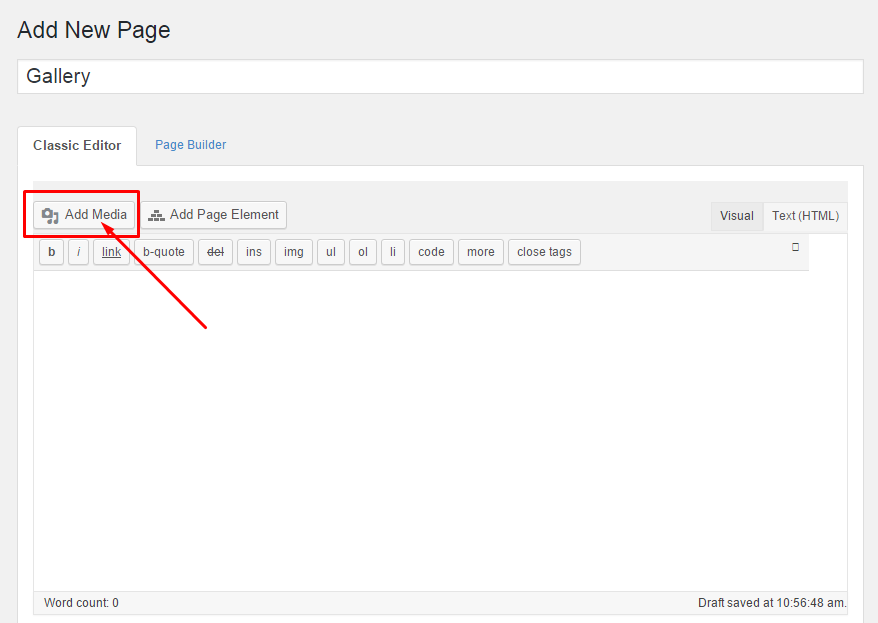
To create a gallery create a new page, switch to classic editor and click the "Add Media" button:
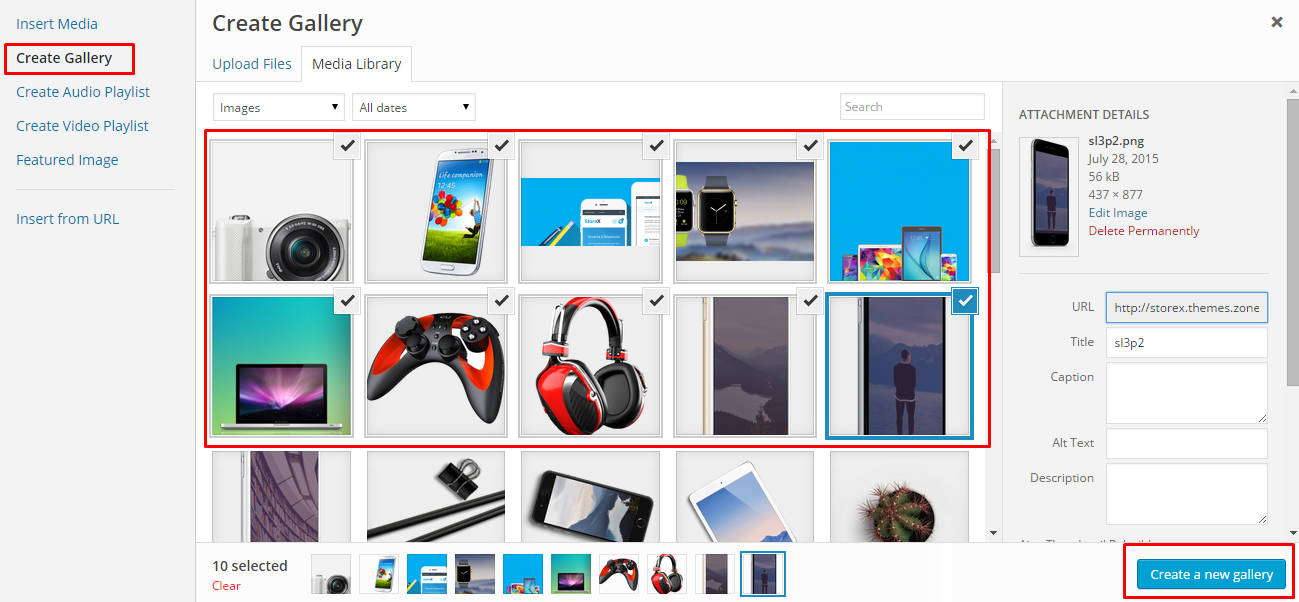
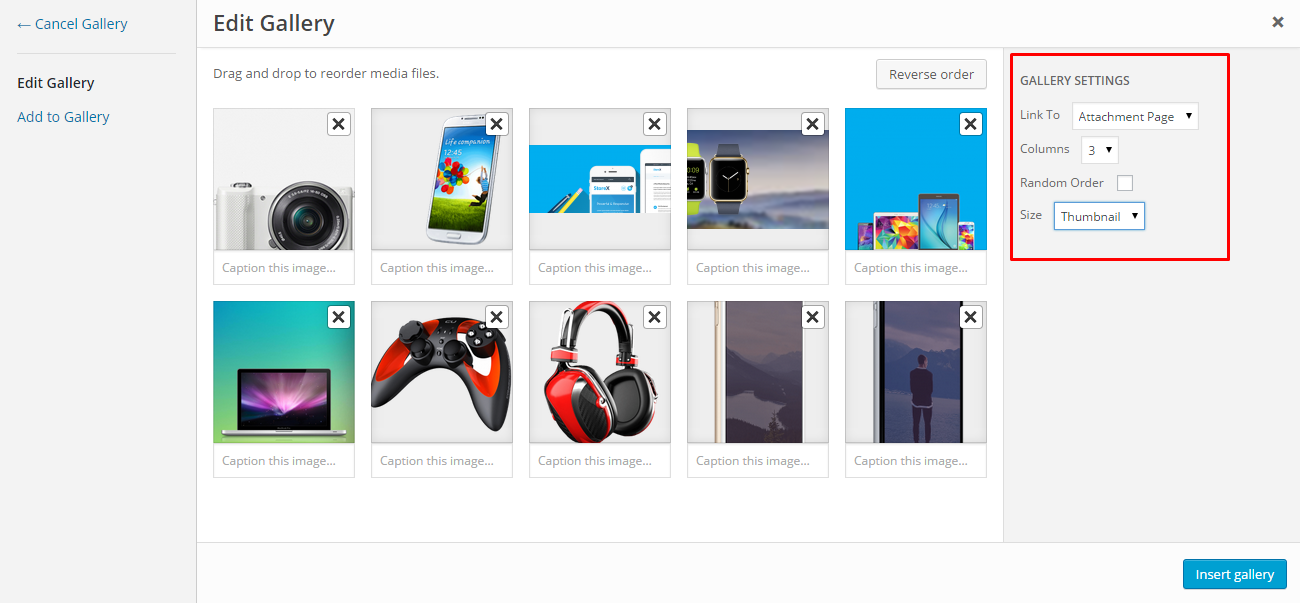
Click the "Create gallery" link and choose the images you want to use in your gallery. Then press "Create a new gallery" button at the bottom:
Choose where gallery thumbnails should link to, the number of columns (2, 3 or 4 for this theme), if you want your images in random order and select your image submnail size. Then press "Insert gallery":
After that you will see your gallery shortcode:
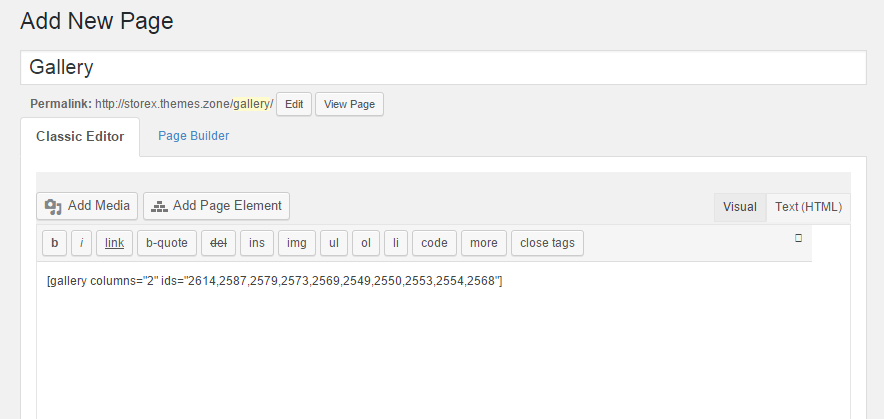
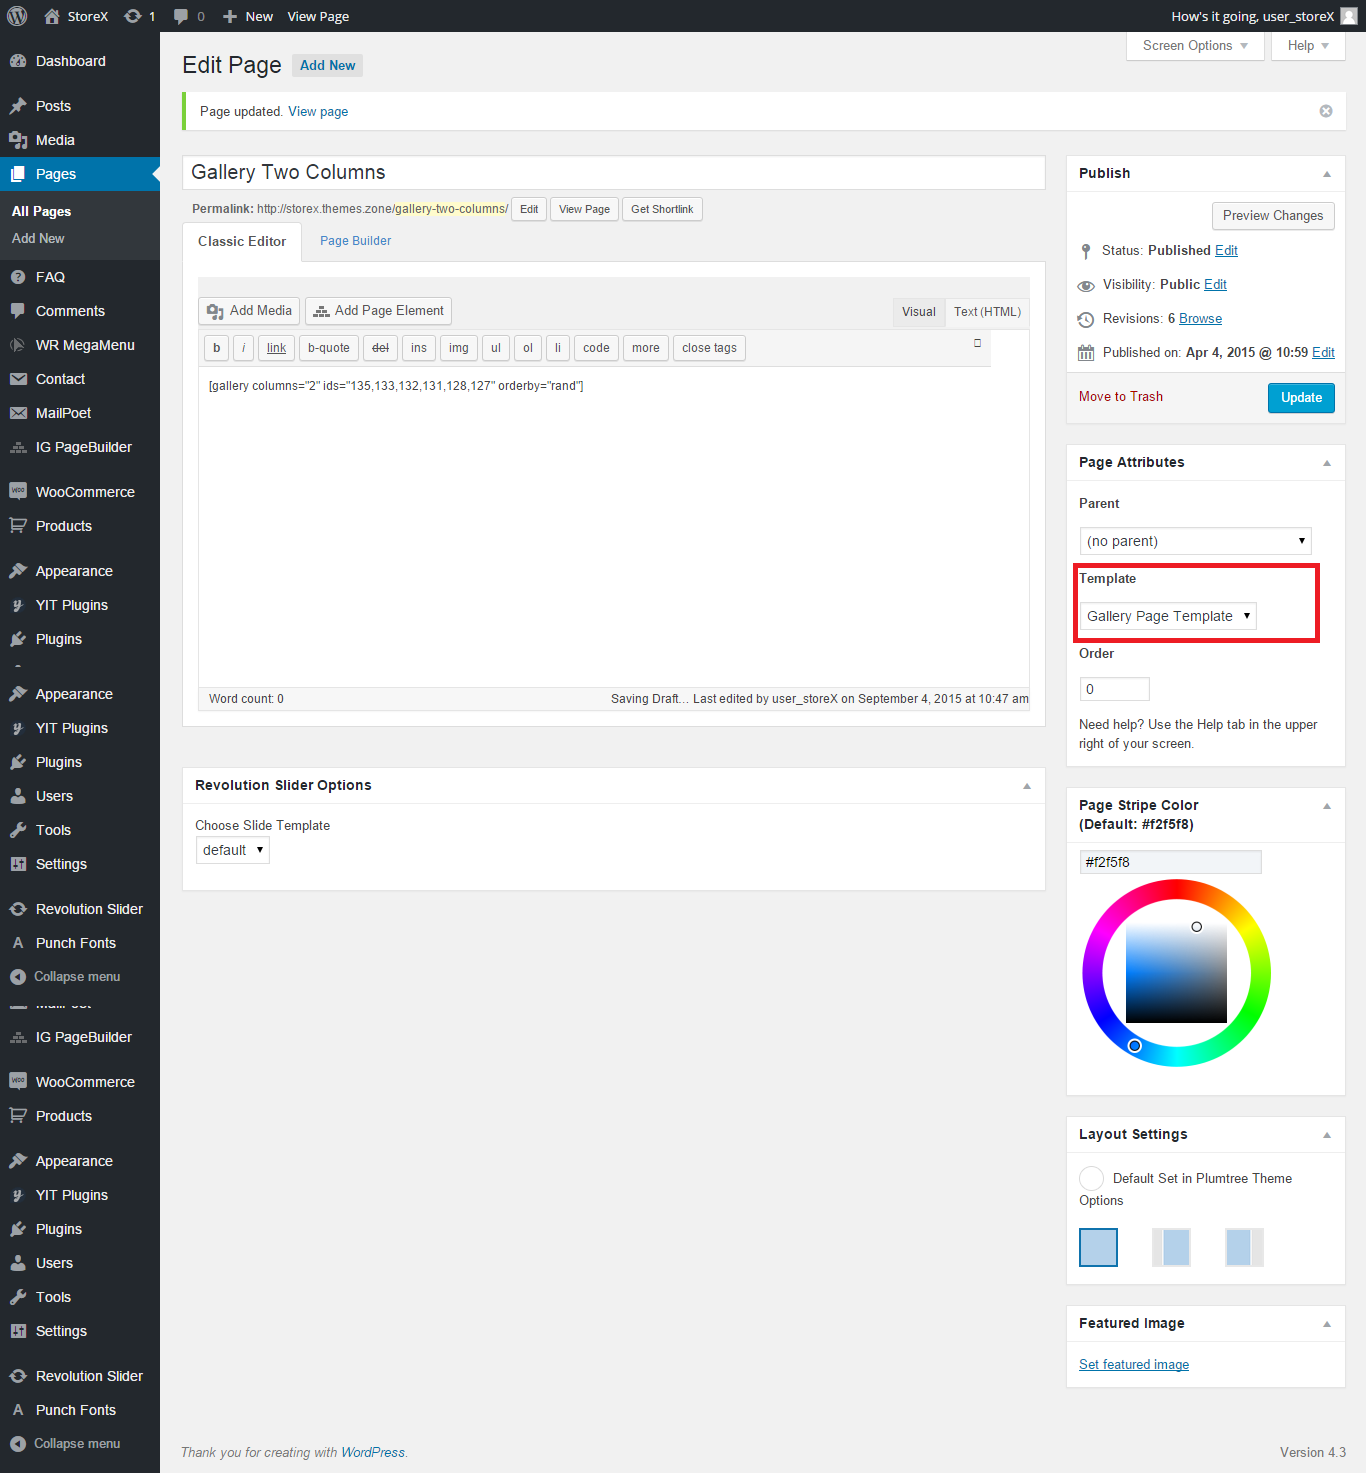
Choose "Gallery Page Template" page template and publish the page.
To create gallery filters which can be seen at our sample data Gallery pages you need to go to your Media->Library menu. Click on the image you want to participate in filtration and put a filter name in the Portfolio Filters field:
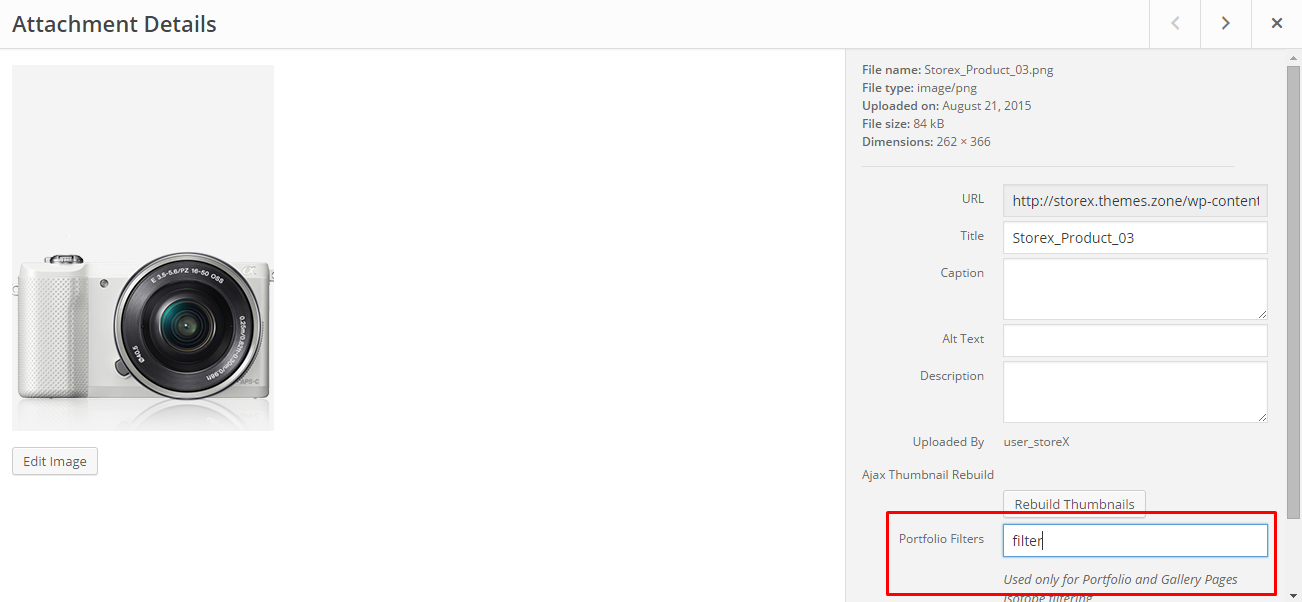
A filter with that word you entered will be created:

The map is built with the help of Google Maps widget of PageBuilder. Here's how it's setting look from the inside:
At the top of the contact form regular "Heading" and "Text" widgets are used. The contact form itself was created in "Contact Form 7" plugin and resembles a "Contact Form 7" plugin shortcode with sample contact form's id inserted in the regular "Text" widget of PageBuilder:
Contacts was created with the help of "PT Contacts Widget" of PageBuilder:
FAQ element was created with the help of "Acronix FAQ" plugin, and resembles a shortcode inside a standard "Text" widget of PageBuilder
Before reading further please read How to add Blog Posts
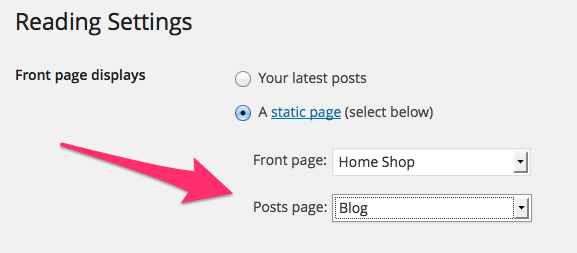
Once you add Blog Posts, you may create a blog page. To do that create an empty page, title it as Blog or News (you may title it anyway you want), publish the page. Next, go to "Settings" -> "Reading", in the "Front Page displays" section find the Posts Page select box and select a page that you have just created. Click "Save Changes" button.
StoreX Theme Offers you several ways to configure blog page, pagination, title bars etc. To do that Open Blog Settings in the Appearance->StoreX Theme Settings menu of your Dashboard:
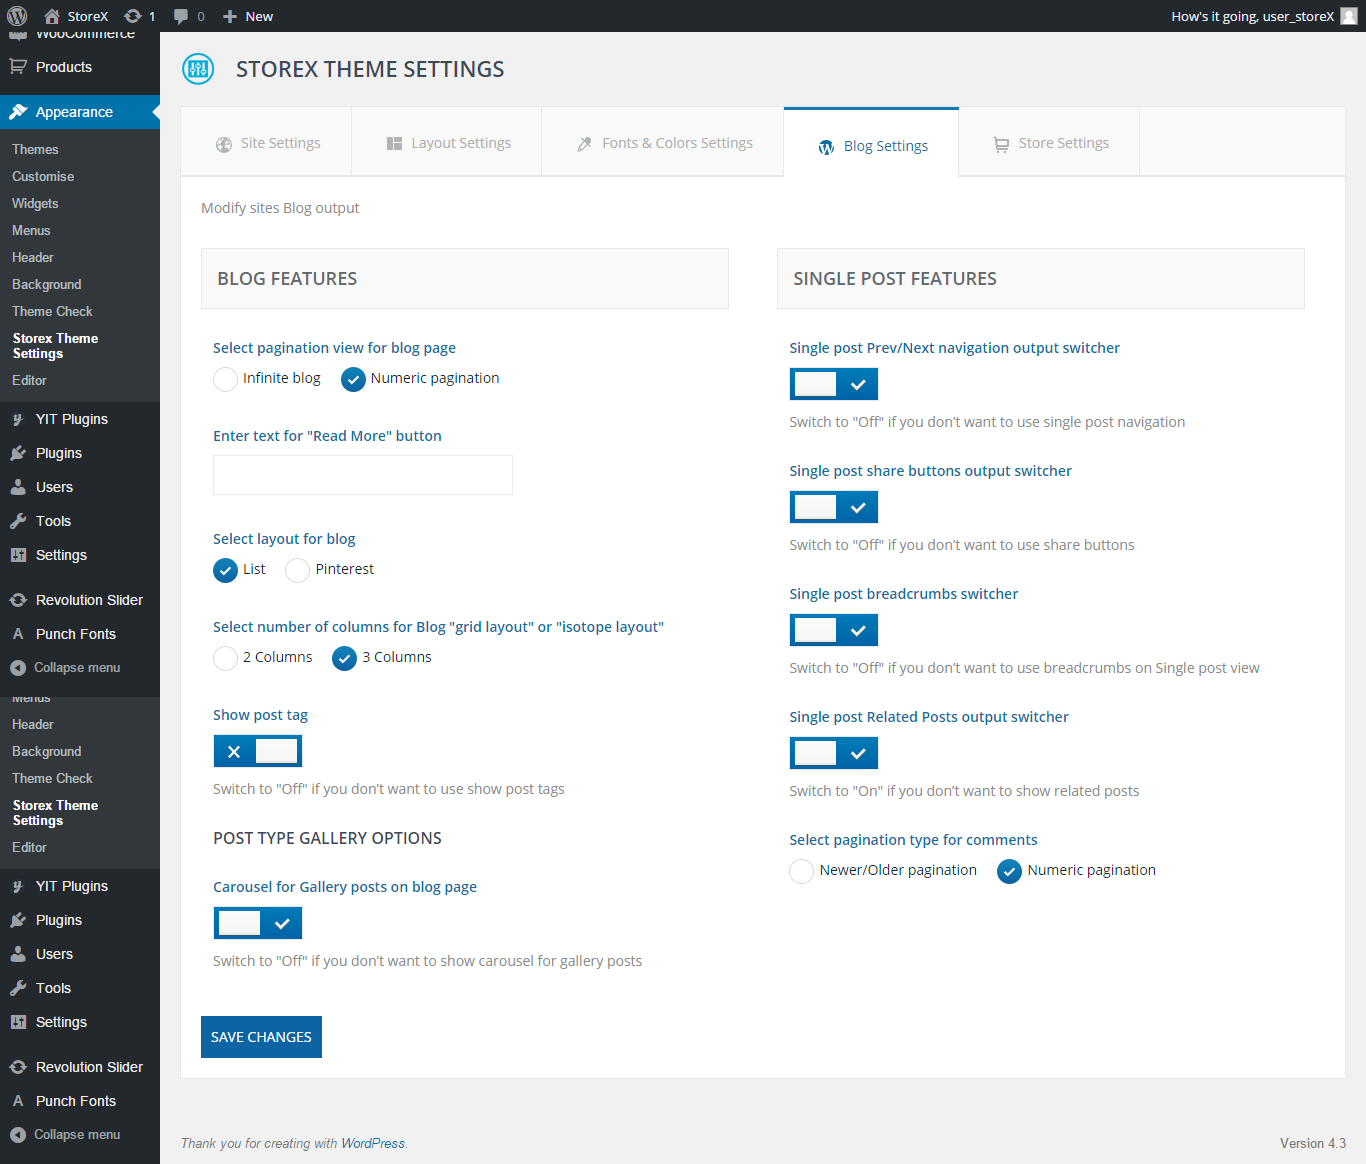
You also may turn on or off the sidebars on Blog Page, if the sidebars are turned off the blog posts will occupy 100% of the page width.
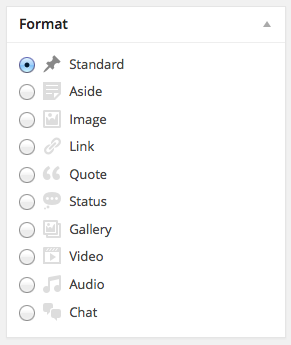
The StoreX Theme supports all available post types like video, audio, gallery and so on.
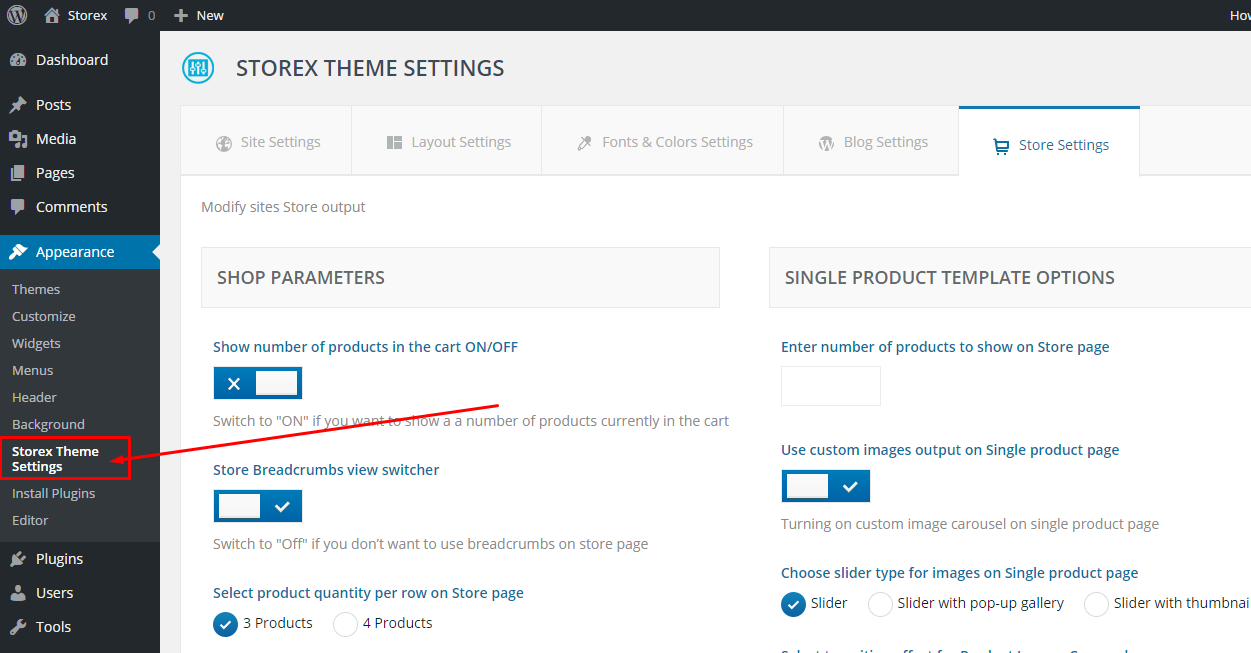
A shop page will be created once you install woocommerce or sample data for StoreX theme. Most of this page's controls are located in the Appearance->Storex Theme Settings->Store Settings menu of your Dashboard.
You can see our Sample Shop page's look and it's main elements you can influence from your dashboard on the image below:
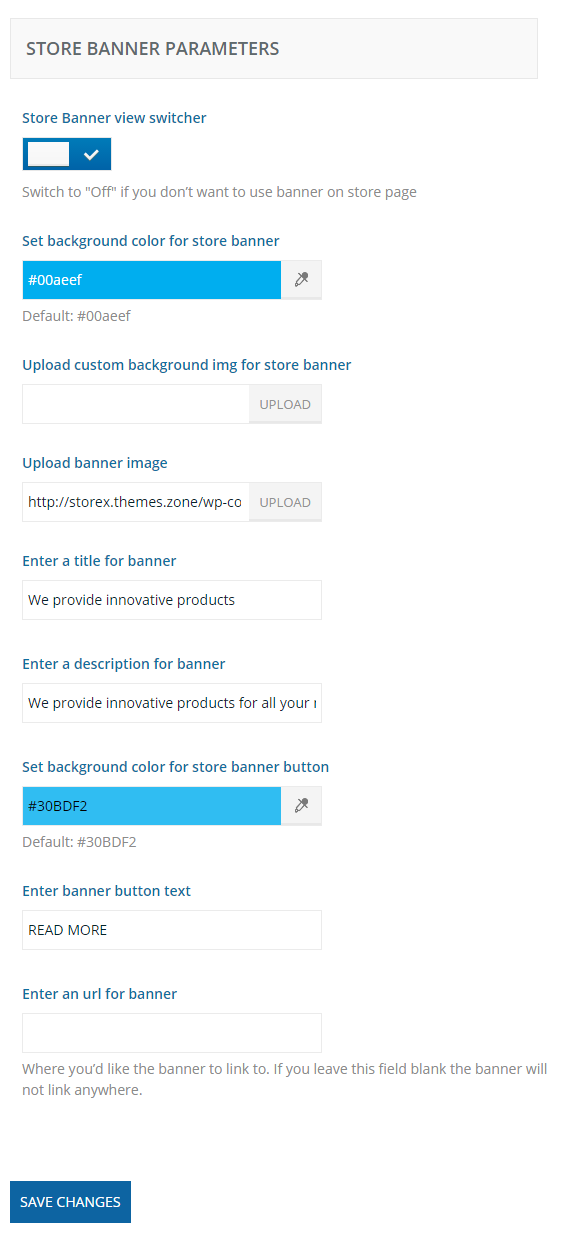
Store banner settings are located in the Appearance->Storex Theme Settings->Store Settings menu of your Dashboard:
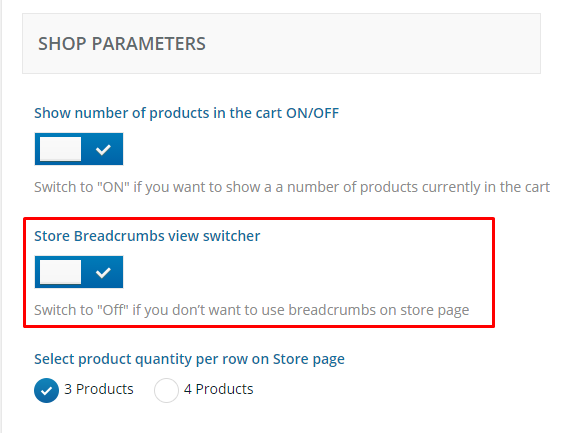
The breadcrumbs area can be switched on/off in Appearance->Storex Theme Settings->Store Settings - Store Breadcrumbs view switcher:
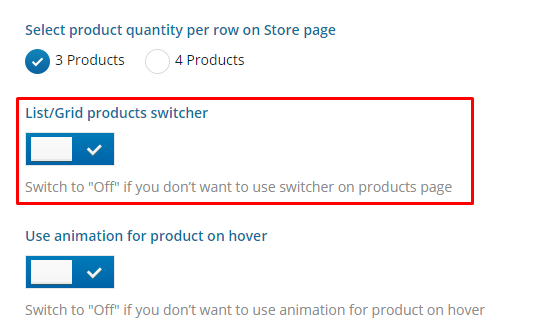
The list/grid view switcher can be turned on/off in the Appearance->Storex Theme Settings->Store Settings - List/Grid products switcher:
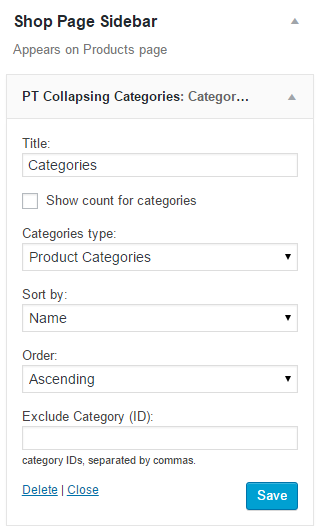
This is the categories shop filter (PT Collapsing Categories filter) located in the Appearance->Widgets->Shop Page Sidebar:
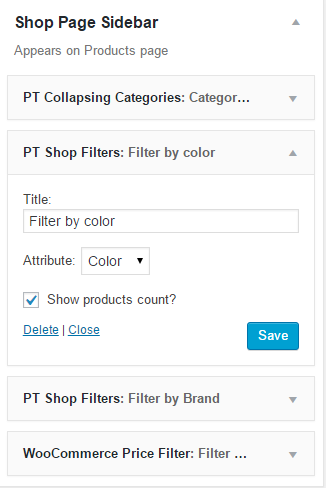
This is the PT Shop Filters filter with the color attribute selected located in the Appearance->Widgets->Shop Page Sidebar:
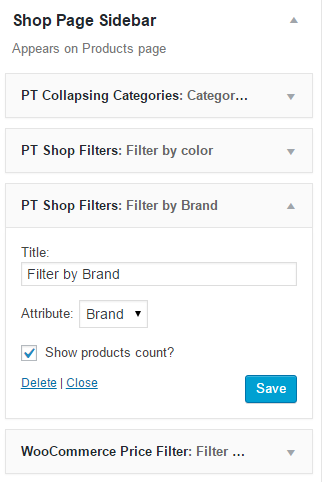
This is the PT Shop Filters filter with the brand attribute selected located in the Appearance->Widgets->Shop Page Sidebar:
This is the WooCommerce Price filter with the brand attribute selected located in the Appearance->Widgets->Shop Page Sidebar:

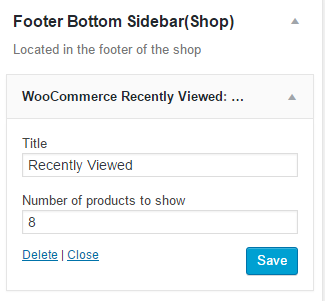
This is the WooCommerce Recently Viewed widget located in the Appearance->Widgets->Footer Bottom Sidebar(Shop):
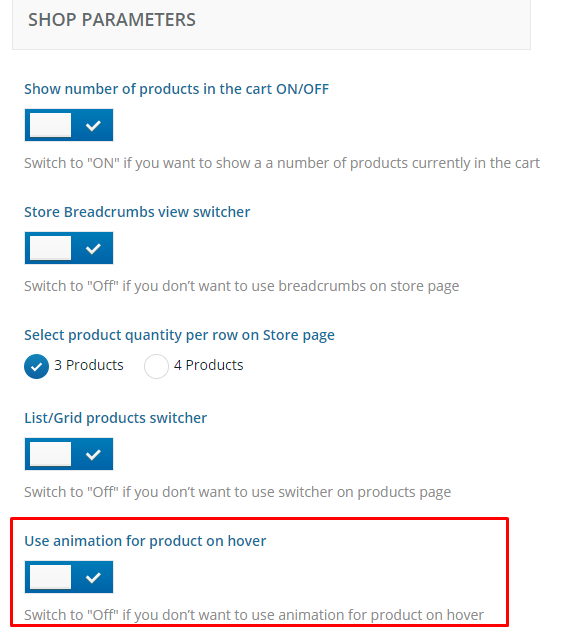
Product hover animation can be turned on/off. Use "Use animation for product on hover" switcher located in the Appearance->Storex Theme Settings->Store Settings menu to switch the hover effect between animation and fading:
StoreX Theme comes with a number of useful shortcodes that will help you build any kind of page from the components presented on the live demo of the theme
StoreX Theme offers you a set of shortcodes and plugins that will help you build different kinds of home pages for different purposes.
StoreX Theme package contains Page Builder plugin. It's a great plugin and we recommend using it as a primary tool for building your site's content.
Video tutorial below shows the basics of Page Builder usage:
Revolution Slider comes with StoreX Theme for free and should be used only with StoreX Theme. Please read the documentation and tutorials on how to use Revolution Slider here
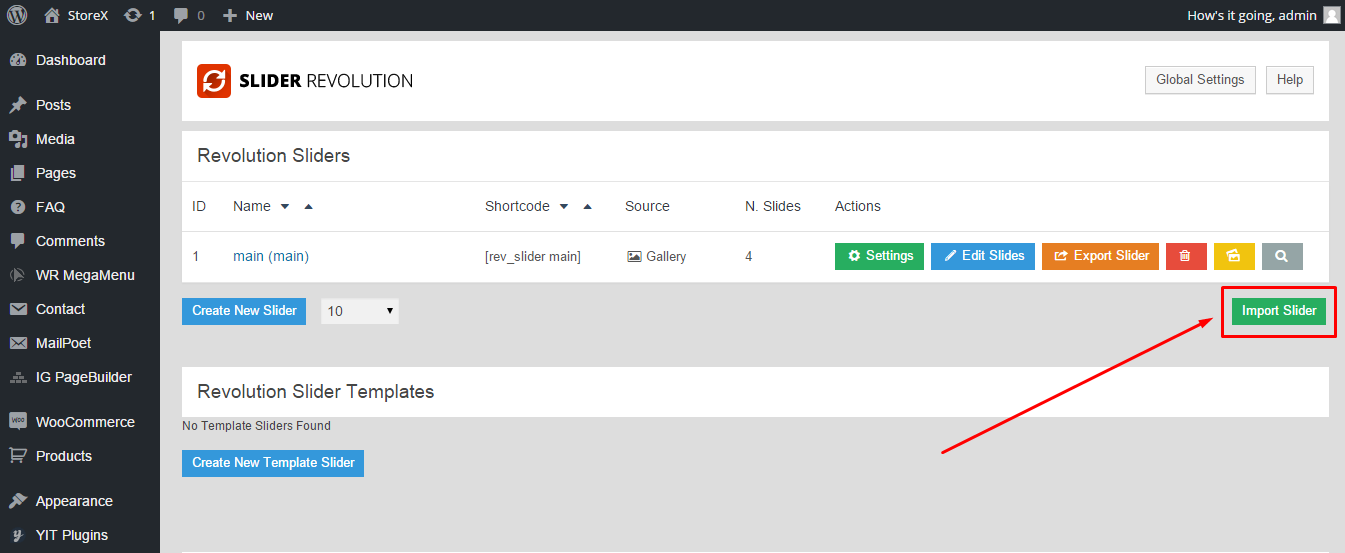
StoreX Theme package contains slider sample data that you can import. To do that go to the backend of your site, click on Revolution Slider Section, find the "Import Slider" button and upload a storex_slider.zip package that is located in SAMPLEDATA folder of the StoreX Theme package.
Once you create new or import an existing slider you will be given a shortcode that you can use do display the slider anywhere on page or blog post (See image below).

Before reading further it is recommended to read Woocommerce Getting Started Guide
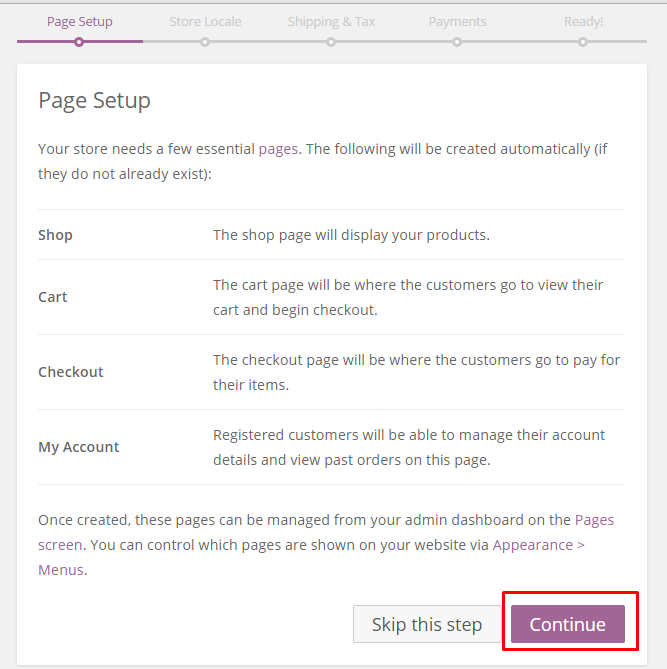
StoreX Theme is designed to fully support WooCommerce plugin. Once the plugin is activated in a new WordPress installtion (no woocommerce data in database), the plugin will prompt you to create WooCommerce Pages.

Click on "Install WooCommerce Pages" button, this will add necessary Pages to your WordPress site.
Each of the created pages contains a WooCommerce shortcode to display WooCommerce content, such as product listing, shopping cart, checkout form, customers account info and so on. Once you add products, categories, product tags you will see them displayed on the WooCommerce Pages.
It is important to get familiar with the functionality of the WooCommerce plugin before using it in the theme.
Wysija Newsletter Plugin is a comfortable way to create and manage newsletters, the plugin contains a newsletter form builder to create newsletter subscription forms, once you activate the theme and install plugins, it will be available to you through the backend of your site.
Before reading further it is recommended to watch this screencast for beginners.
The Contact Form 7 Plugin is a great contact form builder for WordPress, we have styled contact form elements to match the StoreX Theme Style, thus you can create any kind of contact forms and use them anywhere on your site.
More in-depth information about the plugin can be found at Contact Form 7 Plugin Documentation
This plugins allows you to output your twits on your site using Twitter API.
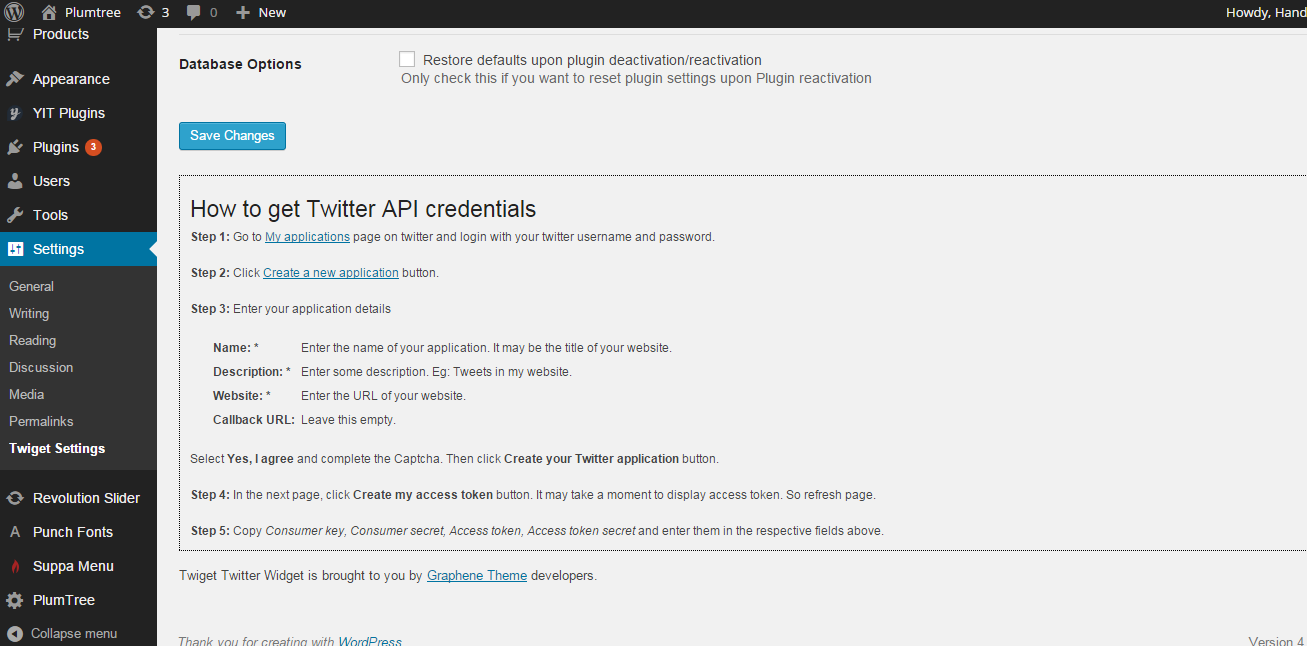
More in-depth information about the plugin can be found at Twiget Support Forum
These Plugins allow users adding products to wishlist and comparing them.
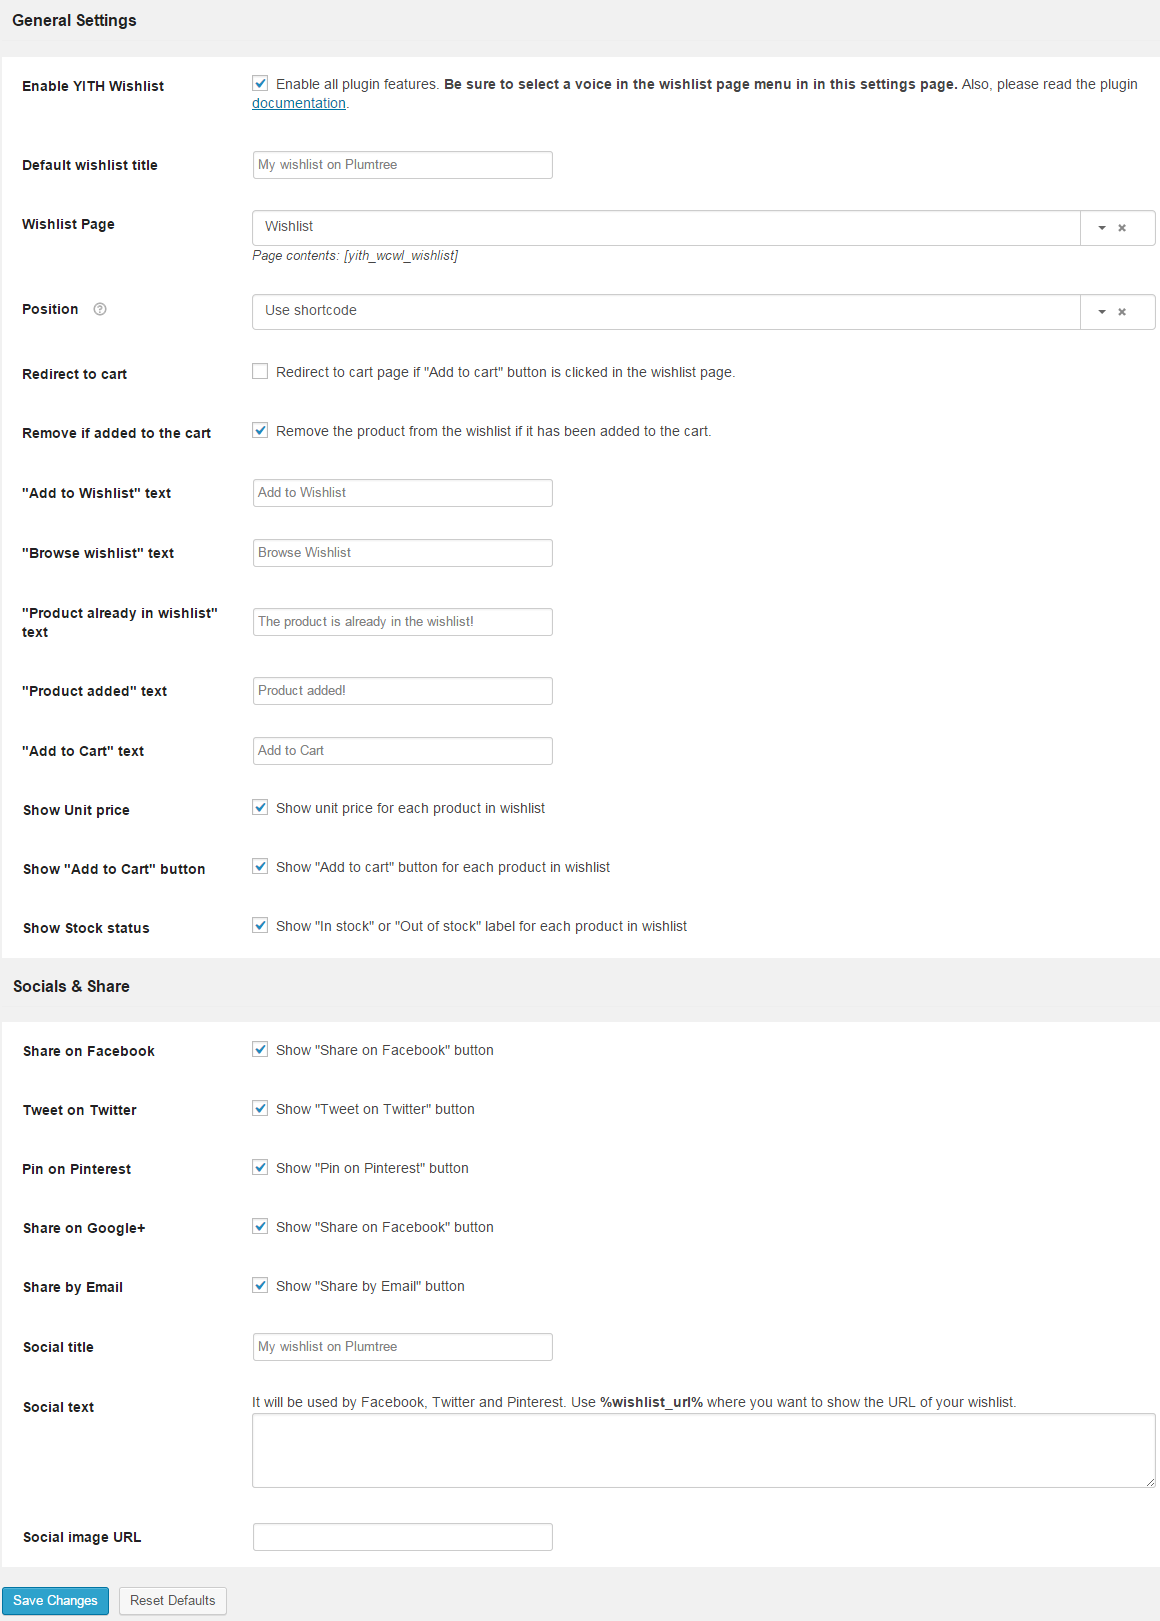
More info on how to use these plugins can be found at YITH WOOCOMMERCE WISHLIST DOCUMENTATION page and YITH WooCommerce Compare Documentation page
There's a lot on information on how to make your site work faster on the Internet. We are going to list certain general recommendations below, as well as recommendations on StoreX theme customization.
It's important to choose a nice hosting for your site. Cheap hosting usually isn't the fastest one.
WordPress, WooCommerce and our theme need resources. A $3-per-month host most likely won't have them, and your StoreX Theme experience, as well as our support duty, will turn into a nightmare.
We usually recommend WordPress hosting plans from MediaTemple to be used with our themes.
You can use caching plugins.
We recommend acuiring and activating one of such plugins after your site's development is over.
Most important ones are:
You can use CDN.
What CDN does is it creates copies of your site's static content (images, css and javascript files) on different servers around the world. When a visitor comes to your site, he or she gets these static files from the nearest server. So, let's say, North American visitors get your site's files from Canada, and European visitors get them from Norway. This increases your site's loading speed dramatically.
Here are some of the popular CDN service providers:
You can optimize your images.
Images usually are the "heaviest" part of your website and take the most time to load. Reduce your images' initial sizes online or offline before uploading them to your site.
These are some of the popular online services for image size reduction:
These are some of the popular offline applications for image size reduction:
You can optimize you database.
The essence of database optimization is deleting drafts, not used (deleted) elements, such as spam comments etc. from your database.
These are some of the popular plugins for database optimization:
You can minify your css and js
After your site's development is over you can minify all your styles and scripts
Online services for css:
Online services for js:
Plugins:
Useful links on the matter:
You can use Lazy Load libraby
With Lazy Load technology user is going to load only those images of your site which he sees in his browser window. Thus your site's load speed will decrease.
Here's the plugin: https://wordpress.org/plugins/bj-lazy-load/
If you need a human being to help you with StoreX Theme - please, create a ticket at our support system.