Get Started
Please note that this document is being updated and enriched with new paragraphs.
Thank you for purchasing Ellie Store Theme. This manual will show you how to work with your theme, how to edit it and make it a "live" website.
Recommended Server Requirements:
- PHP version 5.6 or greater
- MySQL version 5.6 or greater
- The mod_rewrite Apache module (for permalinks)
- PHP max_input_vars 3000 or greater
- WP Memory limit 64 MB or greater (128 MB or higher is preferred)
- PHP Time Limit 60 or greater
- post_max_size 32M
- upload_max_filesize 32M
- WP Multisite usage is not recommended
You can find more information on system requirements here: Wordpress Requirements, Hosting Wordpress, Woocommerce Server Requirements.
Theme Installation
                    Ellie Theme is a WordPress theme, therefore it is important to get to know WordPress CMS before you continue. If you are not familiar with WordPress please visit WordPress getting started guide

                    You may find a detailed documentation of WordPress functionality at WordPress Codex

                    Please, make sure to use original WordPress copy from wordpress.org website. Do not use the pre-installed copy provided by your hosting company.
Once downloaded, unzip the compressed folder to see the structure of package.
1. Go to THEME folder, there you will find a packaged ellie.zip folder, upload the package to wp-content/themes/ folder of your WordPress and uncompress it. Once uncompressed, the theme can be activated.
2. Go to backend section of your WordPress site (http://link_to_your_site/wp-admin/), then go to Appearance -> Themes and activate the Ellie Theme).
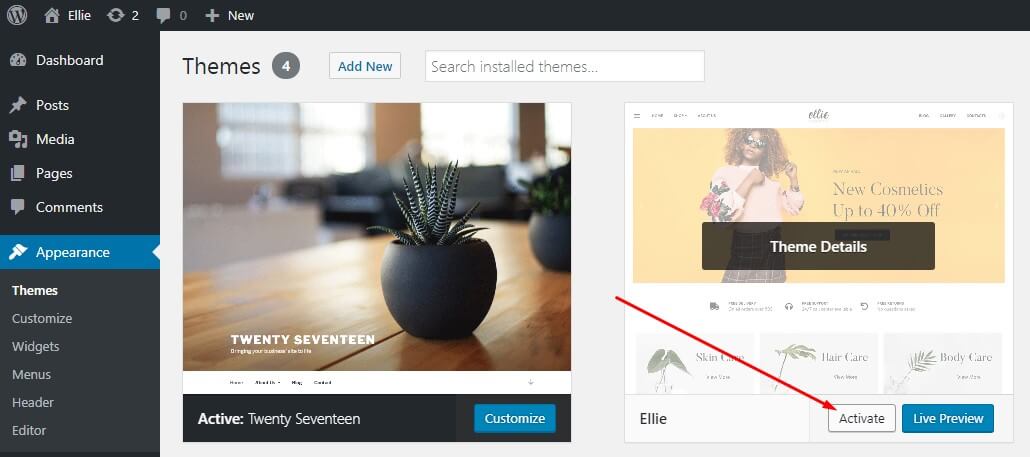
3.When you click on "Activate" button to activate Ellie Theme, you will see the a notice offering you to install required and recommended plugins. Click "Begin installing plugins", on the screen that appears, next select the plugins you want to be installed, pick "Install" in Bulk Actions select box and click "Apply" button. For optimal user experience install and activate all recommended plugins.

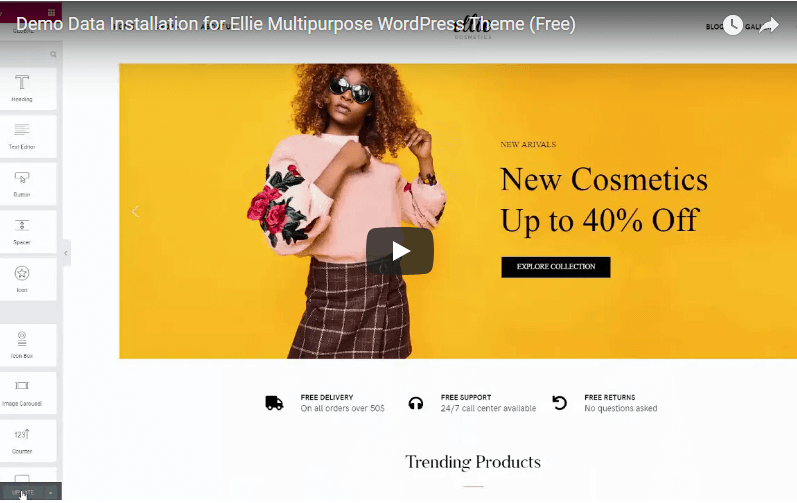
Demo Data Installation
                    Warning! It is recommended to install sample data on a clean WordPress installation!
                    Otherwise full or partial data loss may occur!
Please note that demo data which comes with our theme uses both free stock images from a variety of sources. These images and videos are not included with your theme download, and you are required to acquire an appropriate license for any image or video if you wish to use them on your site. Also, please note that even free images can't often be used for commercial purposes. Always make sure you read the details of each resource to fully understand the license it comes with.
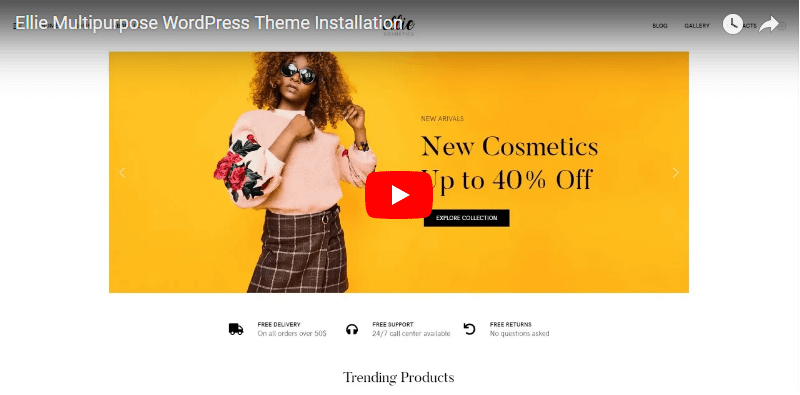
After you activate your theme and install required plugins you may want to install sample data to make your site look like Live Demo of our theme, which can be found here: http://ellie.themes.zone/. These are the steps you need to follow to install sample data:
1. Log in to your WordPress dashboard
2. Before you begin, make sure all the required plugins are activated. To begin installing sample (demo) data, in your WordPress dashboard go to Appearance -> Import Demo Data, click the Import Demo Data button once
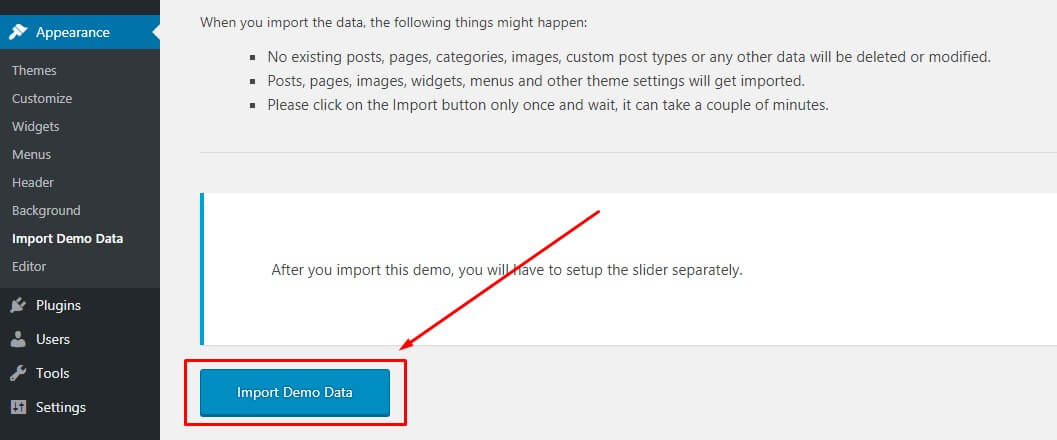
and wait till installation is over. The process may take several minutes
3. Import the demo slider (if needed). To import the demo slider in your WordPress dashboard go to Smart Slider -> press the Import slider button
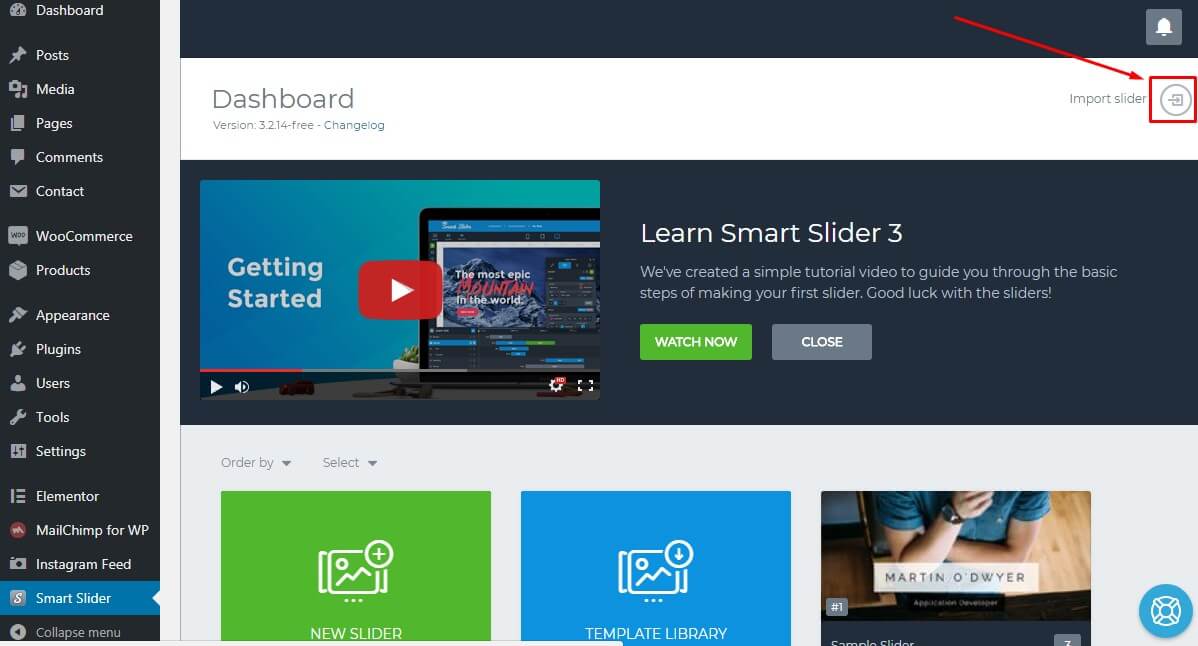
Press chooose file and choose the demo slider from the theme package you downloaded, or you can download it here separately, and press import.
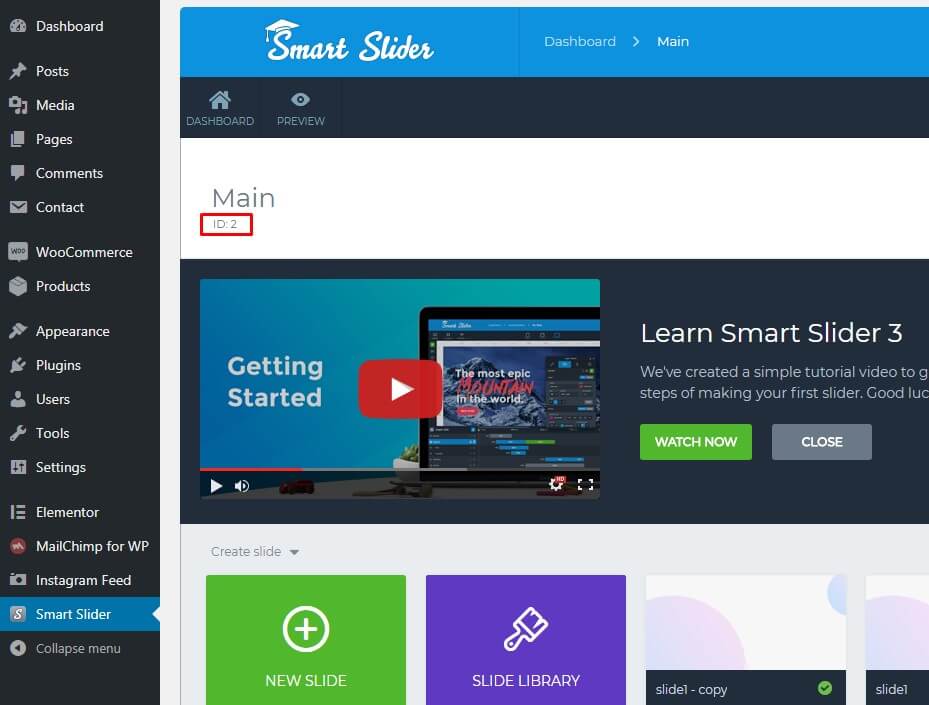
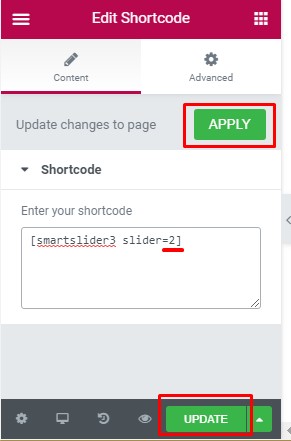
Make sure your newly imported slider id matches the slider id mentioned on the home page of your site. Most likely it won't. By default our demo home page is looking for slider with an id equal to 3, but in reality your imported slider will most likely have a different id. It is likely going to be 2. So you need to go to your imported slider settings, find it's id, then go to editing your demo home page and change the id for the slider using Elementor.
To find the demo slider's id go to Smart Slider menu in your WordPress dashboard, click on the slider you just imported, it's called Main, and look up it's id at the top:
Then open your home page, press Edit with Elementor at the wp admin bar:
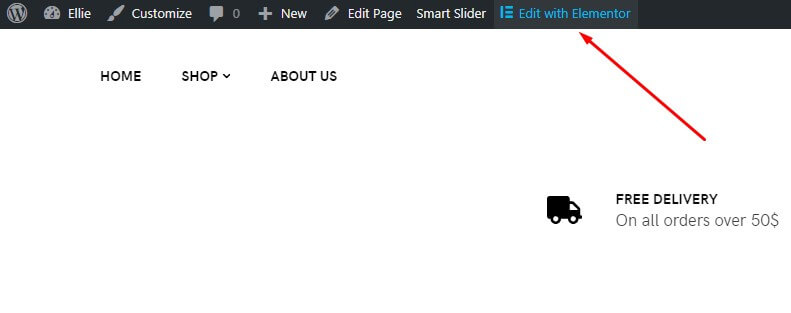
Hover your mouse pointer over the top element of the page and press Edit widget
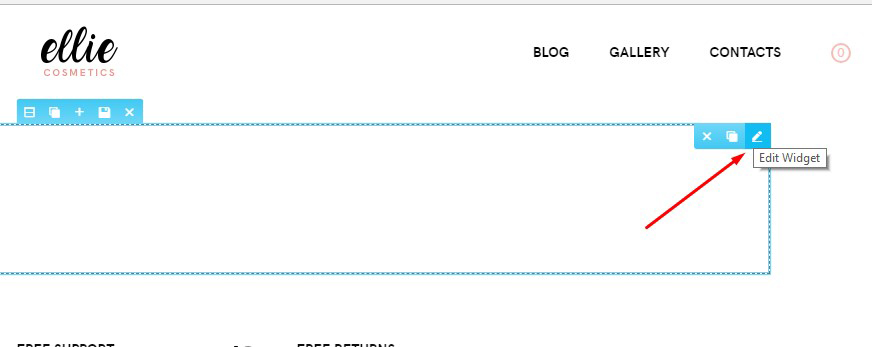
and change the slider id in the shortcode you can find at the left side of your screen from 3 to your actual slider id, 2 in our sample case. Then hit Apply and Update buttons.
The slider should appear on your home page now once you refresh it.
4. Make the Instagram feed at the bottom of the home page work (if needed). To do this login to your Instagram account in a new browser tab, then in your WordPress dahboard go to Instagram Feed, press Log in and get my Access Token and User ID button. Then go to the customize tab and set what amount of images you want to show, their paddings etc. Don't forget to save changes.
5. Add the Newsletter sigup form which can be seen in the footer of our demo site. To add it go to Appearance -> Widgets, find MailChimp Sign-Up Form widget and drag-n-drop it to the Footer Sidebar. Then go to MailChimp for WP -> Form in your WordPress dahsboard and press Save Changes. The sign up form should appear on the front end of your site after this.
6. Enable the off-canvas sidebar, which slides out from the left side of your screen. To enable it go to Appearance -> Widgets and drag the following widgets to the Off-canvas widget area: Search, Navigation menu (select Off-canvas menu in it, add title that says Menu and hit Save), and a Custom HTML element with the following code in it:
<div class="hidden-logo">ELLIE</div>
Theme Options
Ellie has a powerful set of theme options on board to make your user experience pleasant and to provide you with effective customization tools. One of importan peculiarities of Ellie theme options is that they are available through WordPress Customizer and will change depending on the page you are customizing at the moment.
Typography
Typography settings are available under Appearance -> Customize -> Typography. The section consists of a constant and a variable part, which changes depending on the page you are editing in Customizer at the moment. These are the main typography option blocks:
- Global Font
- Headings Font
- Logo Font
- Menu Font
- Off-Canvas Sidebar Widget Titles
- Accent Color
- Footer Signature Font
- Product Titles on Product Listing Page (appears when the shop page is opened in Customizer)
- Product price on product listing page (also optional)
- Add to cart button on product listing page (optional, appears on the shop page in Customizer)
- Blog Widget Titles (optional, appears on the blog page in Customizer)
- Blog Post Titles (optional, appears on the blog page in Customizer)
- Post Titles (optional, appears on single post pages in Customizer)
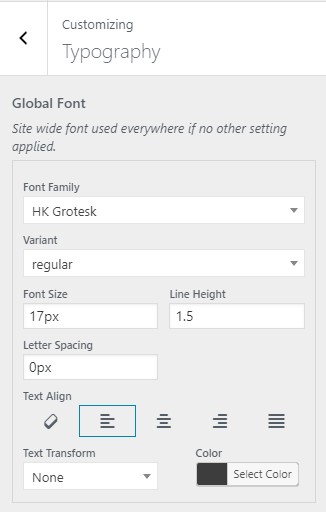
Most of these option blocks have Font family dropdown selector with Google Fonts in it, a variant of the font - regular, italic, different font weights, font size, line height, letter spacing options, text alignment, text transform, text color options. These options provide you with supreme control over fonts on your site.
Header Layout
This is a static option, and it does not change when you visit different pages of the site while using customizer. This option set provides you with useful tools which control your header appearance:
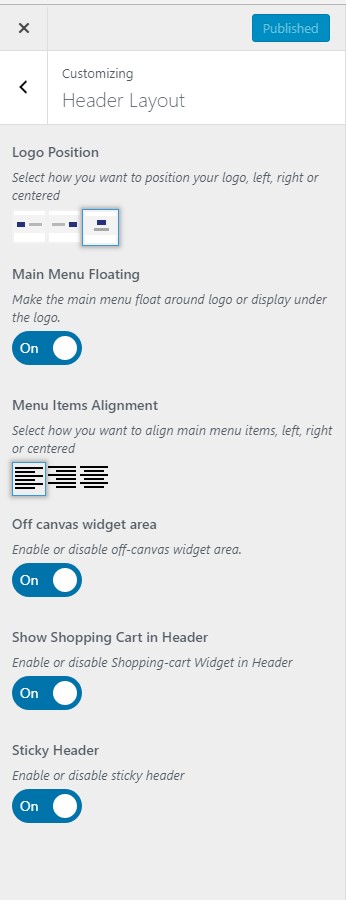
Logo position allows you to define your logo alignment - to the left of the header:
![]()
to the right:
![]()
or in the middle of it:
![]()
Main menu floating - when it's on the main menu floats around the logo, when it's off - the logo is displayed above the main menu, like this:
![]()
Menu items alignment aligns main menu items to the left, to the right, or in the middle of the header
Off-Canvas widget area switcher enables and disables Off-canvas widget area which slides from the left side of the screen
Show shopping cart in header switcher enables and disables shopping cart widget in the header
Sticky Header switcher enables and disables sticking of the header to the top of your browser screen when site pages are being scrolled down. Please note that sticky header appears on mouse hover and it not visible all the time!
Theme Layout
This option defines your sidebar position - left, right, or no sidebar, for 3 major groups of your pages: static pages, such as home page, about us page, contacts page etc., blog pages, such as blog arhive and single blog post, and shop pages, such as shop archive and single product page.
Footer Layout
Show/Hide Footer Sidebar Section switcher defines whether to enable the widgitized are of the footer, where the e-mail signup form is located on our demo site.
Blog options
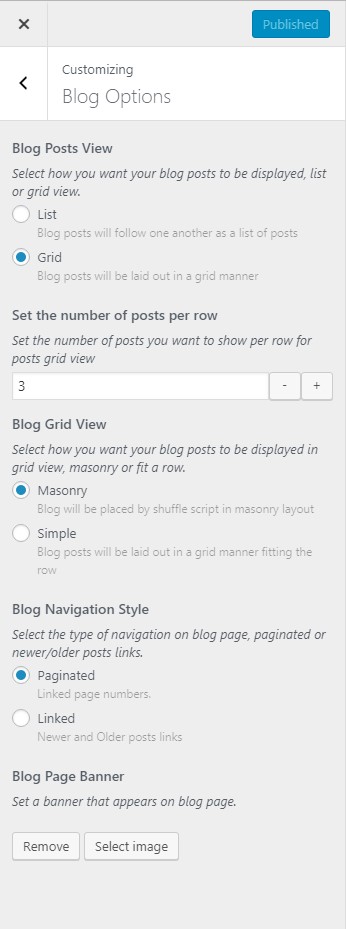
This set of theme options is visible only when you select your blog page in customizer.
Blog Posts View helps you to select how you want your blog posts to be displayed, list or grid view
Set the number of posts per row allows you to set the number of posts you want to show per row for posts in grid view
Blog Grid View allows you to select how you want your blog posts to be displayed in masonry grid, or in simple grid to fit a row
Blog Navigation Style allows you to select the type of navigation on blog page, paginated or newer/older posts links
Blog Page Banner allows you to set a banner that's shown at the top of the blog page
Post Options
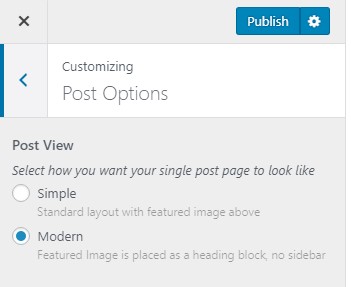
This set of theme options is visible only when you select your single blog post page in customizer.
Post View selector allows you to choose between simple blog post layout, and modern blog post layout, where the featured image is placed as a heading block, and there's no sidebar.
Shop Page Options
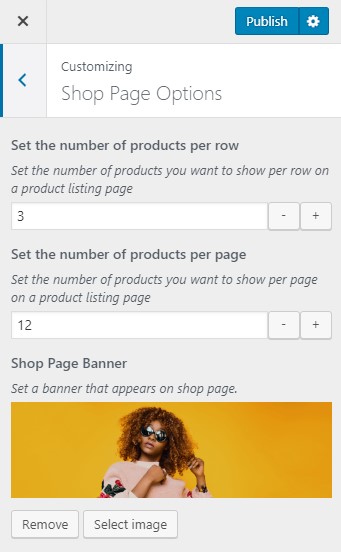
This set of theme options is visible only when you select your shop page in customizer.
Set the number of products per row allows you to set the number of products you want to show per row on a product listing page, from 2 to 5
Set the number of products per page allows you to set the number of products you want to show per page on a product listing page
Shop Page Banner allows you to set a banner that appears at the top of the shop page
Product Page Options
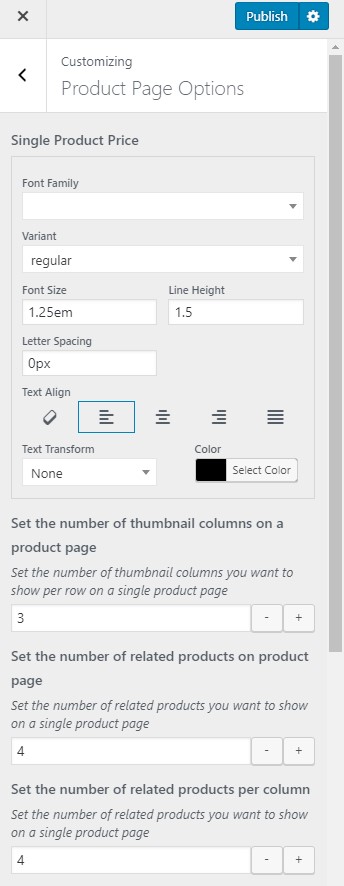
This set of theme options is visible only when you select your single product page in customizer.
Single Product Price provides you with various font-related settings for product price
Set the number of thumbnail columns on a product page allows you to set the number of thumbnail columns you want to show per row on a single product page
Set the number of related products on product page allows you to set the number of related products you want to show on a single product page
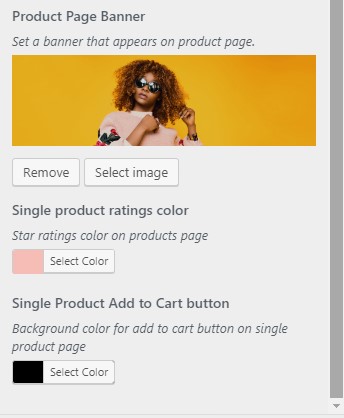
Product Page Banner allows you to set the banner that appears at the top of the product page.
Single product ratings color colors star ratings on products page
Single Product Add to Cart button allows to change background color of this button
Site Identity
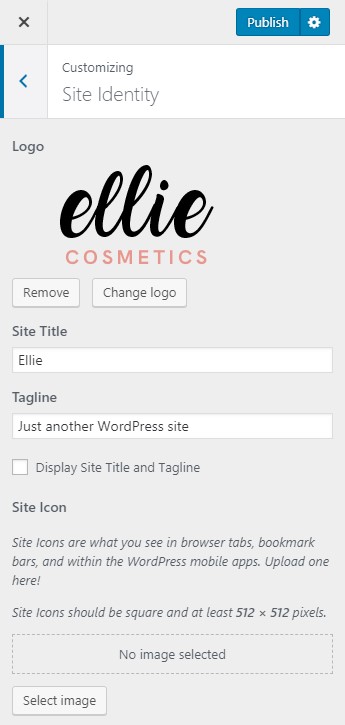
Site identity allows you to change your logo, site title, tagline, site icon
Colors
This option allows you to change background color for the whole website based on Ellie
Header Image
This option allows you to set a header image that will appear on your home page and your blog archive page
Background Image
This option allows you to set a background image for the whole site and position it
Theme Customization
Please note that theme support does not include services to modify or extend the item beyond the original features, style and functionality. For customization services that will help you tailor the item to your specific requirements, it is recommended that you contact our support team to see if we are going to be able to privately offer you paid customisation services. You can also hire a third-party developer to customize the theme for you.