Introduction
Please note that this document is being constantly updated and enriched with new paragraphs
Thank you for purchasing a Clickboutique Fashion Store Premium Theme. This manual will show you how to work with your theme, how to edit it and make it a "live" website.
If you have any difficulties or stumbled upon a bug please contact us at Our Support Page we offer one on one personal support
Get Clickboutique WordPress ThemeHardware Requirements:
- PHP version 5.6 or greater.
- MySQL version 5.6 or greater.
- The mod_rewrite Apache module (for permalinks).
More Information you can find here: Wordpress Requirements, Hosting Wordpress, Woocommerce Server Requirements.
Changelog:
LATEST - ver. 2.2:
- STYLES: minor changes;
- GLOBAL: Woocommerce ver. 2.6 compatibility added;
ver. 2.1:
- STYLES: minor changes;
- GLOBAL: custom product badges output added;
ver. 2.0 - Initial Release
Package Contents
The package of the Clickboutique Fashion Store Theme contains everything that you need to customise the look and functionality of the theme
After unzipping the template package you will find 4 folders: "THEME", "PLUGINS", "DOCUMENTATION" and "SAMPLEDATA".
THEME folder contains the Clickboutique Fashion Store theme, PLUGINS folder contains the plugins that you may use with the theme, DOCUMENTATION folder contains this particular document, SAMPLEDATA contains the data that was used for the live demo of the theme located at http://clickboutique.themes.zone/
Below is the package structure:
-
THEME – contains the Dash Store theme.
- clickboutique.zip
-
PLUGINS - contains the plugins that you may use with the theme.
- contentbuilder.zip
- jck-woo-quickview.zip
- revslider.zip
- twiget.zip
- very-simple-contact-form.zip
-
SAMPLEDATA - contains the data that was used for the live demo of the theme.
- sample-data-installer.zip
- dummy-data.zip
THEME folder contains Clickboutique theme, this folder have to be uploaded to wp-content/themes/ folder of your WordPress. The main CSS file of the theme is located in the clickboutique folder.
First Steps
Clickboutique Theme is a WordPress theme, therefore it is important to get to know WordPress CMS before you continue. If you are not familiar with WordPress please visit WordPress getting started guide
You may find a detailed documentation of WordPress functionality at WordPress Codex
Installing the Theme
Once downloaded, unzip the compressed folder to see the structure of package.
Important! Please, make sure to use original WordPress copy from wordpress.org website. Do not use the pre-installed copy provided by your hosting company.
1. Go to THEME folder, there you will find a packaged clickboutique.zip, upload the package to wp-content/themes/ folder of your WordPress and uncompress it. Once uncompressed the theme can be activated.
2. Go to backend section of your WordPress site (http://link_to_your_site/wp-admin/), then go to Appearance -> Themes and activate the Clickboutique theme.

3. When you click on "Activate" button to activate Clickboutique Theme, you will see the a notice offering you to install required and recommended plugins. Click "Begin installing plugins", on the screen that appears, next select the plugins you want to be installed, pick "Install" in Bulk Actions select box and click "Apply" button. For optimal user experience install and activate all recommended plugins.

Installing Sample Data
Warning! You should not install sample data on an existing website - it's database will be deleted and replaced with sample one. You also should not run sample data installer on a WordPress MultiSite - the database for all you overwritted as well. As long as you are using one database for several sites all of these sites may be lost.
Warning! Please note that images used on our live demo cannot be used on your live sites build with the help of our theme. You should only use properly licensed images on your live projects. Images you see on our live demo are not sold with the theme and therefore are not included in the theme package.
After you activate your theme and install required plugins you may want to install sample data to make your site look like Live Demo of our theme, which can be found here: http://clickboutique.themes.zone/. You also need to donwload the "uploads" folder (click this link to download the uploads folder), unzip it and upload it to your wp-content folder. After that install and activate sample data installer plugin. It can be found in "Sample data" folder of you theme package.
Video tutorial on how to install Sample Data:
- The widget-settings-importexport.zip (plugin) used in the video can be downloaded here.
- .json file for the widget is located in the "dummy-data" folder -> clickboutique_widget_data.json
- .xml file for the widget is located in the "dummy-data" folder -> clickboutique_dummy_content.xml
Creating a child theme
We strongly recommend you to create a child theme and use it for customizing Clickboutique Theme. This way you can update Clickboutique Theme and it's plugins without fear of loosing implemented changes.
You can download Child Theme for Clickboutique here
Example of functions.php of a child theme:
<?php
/ *Clickboutique theme child functions. */
add_action('wp_enqueue_scripts', 'clickboutique_child_theme_enqueue_styles');
function clickboutique_child_theme_enqueue_styles() {
	wp_enqueue_style( 'parent-style', get_template_directory_uri().'/style.css' );
	wp_enqueue_style( 'child-style', get_stylesheet_directory_uri().'/style.css' );
}
Theme Options
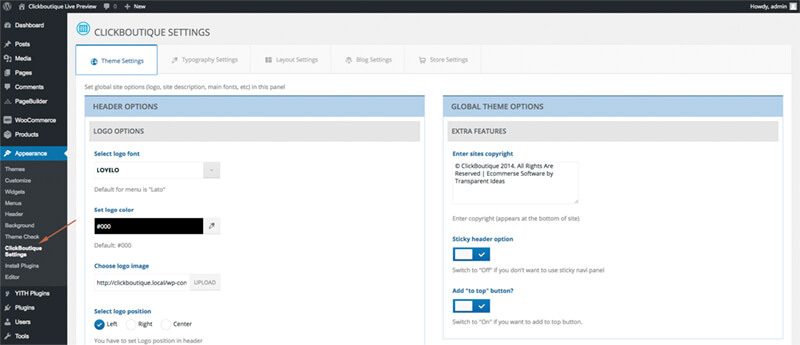
1. Theme Settings:
- Select logo font – choose font for text logo;
- Set logo color – choose color for text logo;
- Choose logo image – upload an image for your logo;
- Select logo position – change position for your logo in header;
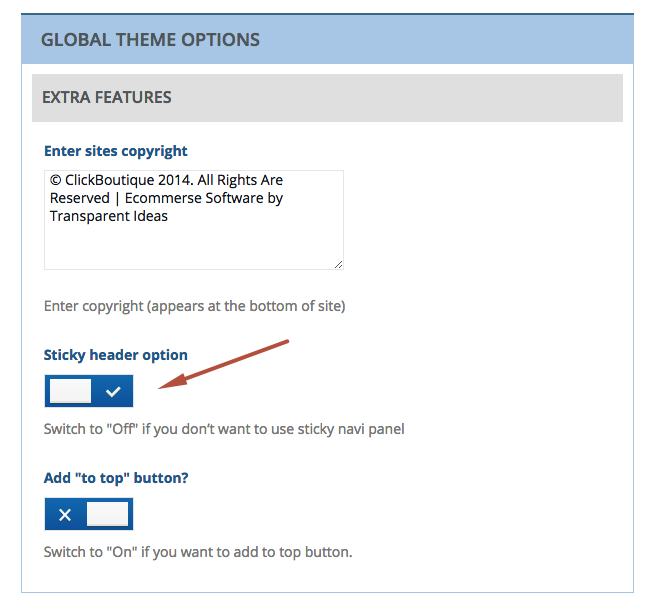
- Enter sites copyright – Enter copyright (appears at the bottom of site);
- Sticky header option – you can enable sticky nav menu here;
- Add "to top" button? – you can add special button that scrolls up to the top of the site when clicking;
2. Typography Settings:
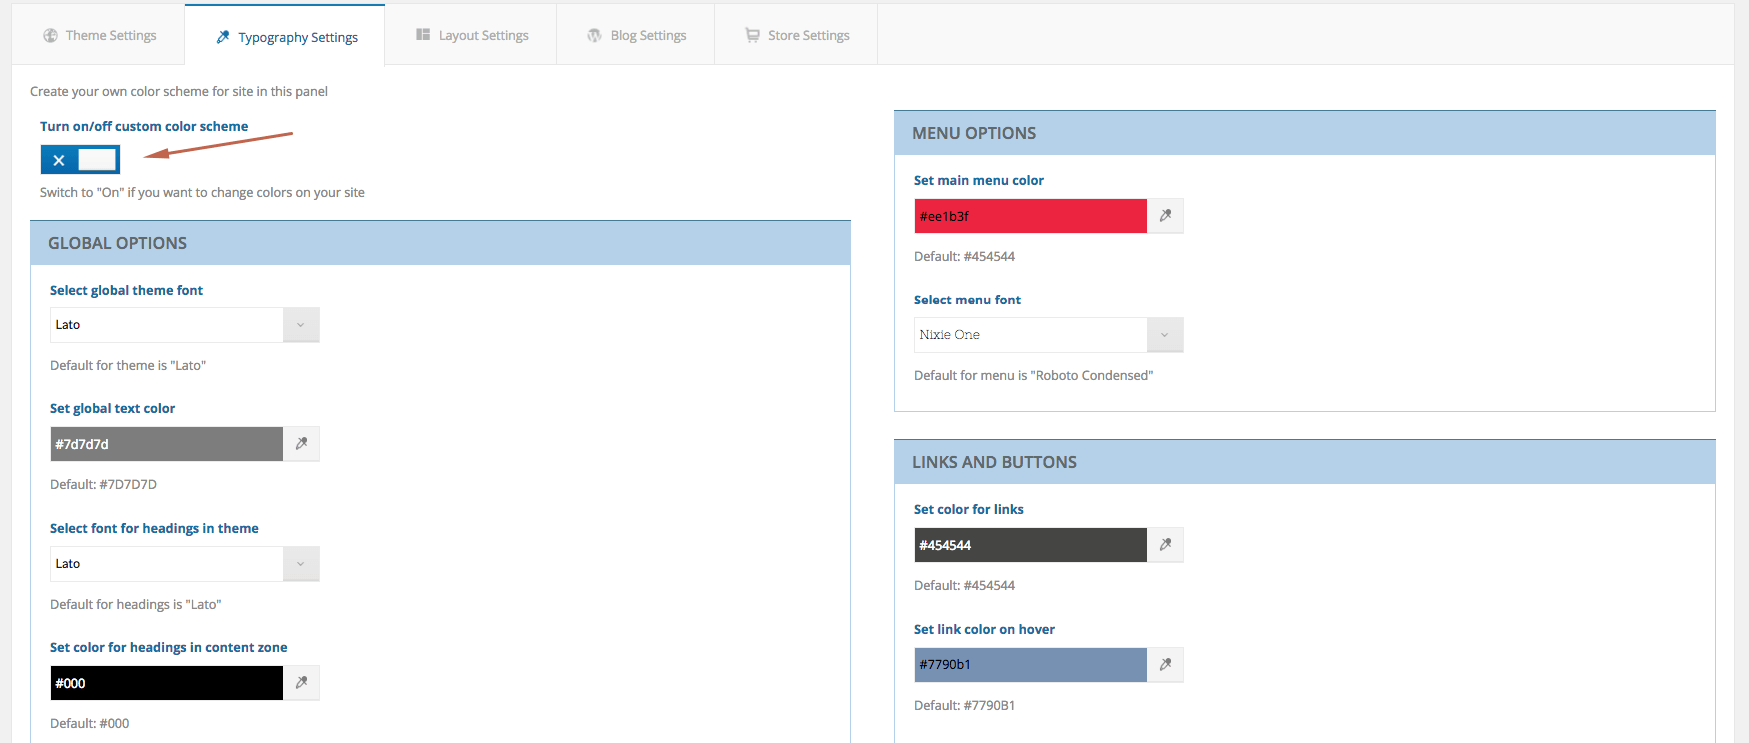
Here you can change color scheme for your site. Also you can change fonts for main navigationn and headings.
Attention! Switch to "On" custom color sheme switcher if you want to add color changes.
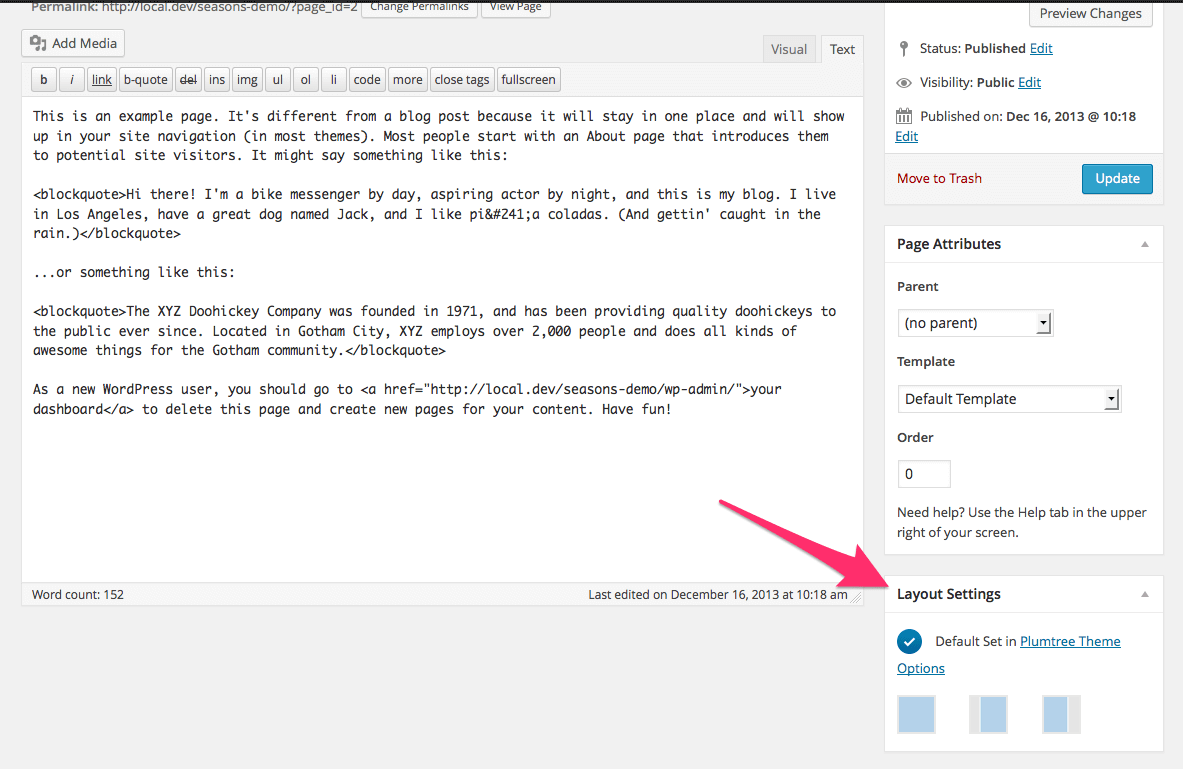
3. Layout Settings:
ClickBoutique Theme offers you a dynamic way of sidebar positioning. You can set both global and per page sidebar positions.
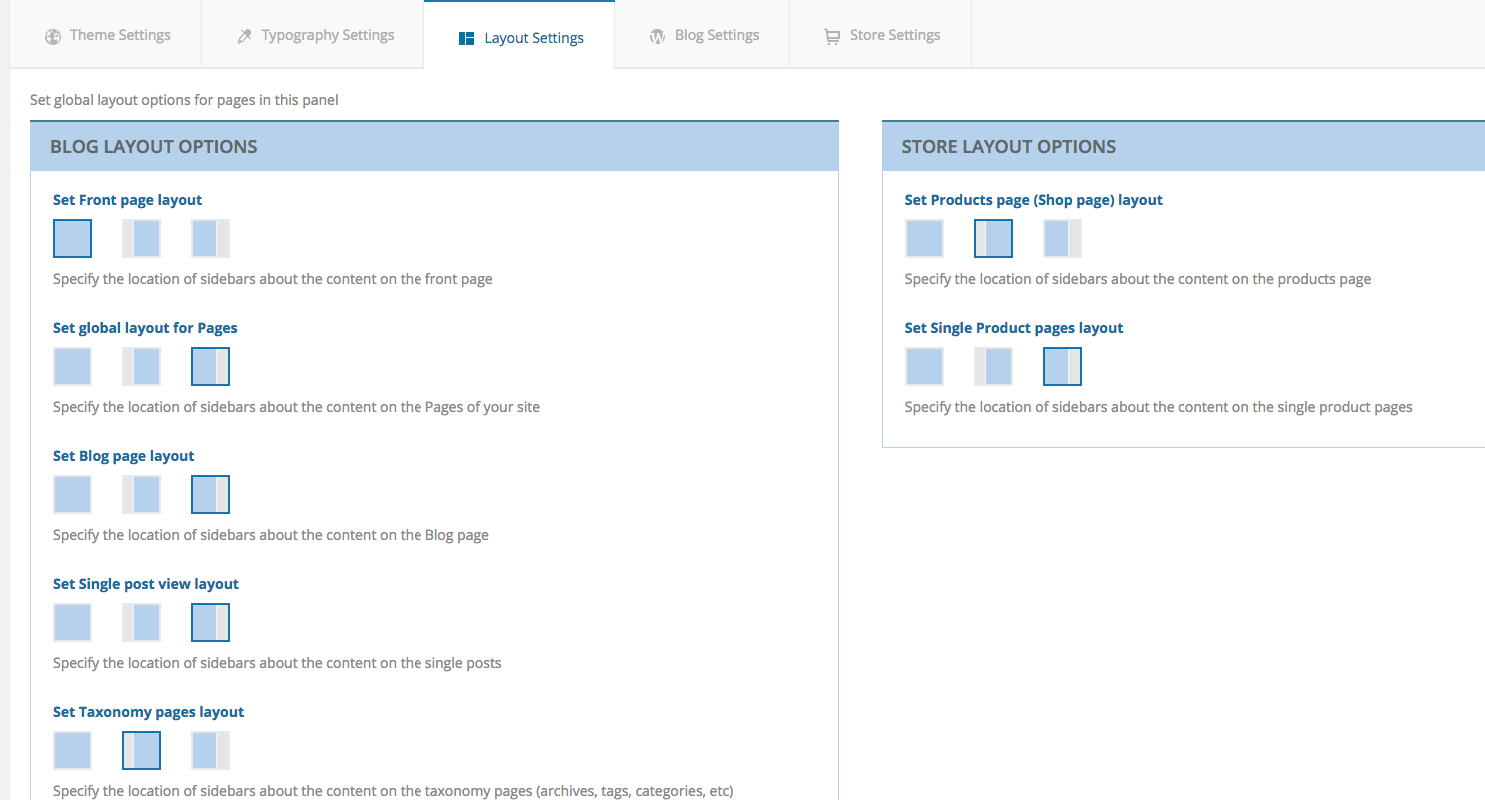
The "Layout Settings" panel lets you set global layout settings for each type of page. You can set sidebar position to left, right or with out the sidebar. Front Page Layout lets you set the sidebar position for the Home Page, "Global layout for Pages" setting will set global value for all static pages present on the site. The "Blog Page Layout" settings will set sidebar position for "Blog" pages (Page that has blog posts listed). "Single Post View" controls the position of a sidebar on single post page (the Single Post page). Store Layout options lets you set sidebar position on Store Pages (Product Listing Page, Single Product Page).
You also can set Sidebar Position for each created Page. Open a static page for editing in the backend of your site, there you will find a "Layout Settings Widget", set the sidebar position in that widget and the global value for the sidebar position will be overridden.
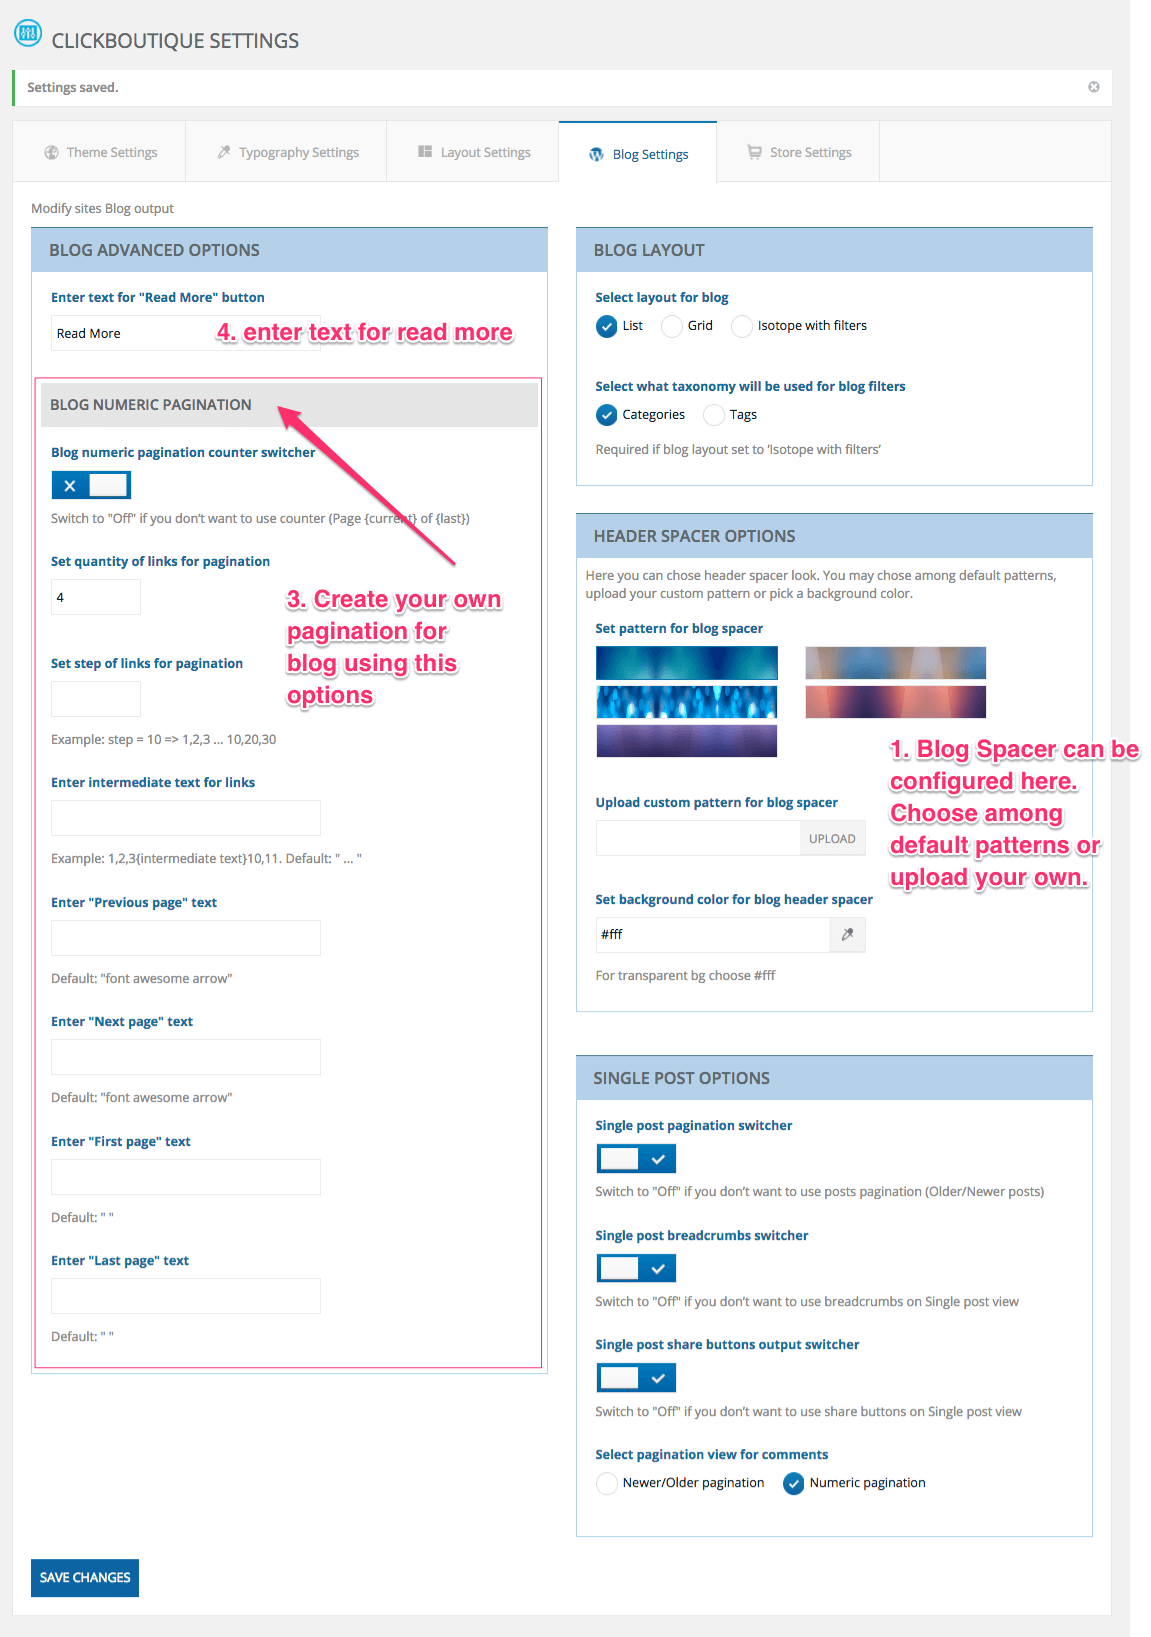
4. Blog options:
- Enter text for "Read More" button – specify custom "read more" text;
- Blog numeric pagination – here you can customise pagination output for blog pages;
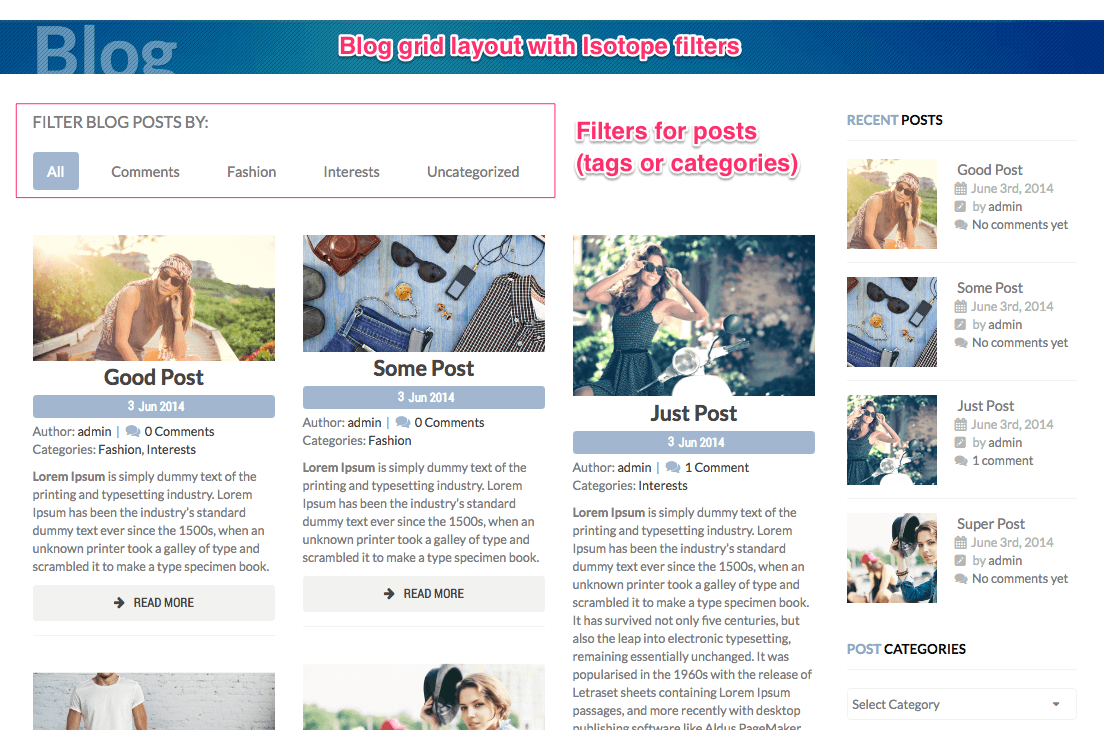
- Select layout for blog – select layout for Blog page ;
- Select what taxonomy will be used for blog filters – select filters for Blog posts;
- Header spacer options – here you can choose predefined patterns for spacer or upload your own.
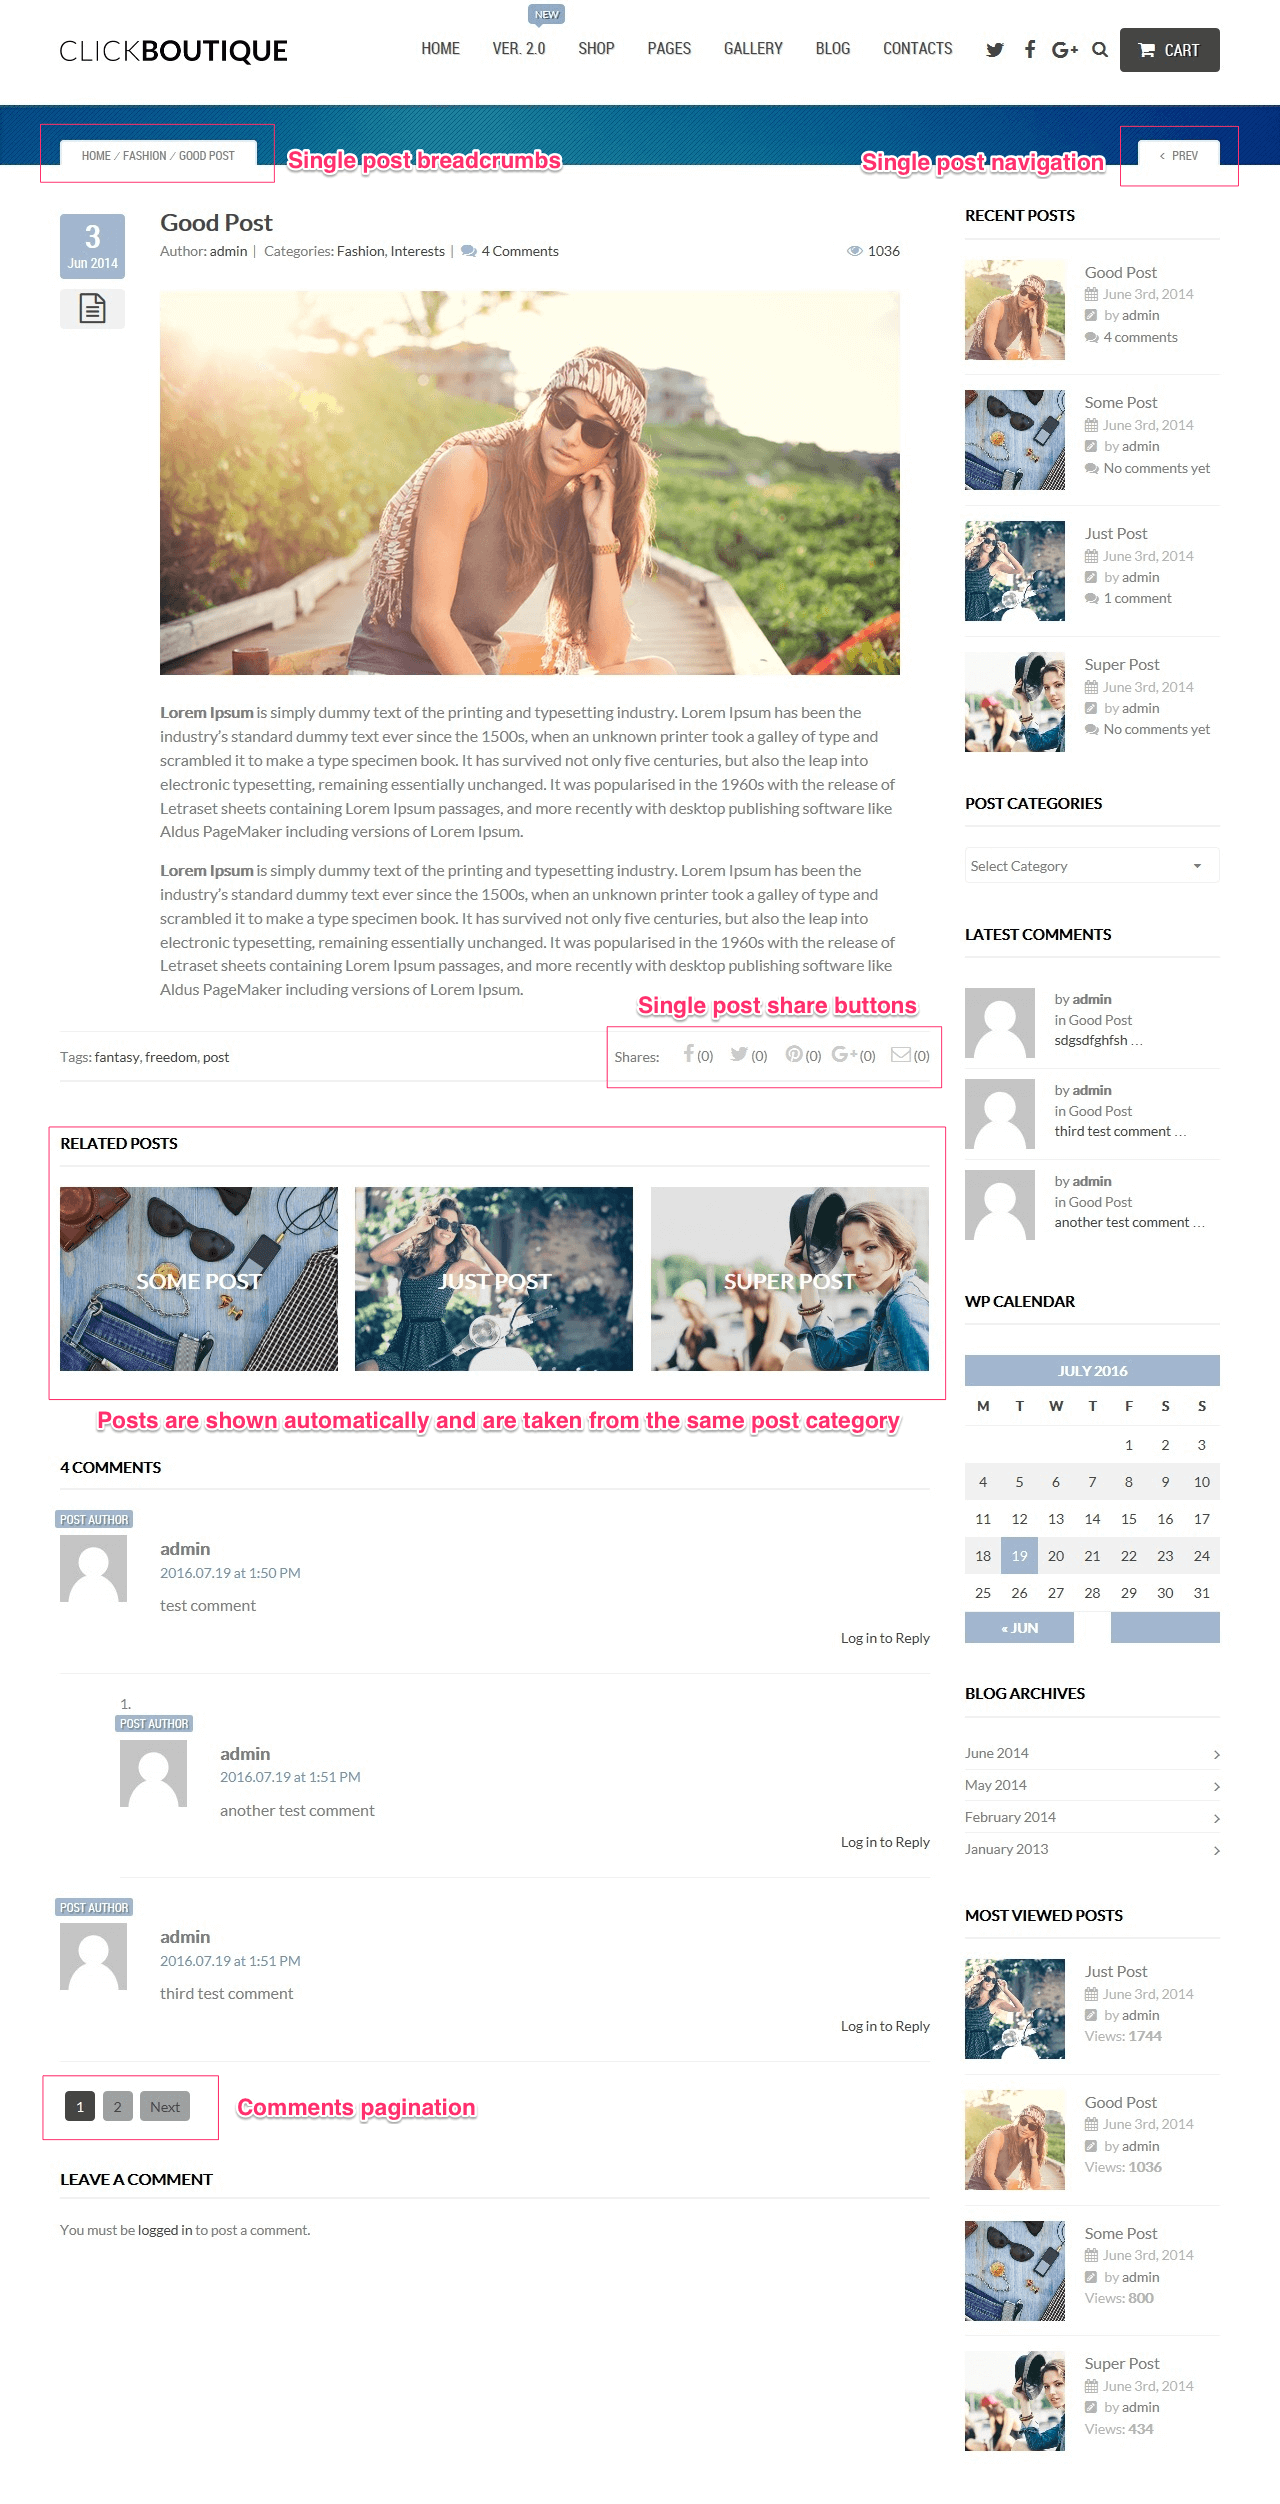
- Single post pagination switcher – add prev/next post links;
- Single post breadcrumbs switcher – add breadcrumbs to single post;
- Single post share buttons output switcher – add social network links;
- Select pagination view for comments – select pagination type for comments;
5. Store Options:
- Show number of products in the cart ON/OFF – adding digital counter of products that were successfully added to the cart;
- Catalog Mode ON/OFF – special mode of products display (without prices and add to cart possibility);
- Enter number of products to show on Products page – enter number of products to display on shop page;
- List/Grid products switcher – show List/Grid products switcher;
- "Add to cart" button position – Choose where to show "Add to cart" button;
- Choose hover animation type for products – Choose animation type when hovering products;
- Store Breadcrumbs view switcher – add breadcrumbs to store pages;
- Shop page product categories block – add special block with categoriesto shop pages(located before main product loop);
- Single Product pagination (prev/next product) view switcher – add prev/next product links;
- Single product share buttons output switcher – add social network links;
- Shop spacer options – here you can choose predefined patterns for spacer or upload your own.
- Store Banner parameters – here you can customise store banner.
- Wether to use sliding gallery – enable custom way of product output;
- Choose slider type for images on Single product page – choose slider type for optional images output;
- Select transition effect for Product Images Carousel – select animation for product images;
Theme Structure
The ClickBoutique theme supports default WordPress functionality, such as post types and page templates. This allows you to build any kind of page, plus theme contains a lot of useful shortcodes and pre-built elements.
Page Templates
ClickBoutique Theme comes with four page templates:
- Default Template – default WordPress page template with comments section and sidebar;
- Front Page Template – the content of the page uses 12 cols wide container (use this template to build Contact Us Page);
- Front Page Template Wide – the content of the page is full width;
- Wide Page Template – the content of the page uses 100% of the browser width (use this template to build Front Page);
- Gallery Page Template – to be used for Gallery;
- Portfolio Page Template – to be used for Portfolio Page.
It is most likely that in 99% of cases you will need either Full Width Page Template or Page Template with Container, for instance to build a Home Page and About Us pages you will have to use Full Width Page Template, for Gallery Page use Gallery page template, for Portfolio Page use Portfolio page template. So what is the difference between page templates? The Full Width Page Template displays the content using 100% of the browser's window width this is handy when you need to display items that have to occupy 100% of window's width like Revolution Slider or "rotating tweets" shortcode. The Page Template with Container template does not use 100% of the window's width, instead it displays the content in a container (12 columns see Bootstrap Grid System for more information).
Header
Header of ClickBoutique theme consists of menu, logo, and one sidebar filled with widgets - Header (Logo group) sidebar. Let's take a closer look at the demo elements.

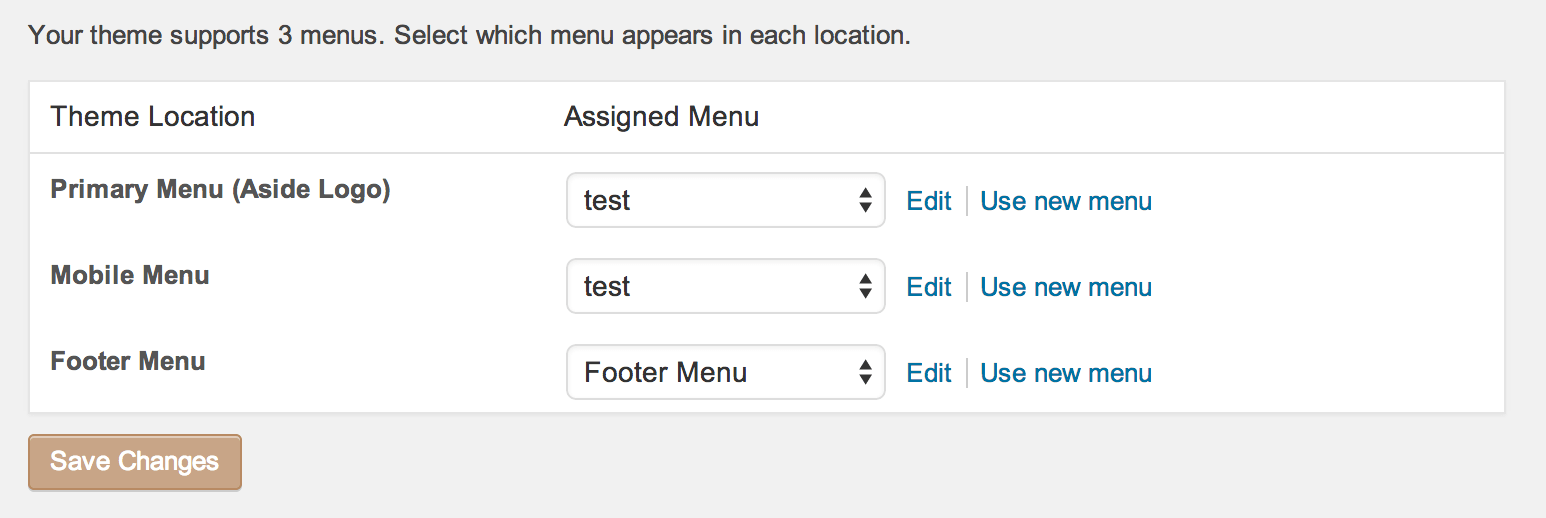
There are three menu locations available in the ClickBoutique Theme, Primary Menu, Footer Menu and Mobile Menu.
It is recommended to assign Menus that you already have or will create in following order:
ClickBoutique Theme offers you a convenient way of creating Main Menu of your site. We have enabled the menu with Mega Menu capabilities that you can switch on or off. You can switch a second level menu to a Mega Menu mode for specified menu items. Watch a video tutorial below to see how.
Attention! The Mega Menu option is available only for Primary Menu location.
2. Logo:
ClickBoutique Theme offers you several different ways of Header Layout. To change Header View go to Appearance -> ClickBoutique Settings section in the backend of your site, select "Theme Settings" tab.
You can upload Logo image via the backend of your site. In the "Theme Settings" tab click on "Upload" button, select the image to upload and then set it as your logo.
![]()
You can set Logo position to Left, Center and Right once set the positions of the Main Menu will change accordingly to Right, Center or Left.
![]()
Other logo parameters - like width and height - can be set/changes using css overrides. For example, we can increase logo size by adding the following override at the end of our theme's (or child theme's) style.css file:
.site-logo {
    max-width: 227px;
}
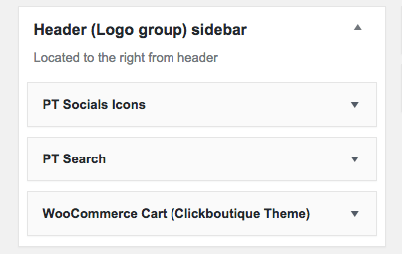
3. Widgets:
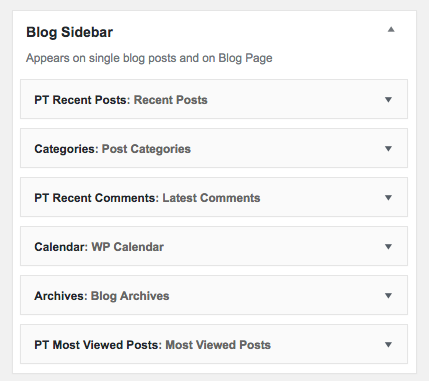
Header Sidebars are meant to be used with specific widgets. To assign widgets to sidebars open Appearance -> Widgets and Drag and Drop widget to needed sidebar. To replicate the layout of the ClickBoutique Demo place widgets into header sidebars in the order given in the image below.
4. Sticky Menu:
ClickBoutique Theme has a hidden panel that appears at the top of the page when a paged is scrolled down. The hidden panel contains a menu location and a sidebar.
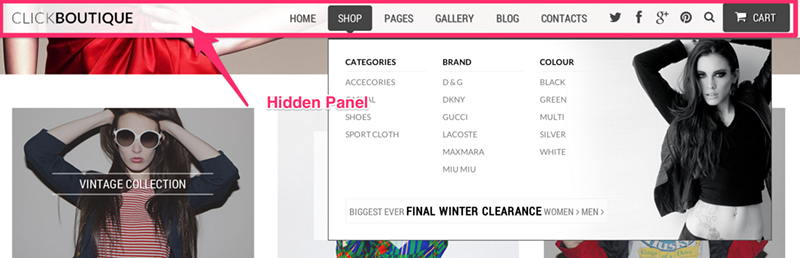
The hidden panel will replicate the content of the header, so you don't need to set it up separately.
The hidden panel can be turned off or on, to do that go to the backend of your site, select ClickBoutique Settings -> Theme Settings, there you will find Hidden Panel view switcher.
Content
ClickBoutique Theme uses Bootstrap grid system.
Grid System gives you a comfortable way to build any kind of responsive layout, every page on the live demo was built using grid system. ClickBoutique Theme comes with page builder plugin, that is used to build static pages. Please watch video tutorials below on how to use the PageBuilder plugin.
PT Banner element in Page Builder:
PT Carousel element in Page Builder:
PT Members element in Page Builder:
PT Recent Posts element in Page Builder:
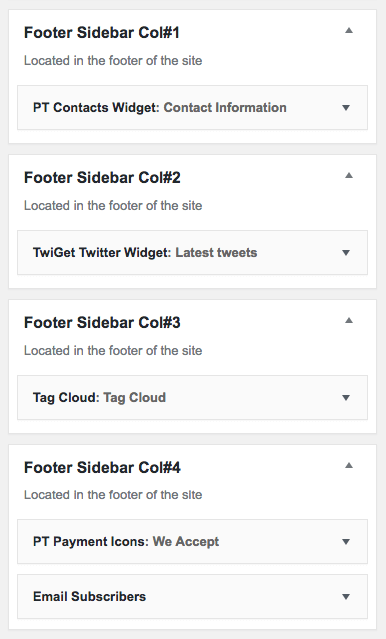
Footer
ClickBoutique Theme Footer contains four footer sidebars and footer menu location. Footer sidebars can be used for any widget that is available, except specific ones that have to be used in header, like Woocommerce Cart (Clickboutique Theme).
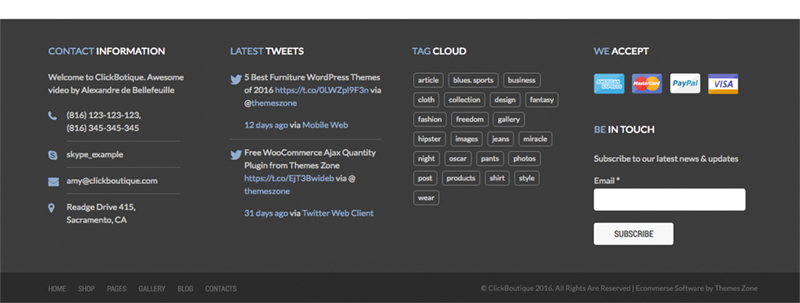
Footer Widgets on the live demo have the following structure:
Creating Pages
In this section you can find out how our demo pages looks like from the inside. Settings for each individual demo page are shown here as well as their elements' structure and their settings.
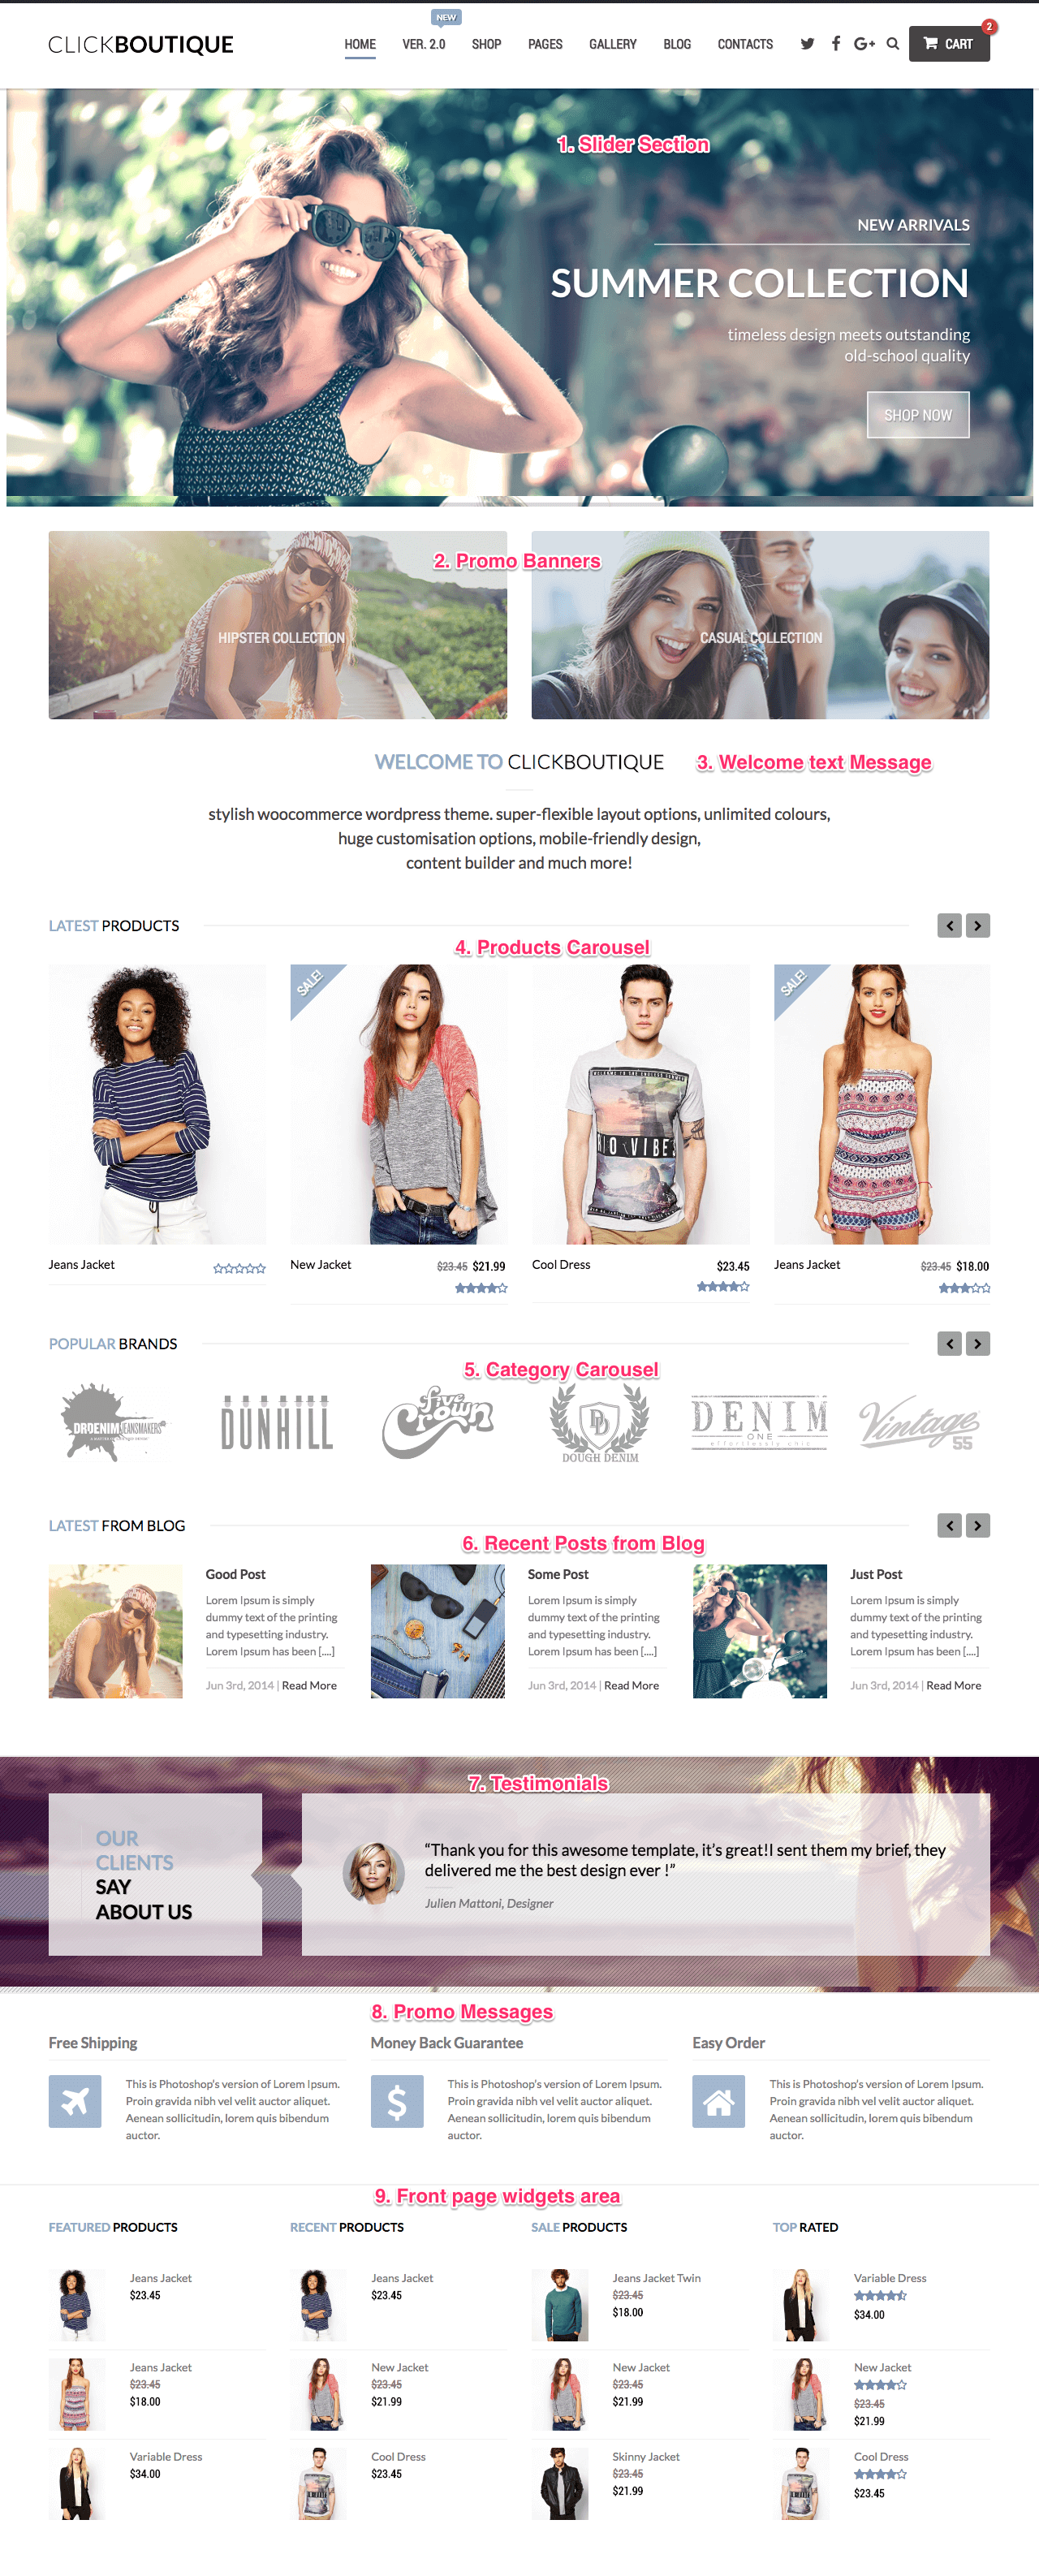
Home Page
Frontend:
Backend:
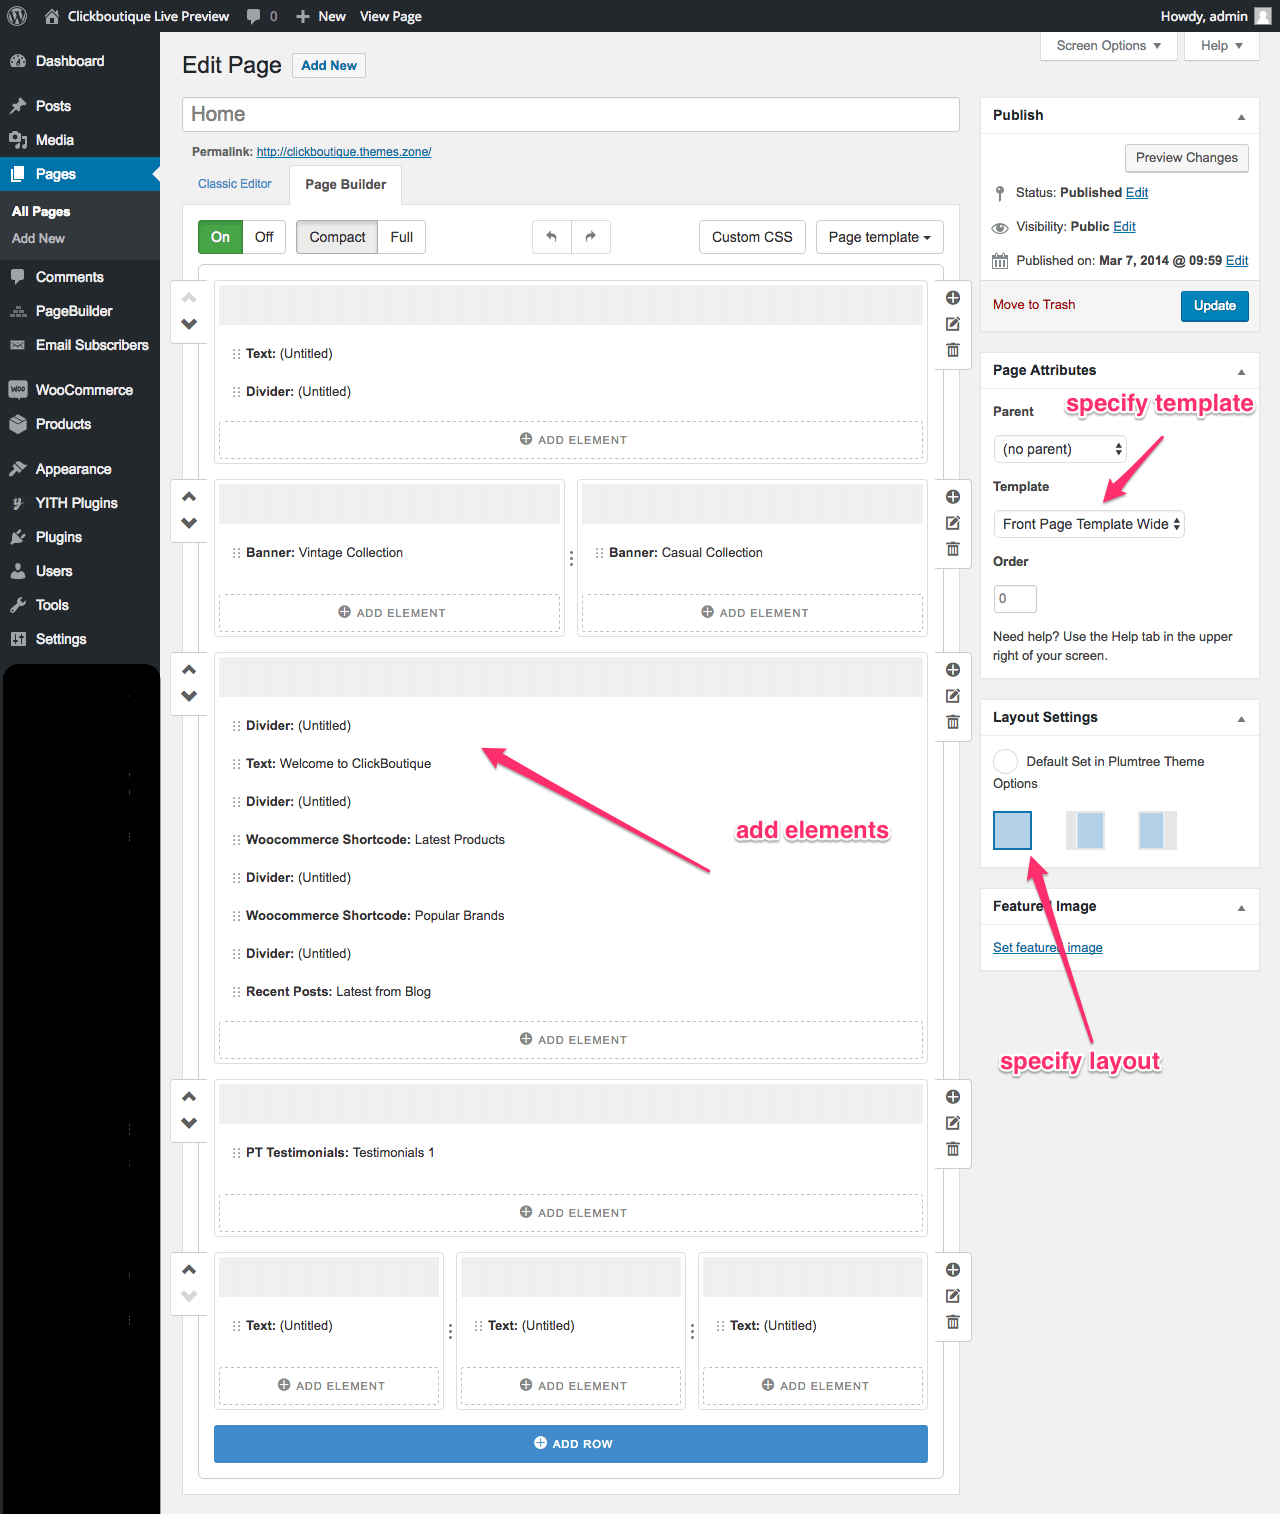
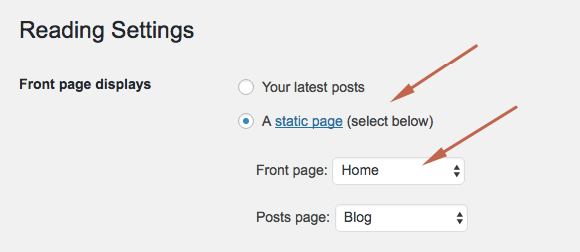
To create a Home Page go to the backend of your site and select "Pages" section, then click "Add New" button. Enter a page title (let's say Home), assign Front Page Template Wide and click "Publish" button. Then go to "Settings" section and click on "Reading" settings, in the "Front page displays" section set to "A static page" and in the "Front Page" select box select a static page that you want to be displayed as a Home Page ("Home" in our case). Click "Save Changes" button.
1. Slider:
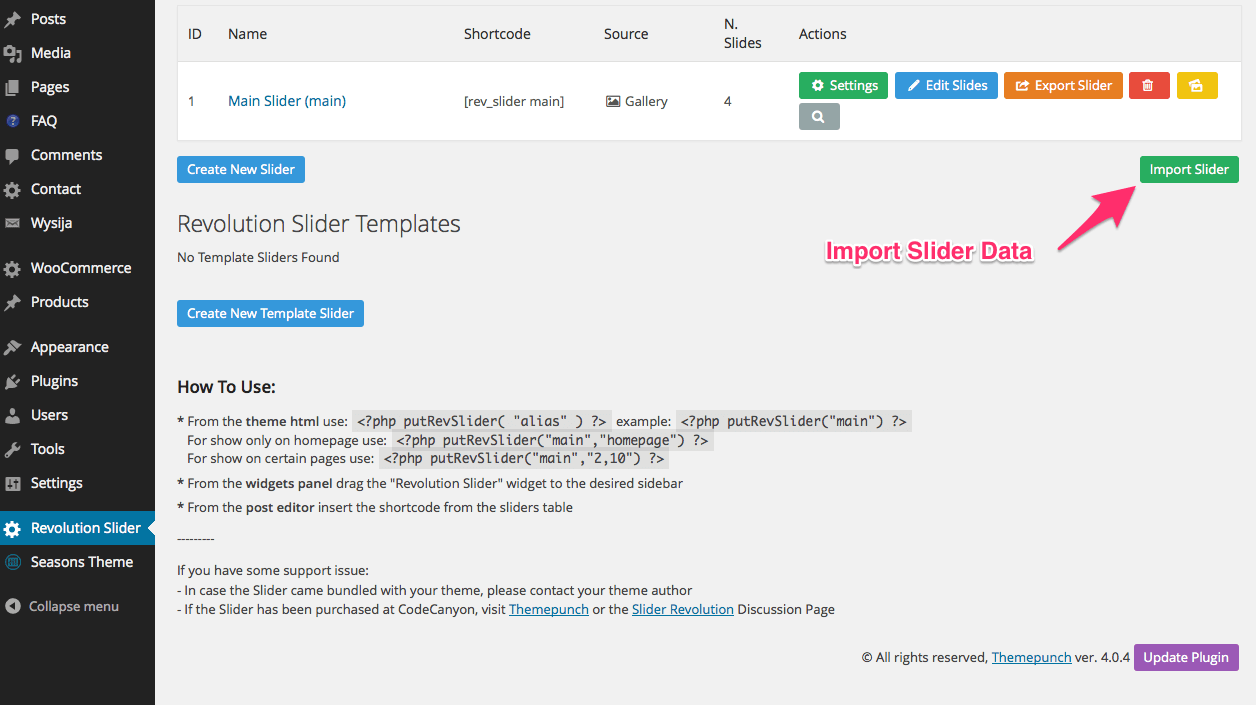
The ClickBoutique Theme package contains slider sample data that you can import. To do that go to the backend of your site, click on Revolution Slider Section, find the "Import Slider" button and upload a clickboutique_slider.zip package that is located in SAMPLEDATA -> dummy-data folder of the ClickBoutique Theme package.
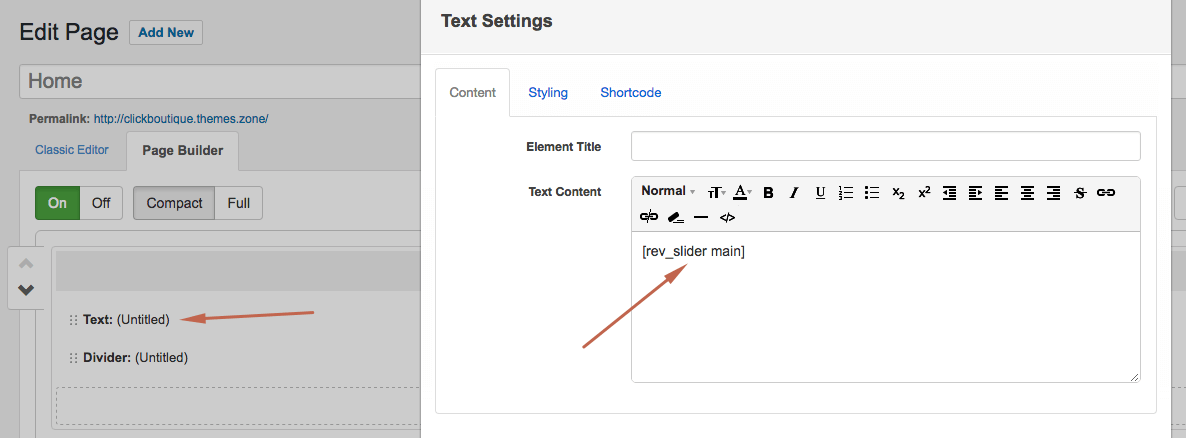
Once you create new or import an existing slider you will be given a shortcode that you can use do display the slider anywhere on page or blog post (See image below).
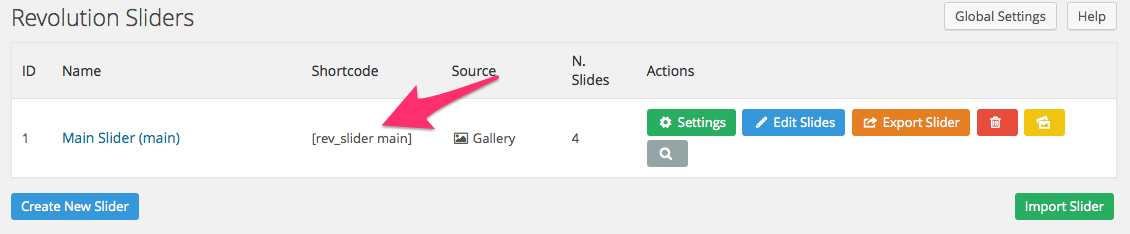
Copy slider shortcode & paste it to "Text" element to add Slider on front page. See image below:
2. Promo Banners:
Promo Banners made with help of Pagebuilder -> PT Banner Element.
Shortcode for first banner:
[ig_banner el_title="Vintage Collection" image_file="http://clickboutique.themes.zone/wp-content/uploads/2014/03/top1.png" image_alt="Vintage Collection" banner_type="with_html" banner_text_position="center center" banner_url="http://" banner_button="yes" banner_button_text="Shop Now" banner_button_position="center center" hover_type="bubba" lazyload="no" disabled_el="no" ]<p style="text-shadow: 1px 1px 0px rgba(0, 0, 0, 0.18); text-transform: uppercase; color: #fff; font-family: 'Roboto Condensed', sans-serif; font-size: 18px; margin: 0 0 0 -31px;">Hipster Collection</p>[/ig_banner]
Shortcode for second banner:
[ig_banner el_title="Casual Collection" image_file="http://clickboutique.themes.zone/wp-content/uploads/2014/03/top2.png" image_alt="Casual Collection" banner_type="with_html" banner_text_position="center center" banner_url="http://" banner_button="yes" banner_button_text="Shop Now" banner_button_position="center center" hover_type="bubba" lazyload="no" disabled_el="no" ]<p style="text-shadow: 1px 1px 0px rgba(0, 0, 0, 0.18); text-transform: uppercase; color: #fff; font-family: 'Roboto Condensed', sans-serif; font-size: 18px; margin: 0 0 0 -31px;">Casual Collection</p>[/ig_banner]
3. Welcome Text Message:
Welcome Text Message is just a html code with pre-defined classes. You can customize text in it but don't change any classes.
<p style="text-align: center;">
  <span class="wel-t" style="text-align: center;">welcome to</span>  <span class="wel-n" style="line-height: 1.5em;">click<b>boutique</b></span>
</p>
<div class="pt_text welc ">
  <p>stylish woocommerce wordpress theme.  super-flexible layout options, unlimited colours,<br> huge customisation options, mobile-friendly design,<br> content builder  and much more!</p>
</div>
4. Products Carousel:
Products Carousel made with help of Pagebuilder -> PT Woocommerce Shortcode.
Settings for this element:
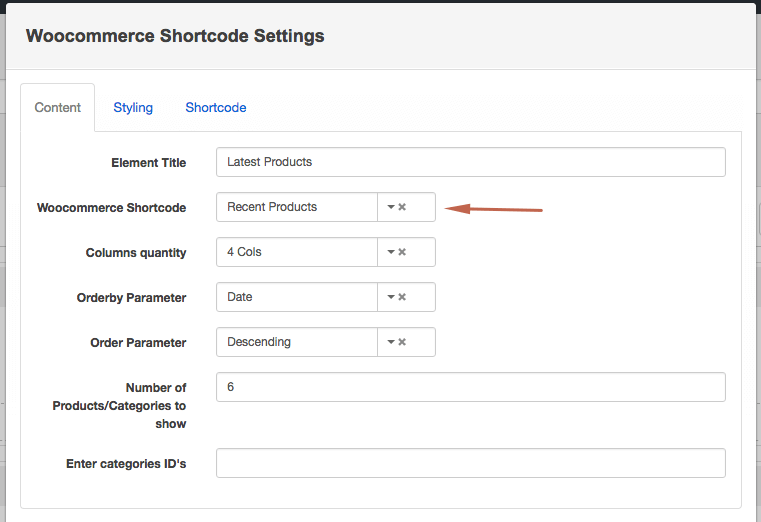
Don't forget to turn carousel on if needed.

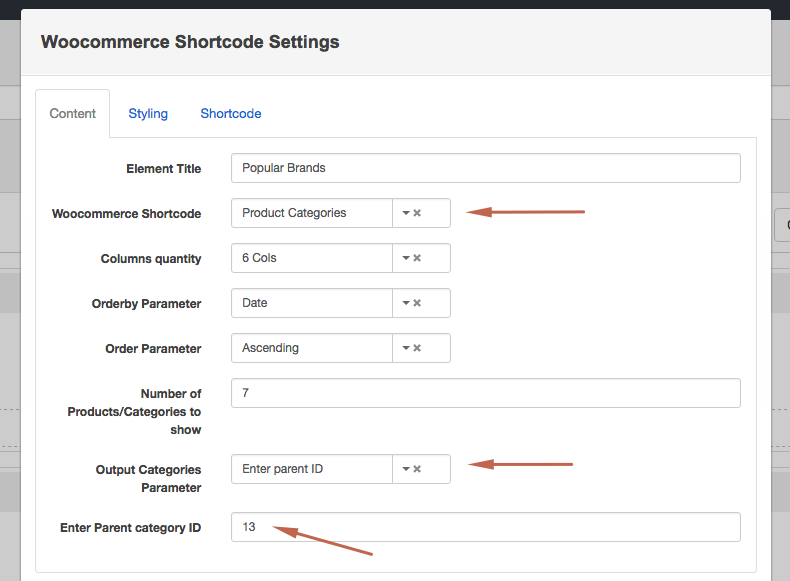
5. Category Carousel:
Products Carousel made with help of Pagebuilder -> PT Woocommerce Shortcode.
This element is equal to previous one except some setting options:
6. Latest from Blog:
Latest from Blog made with help of Pagebuilder -> PT Recent Posts.
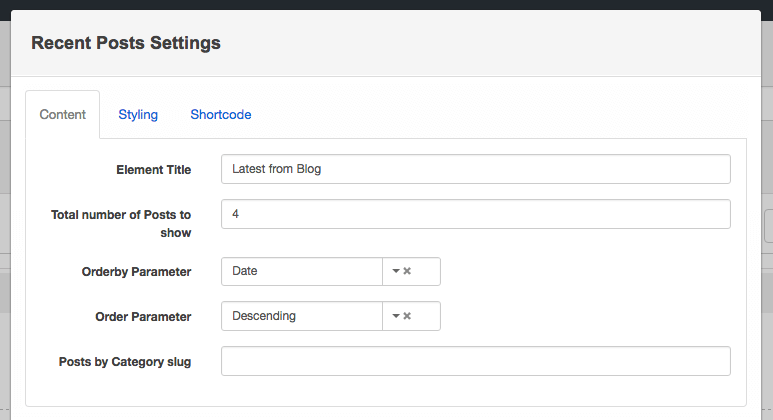
Don't forget to turn carousel on if needed(Styling Tab -> Use Owl Carousel).
7. Testimonials:
Testimonials made with help of Pagebuilder -> PT Testimonials.
Settings example from demo site:
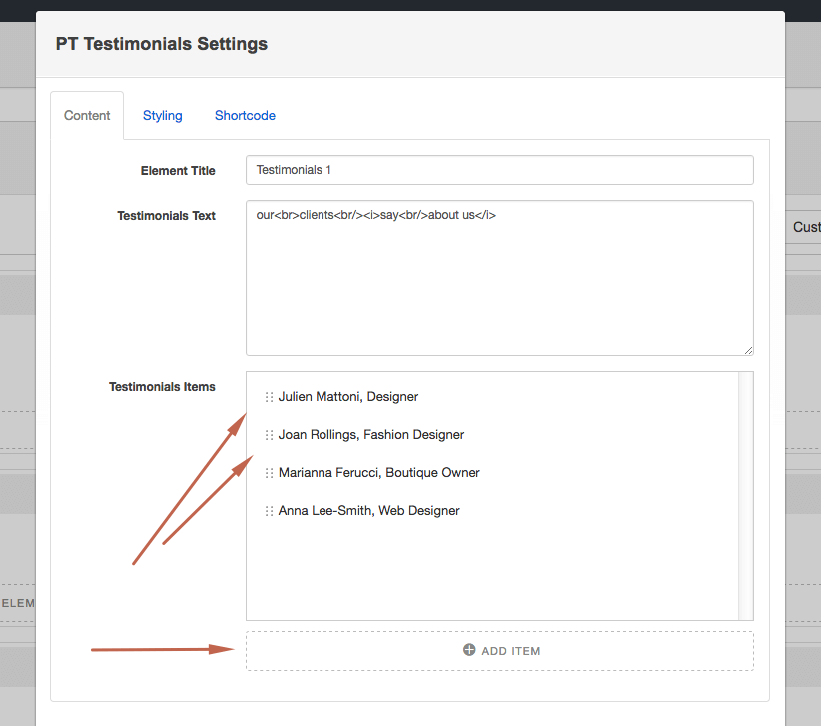
Here you can add reviews & specify title for testimonials block
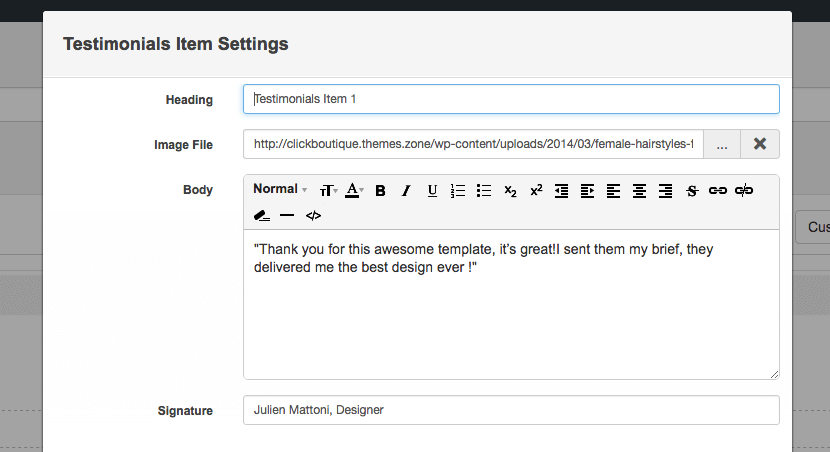
Single testimonial settings example:
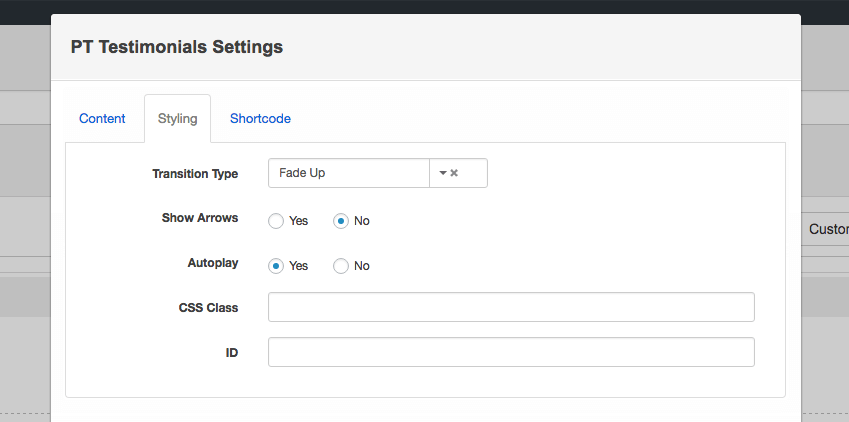
Testimonial styling settings example:
8. Promo Messages:
Welcome Text Message is just a html code with pre-defined classes. You can customize text in it & change icon(you can add any FontAwesome icon).
<h4 class='sm-title'>Money Back Guarantee</h4>
<i class='fa icon fa-usd'></i>This is Photoshop's version  of Lorem Ipsum. Proin gravida nibh vel velit auctor aliquet. Aenean sollicitudin, lorem quis bibendum auctor.
This pattern applied to all 3 messages except titles & icons.
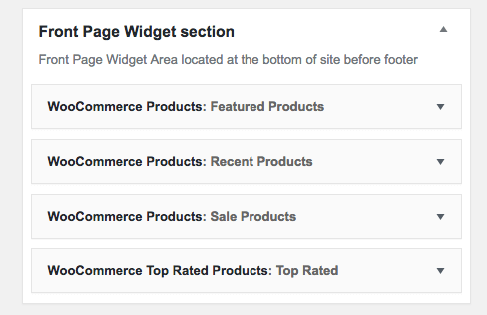
9. Front Page Special Sidebar:
You can add up to 4 widgets, which will be visible only on front page. "Front Page Template" or "Front Page Template Wide" must be selected as page temlate for displaying those widgets.
Go to Appearance -> Widgets to add some widgets. Add widgets to "Front Page Widget section":
Blog Page
Frontend:
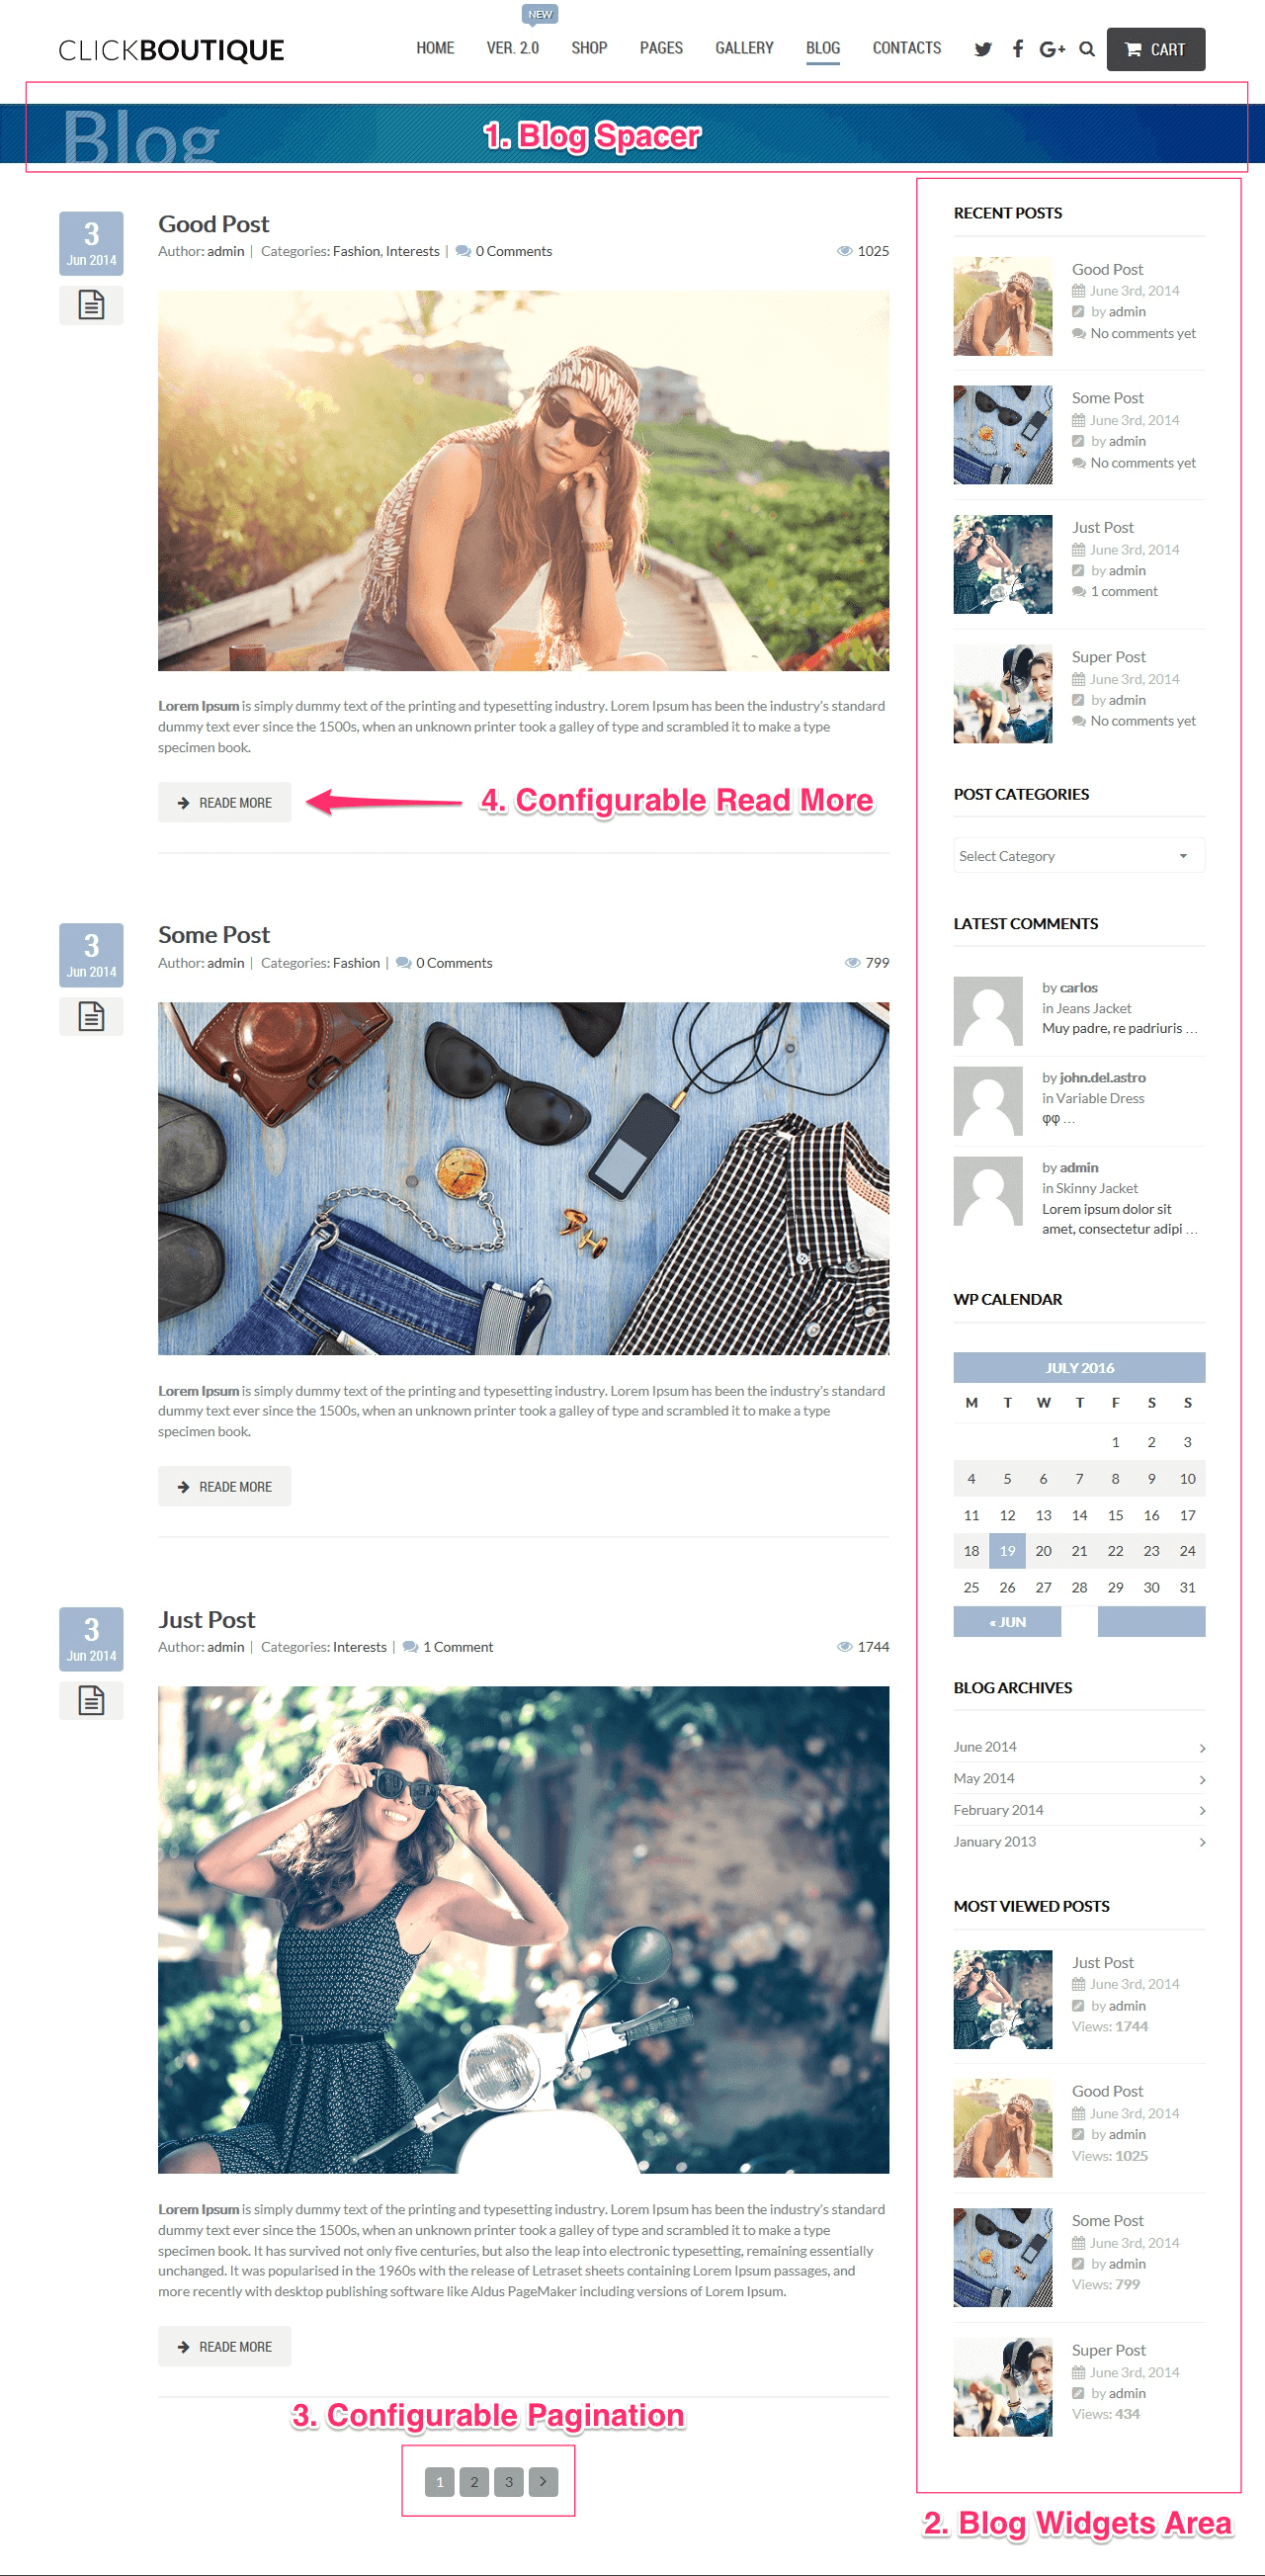
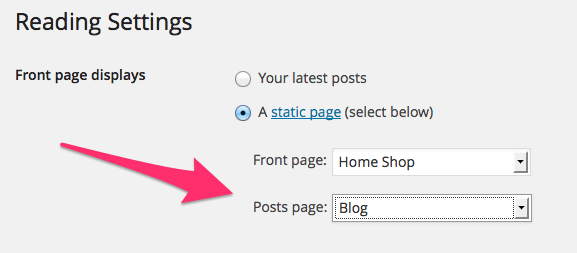
Once you add Blog Posts, you may create a blog page. To do that create an empty page, title it as Blog or News (you may title it anyway you want), publish the page. Next, go to "Settings" -> "Reading", in the "Front Page displays" section find the Posts Page select box and select a page that you have just created. Click "Save Changes" button.
ClickBoutique Theme Offers you several ways to configure blog page, pagination, title bars etc. To do that Open Blog Settings in the ClickBoutique theme settings
Blog grid layout Example:
Blog single post Example:
Widgets Configuration for Blog & Single Post:
Contacts Page
Frontend:
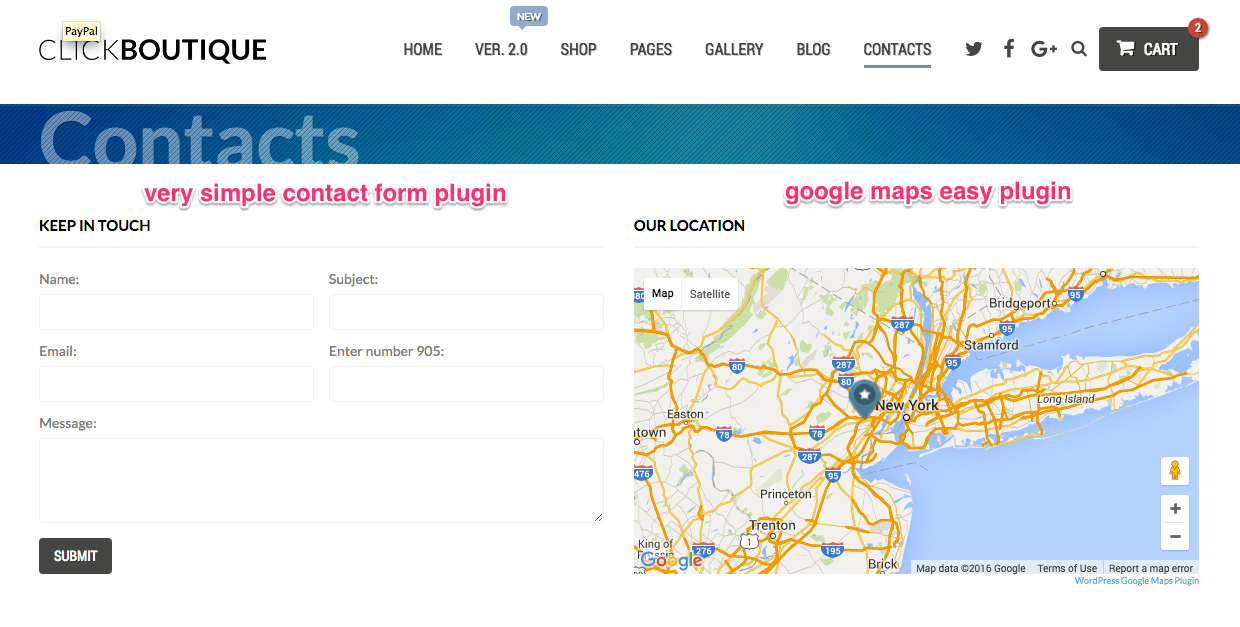
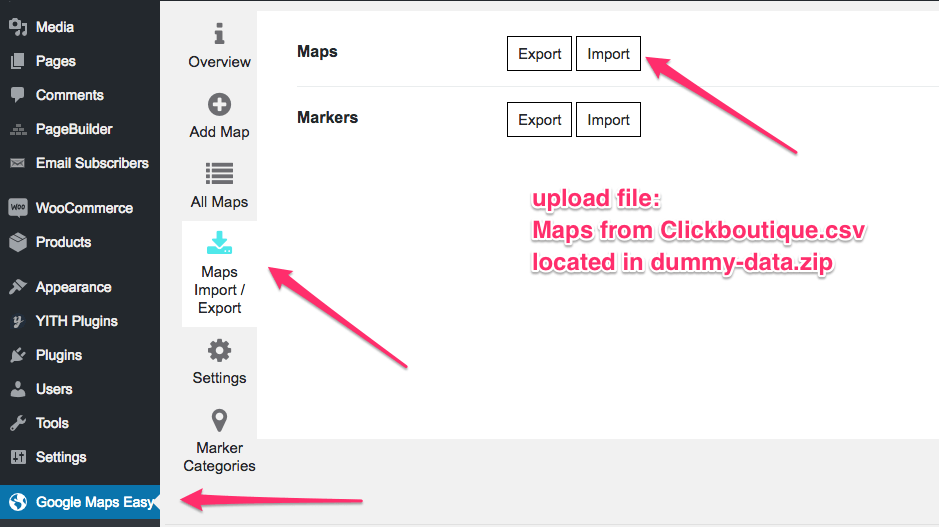
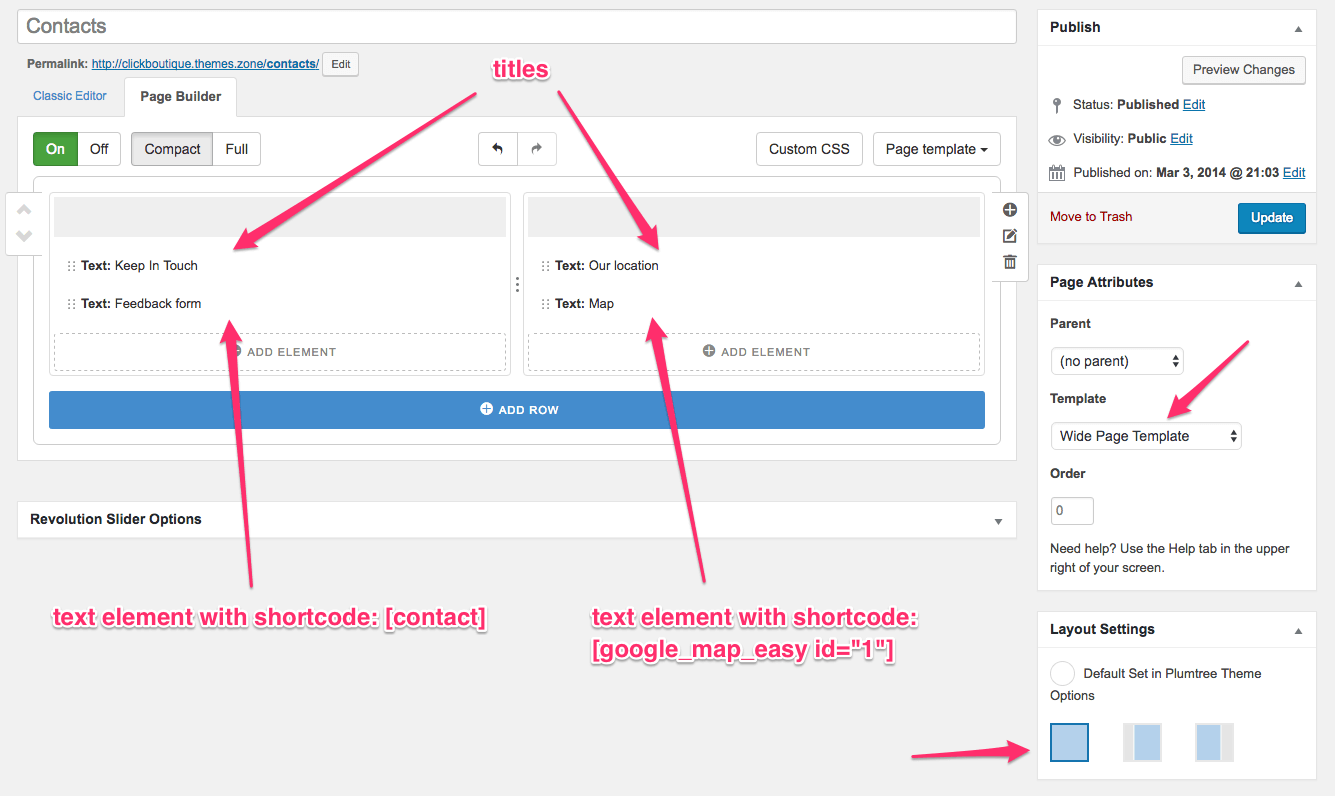
To build a contacts page you will need to use Google Maps Easy shortcode [google_map_easy](Google Maps Easy Plugin installed & activated needed) and Very Simple Contact Form shortcode [contact](Very Simple Contact Form Plugin installed & activated needed). The google maps shortcode has a lot of settings. Visit plugin site for more information -> http://supsystic.com/plugins/google-maps-plugin/
You can import test map from Clickboutique live demo. See the picture below: